

www.my-incredible-app.com, to your Replit published app.
While Replit provides a free subdomain in the format <your-live-app-subdomain-name>.replit.app, a custom
domain gives your app a more memorable address that builds brand recognition and trust with your visitors.
The Domains tool gives you everything you need in one place. In the Project Editor, select Tools, then select Domains under Replit Cloud. You can:
- Buy a new domain through Replit and connect it to your project in one step.
- Connect a domain you already own from another registrar.
- Manage your connected domains — view which project each one points to, track renewals, and disconnect a domain.
You can set up a domain before you publish, but it doesn’t serve your app until the app is published.
Until then, the Domains tool shows a notice that your project isn’t published yet.
Buy a new domain on Replit
If you don’t already own a domain, you can search for one and buy it without leaving Replit. Your new domain points to your project automatically.1
Open the Domains tool
In the Project Editor, select Tools, then select Domains under Replit Cloud.
2
Search for a domain
Under Buy a new domain, enter the name you want in the search field or choose a suggested domain. Replit shows available options across
extensions such as 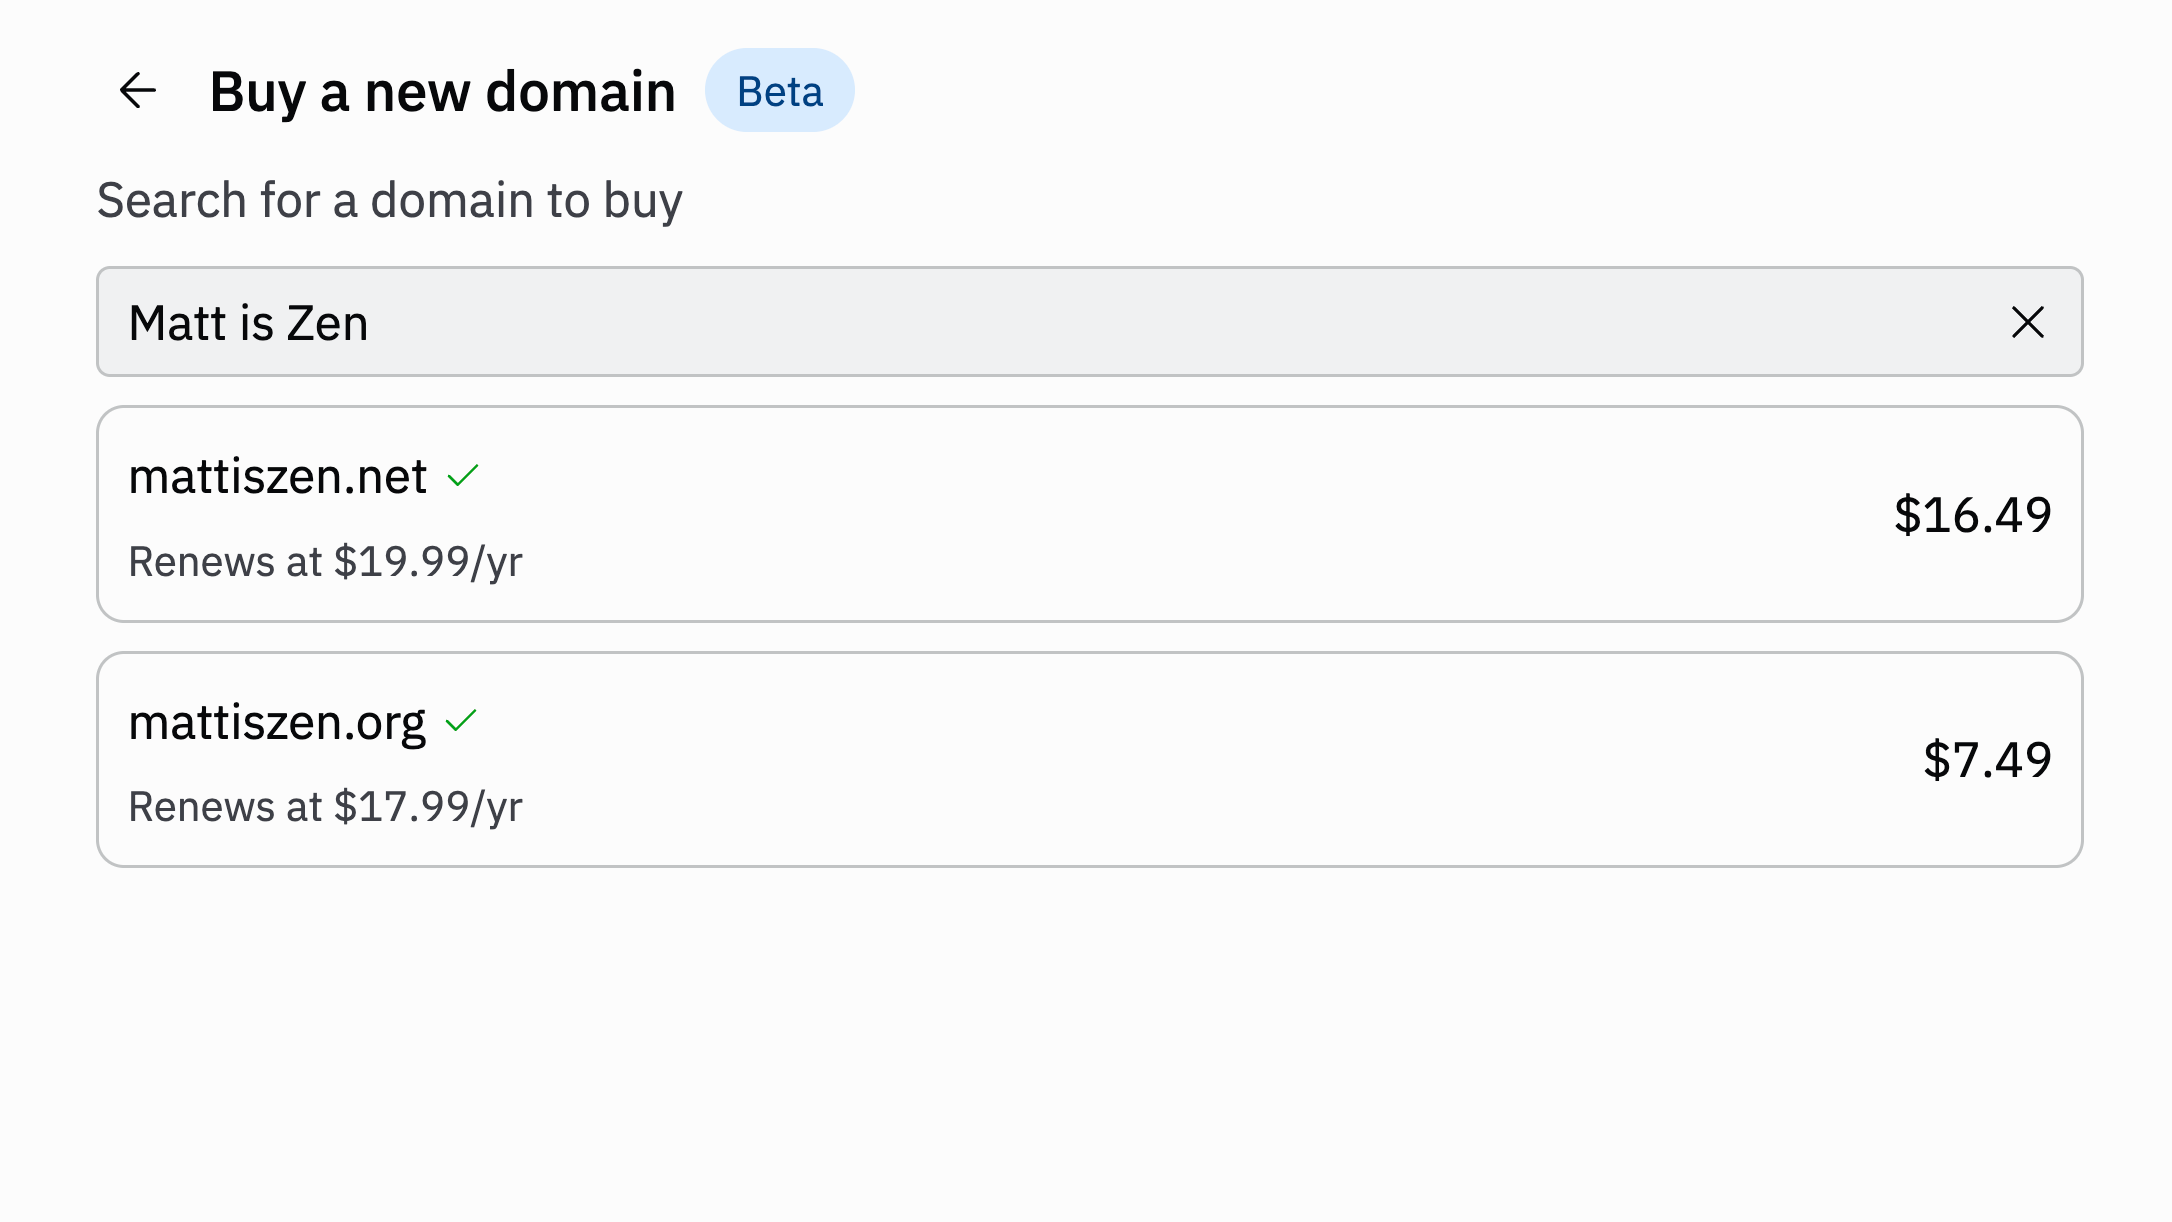
.com, .ai, and more. If you’re not sure what to call it, Replit also
suggests available names based on what your app does, so you can pick one without starting from
scratch.3
Purchase and connect
Select your preferred domain and complete the purchase using your Replit account’s payment method.
Once your app is published, it becomes accessible at the new domain without additional DNS configuration.
Connect a domain you already own
If you already own a domain at another registrar, connect it to your project from the Domains tool. Replit offers a guided setup that configures your DNS for you, with a manual option as a fallback.Guided setup (recommended)
The simplest way to connect an existing domain is to let Replit set it up for you. Replit uses Entri, a third-party domain-connection service: after you authorize it, Entri signs in to your DNS provider and writes the required DNS records on your behalf, so you don’t have to copy them by hand.DNS records are the settings that tell the internet where your domain should point. Setting them up by
hand used to be the trickiest part of connecting a domain. Replit now handles this step for you for most
domains and providers.
1
Open the Domains tool
In the Project Editor, select Tools, then select Domains under Replit Cloud.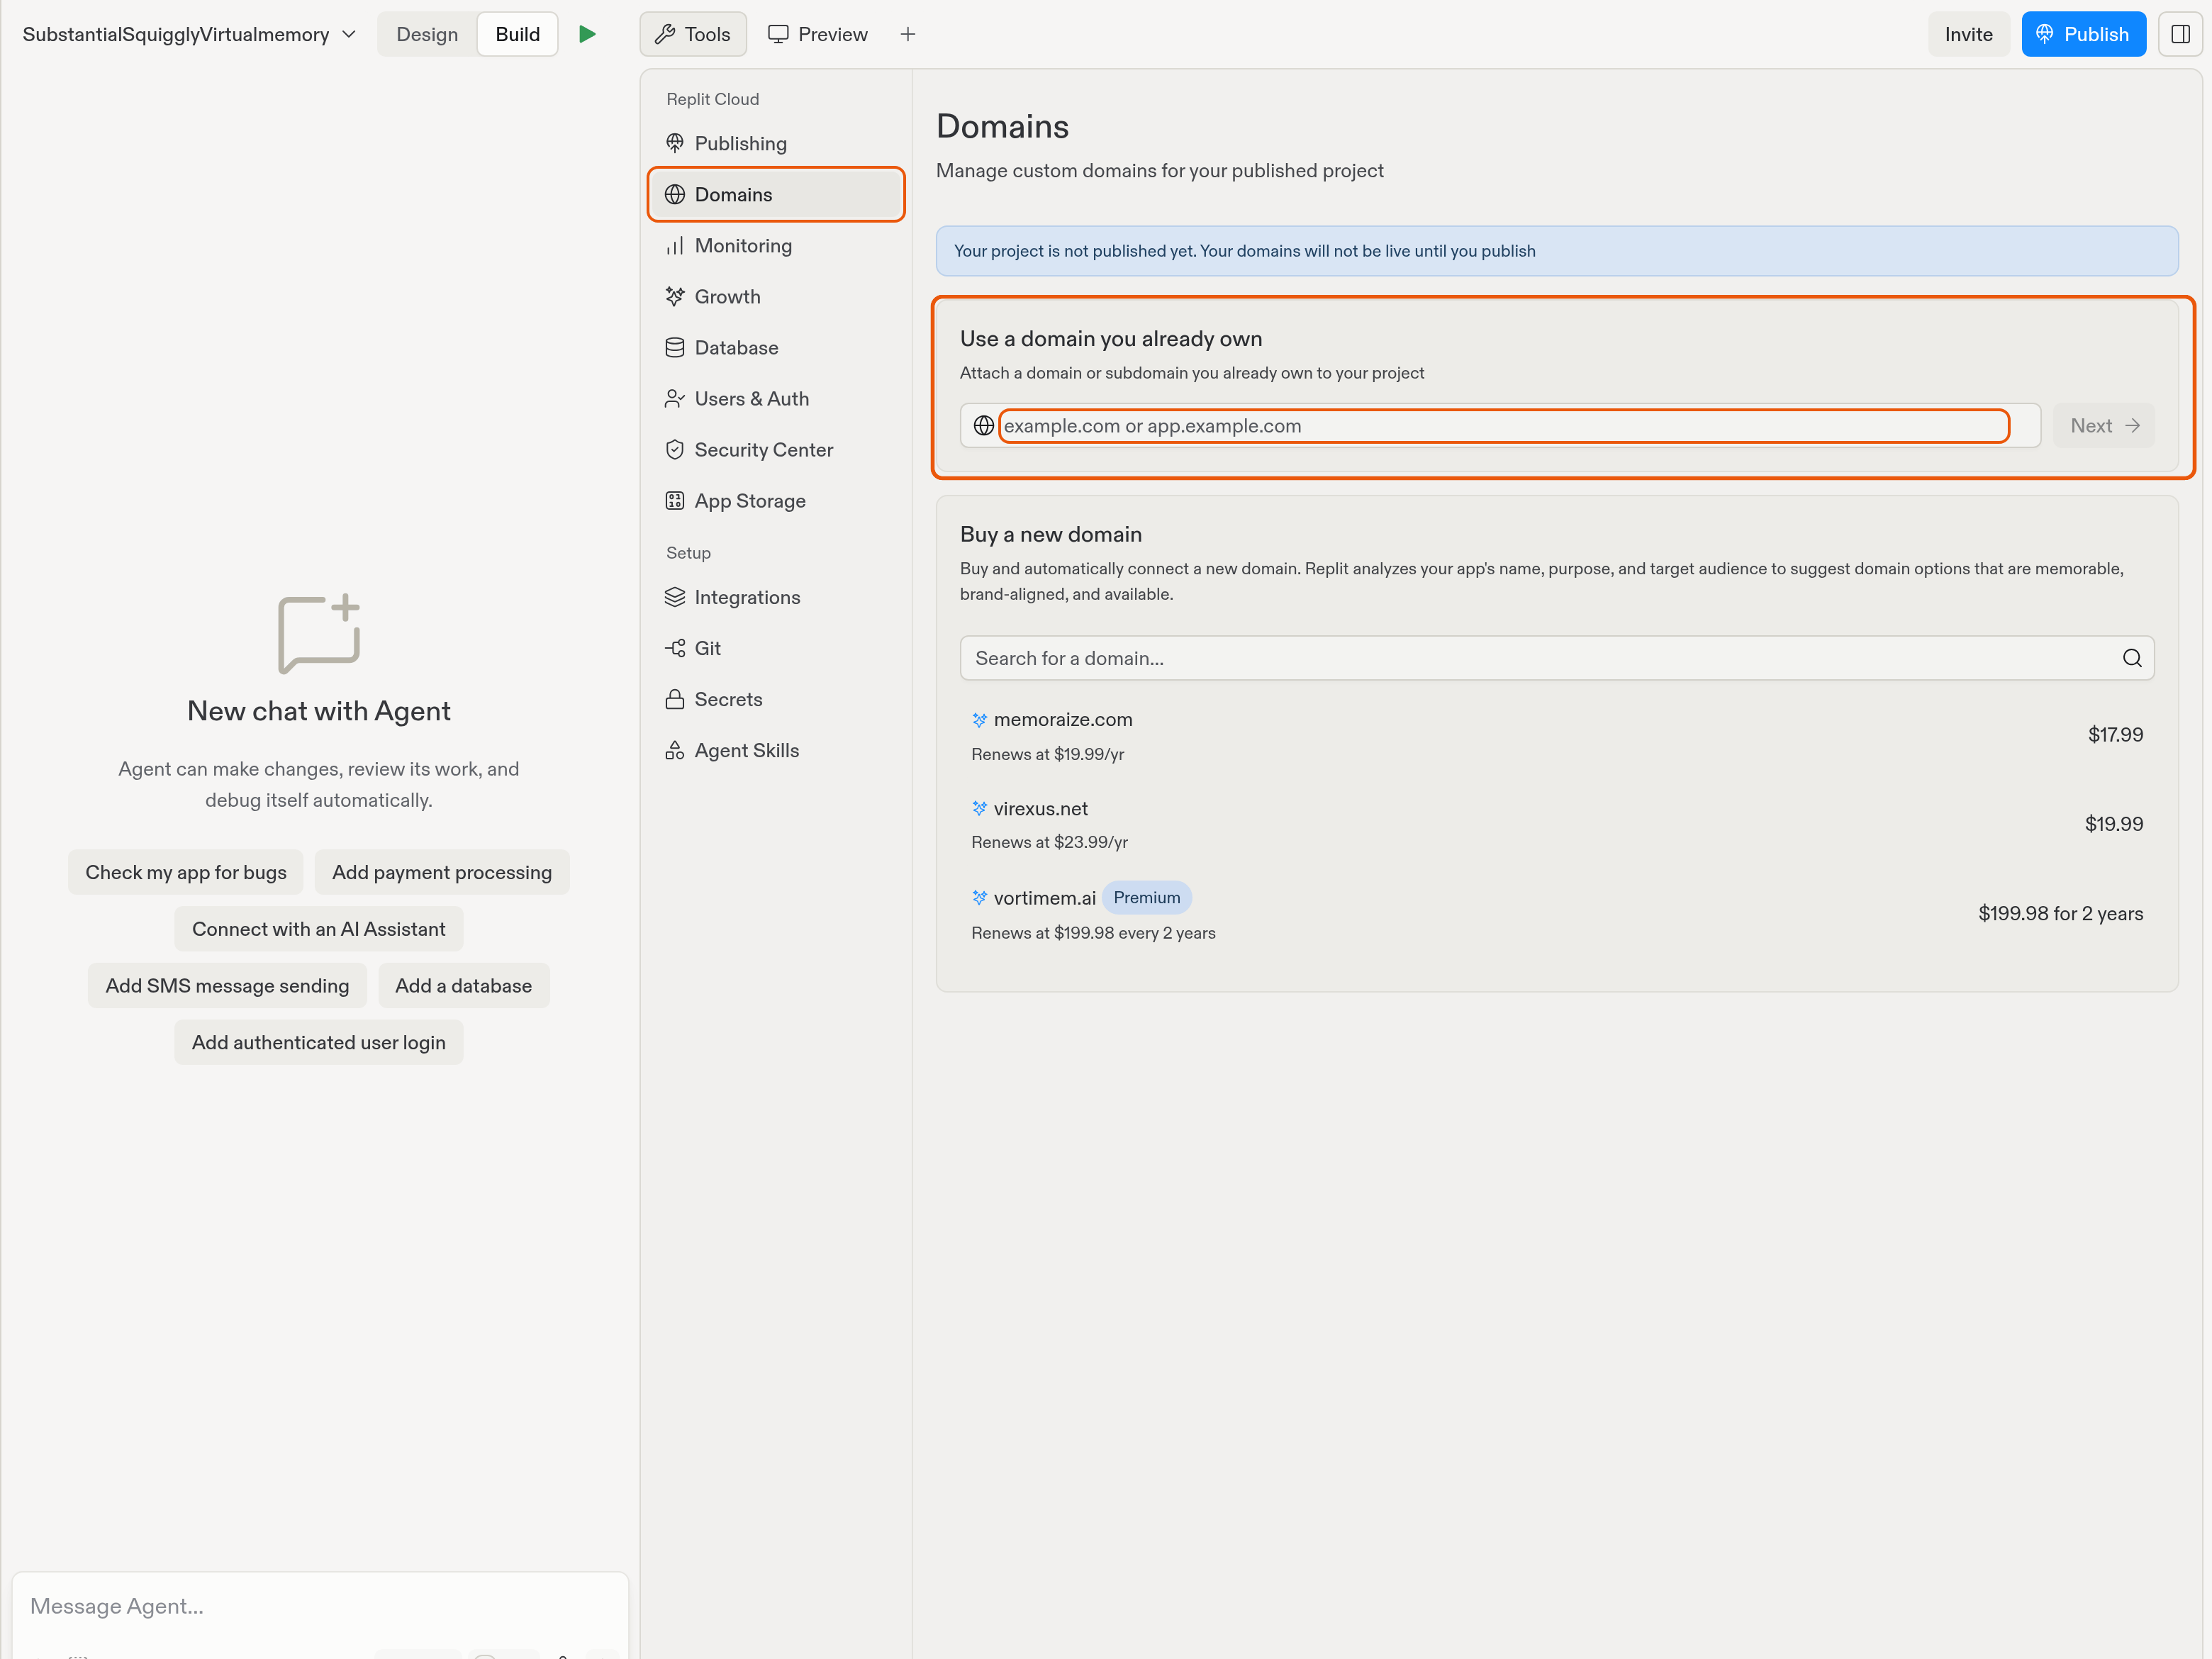
2
Enter the domain you want to connect
Under Use a domain you already own, enter a domain you already own, such as
www.my-incredible-app.com, then select Next.3
Authorize the guided setup
Confirm the connection. Replit opens the guided flow, where you sign in to your DNS provider so the
DNS records can be applied to your account automatically. If the guided flow can’t write the records
for your provider, it shows you the records to add yourself instead.
4
Wait for your domain to verify
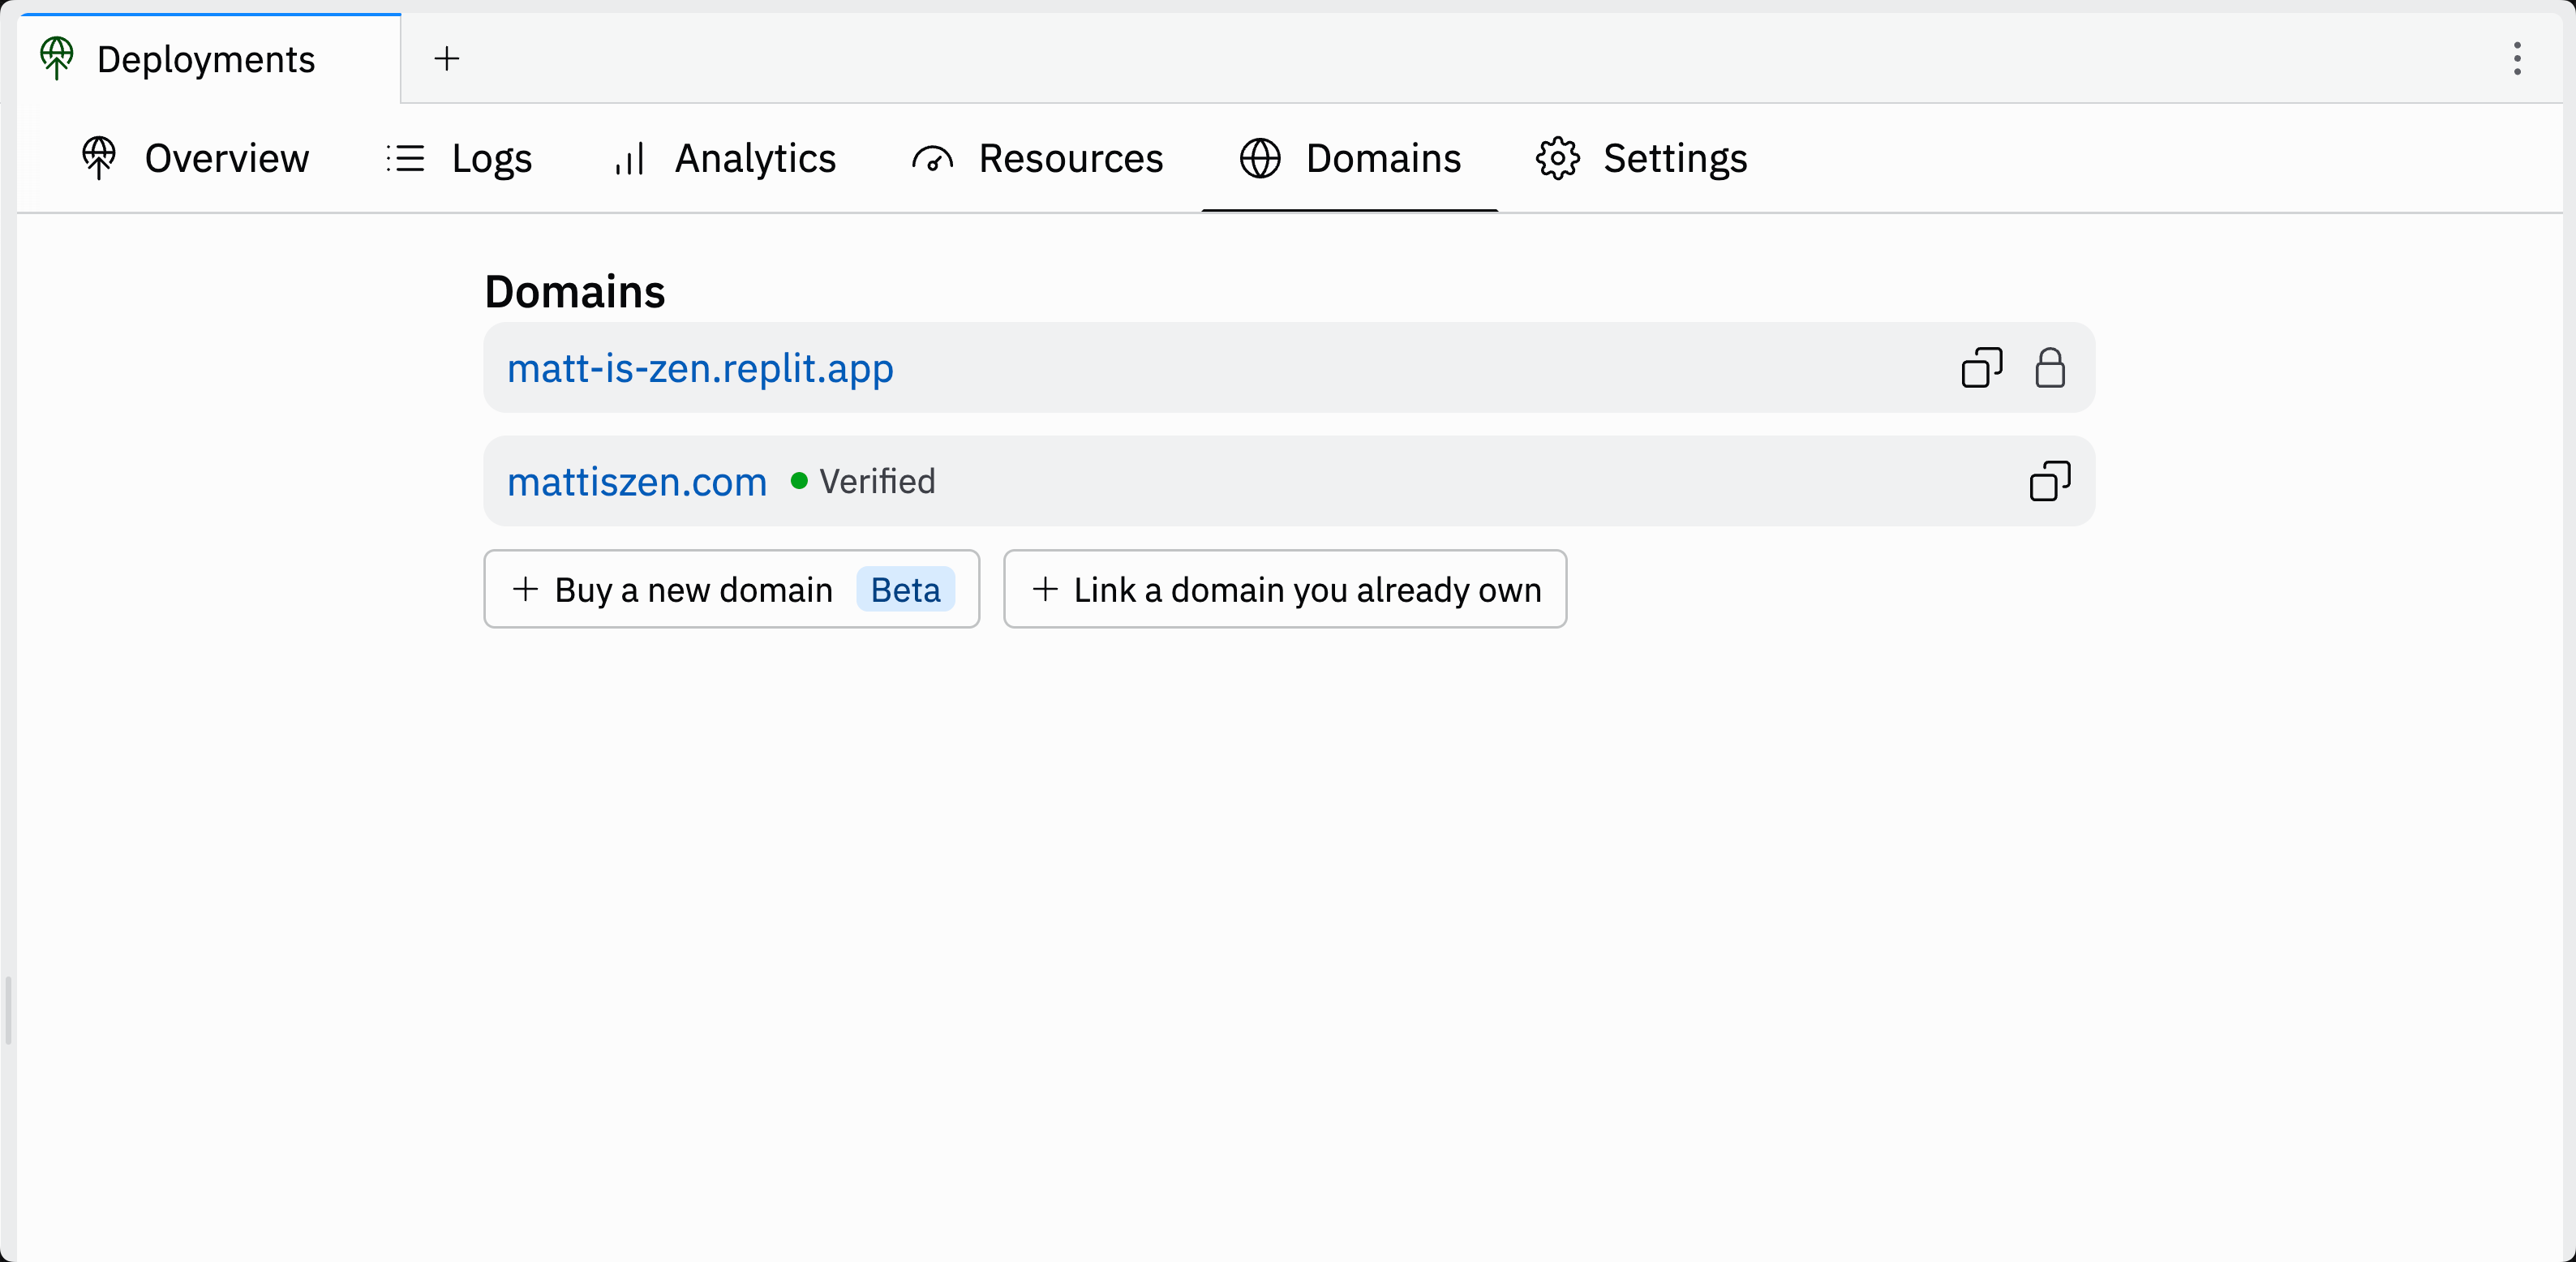
Your domain shows a Verified status once setup completes. This usually takes a few minutes, but DNS
changes can take up to 48 hours to propagate. Load the domain in your browser to confirm it works.
Connect a domain manually
If your provider isn’t supported for guided setup, or you prefer to add the records yourself, follow the steps below to set up your custom domain manually.1
Add your custom domain
Enter your custom domain name in the text field. You can use a registered domain or include a subdomain.For example, 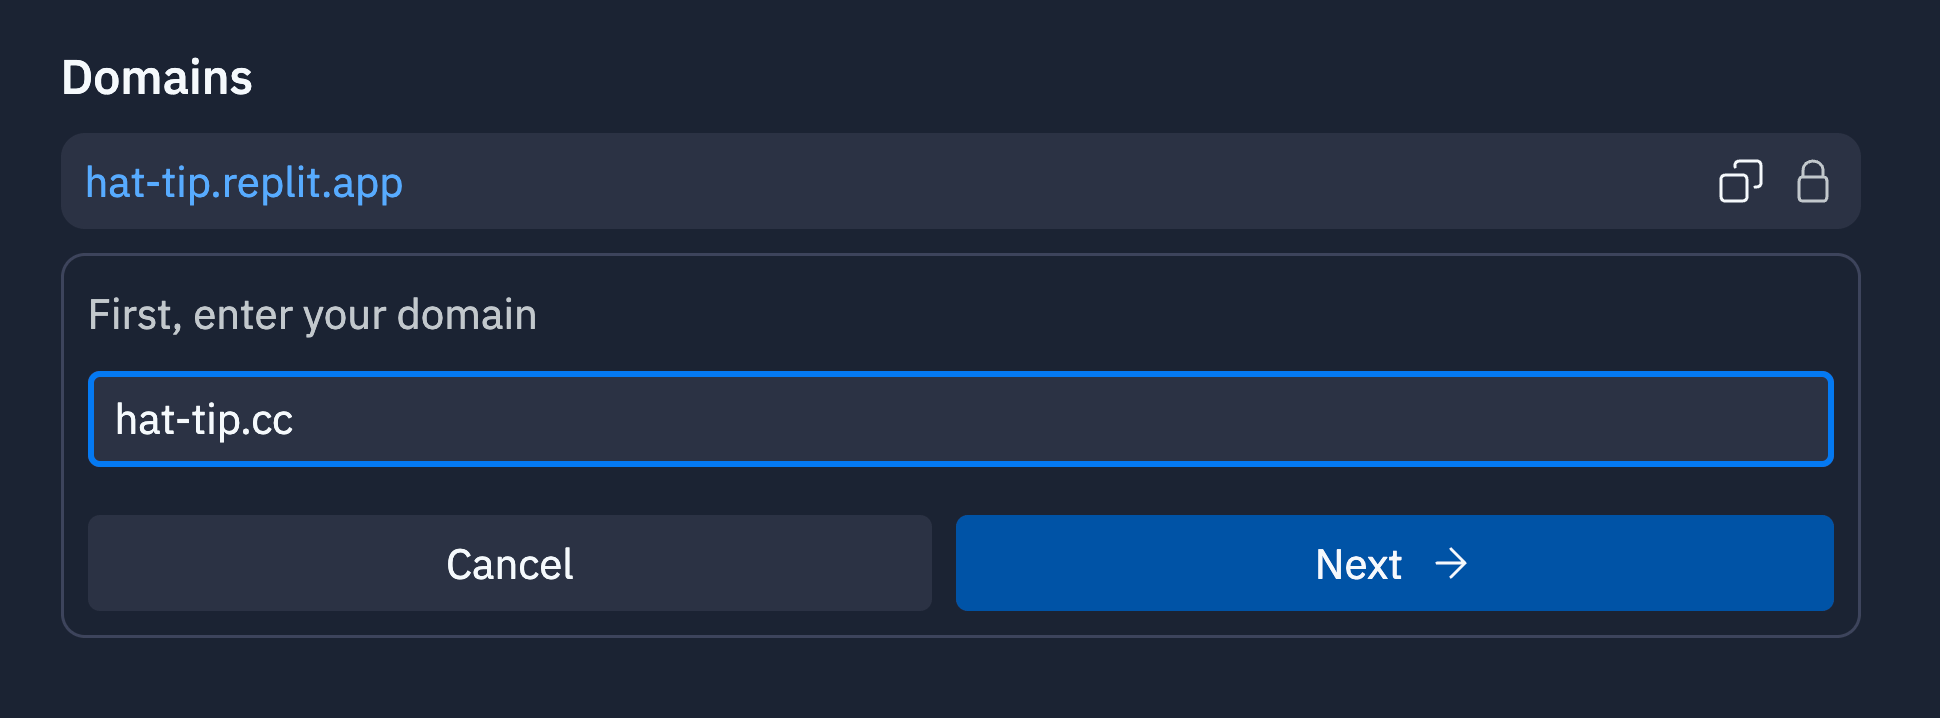
hat-tip.cc is the registered domain and my.hat-tip.cc includes subdomain my.2
Add the DNS records to your domain registrar
Replit generates DNS records that you must provide to your domain registrar.
A domain registrar is the service that manages your domain name, such as GoDaddy or Namecheap.Copy the
A and TXT record values from Replit and paste them into your domain registrar’s
DNS management section. If your domain registrar does not support @ as a hostname, use your registered domain name.3
Optional: Add a subdomain
Subdomains — including As with the apex domain, the
www — are not automatically resolvable when you link your apex
domain. Each subdomain you want to serve must be added as its own entry in the Domains
tool and given its own DNS records at your registrar.To add a subdomain, link it from the Domains tool the same way you linked the apex
domain, then add the DNS records Replit generates for it to your domain registrar.
For example, to add my-subdomain.hat-tip.cc:- Select Tools, then Domains under Replit Cloud, and link
my-subdomain.hat-tip.cc. - At your registrar, add a new
Arecord with hostnamemy-subdomainpointing to the IP address Replit shows for the new entry. - At your registrar, add the matching
replit-verify=...TXTrecord on hostnamemy-subdomain— each subdomain has its ownTXTrecord, separate from the apex’s.
www is a subdomain. Linking hat-tip.cc does not automatically serve
www.hat-tip.cc. If you want visitors to reach your app at both hat-tip.cc and
www.hat-tip.cc, add www.hat-tip.cc as a separate entry in the Domains tool and
publish the A and TXT records it generates on hostname www. Most builders who want
a www address also configure a redirect from the apex to www (or vice versa) at
their registrar.replit-verify=... TXT record you add for each subdomain
must stay in DNS permanently. See
Keep the TXT record in place below.4
Wait for DNS propagation to complete
After adding the records, you must wait for them to propagate online.
This can take between a few minutes and 48 hours.When propagation completes, the Domains tool should show the “Verified” status next to the domain name as shown below: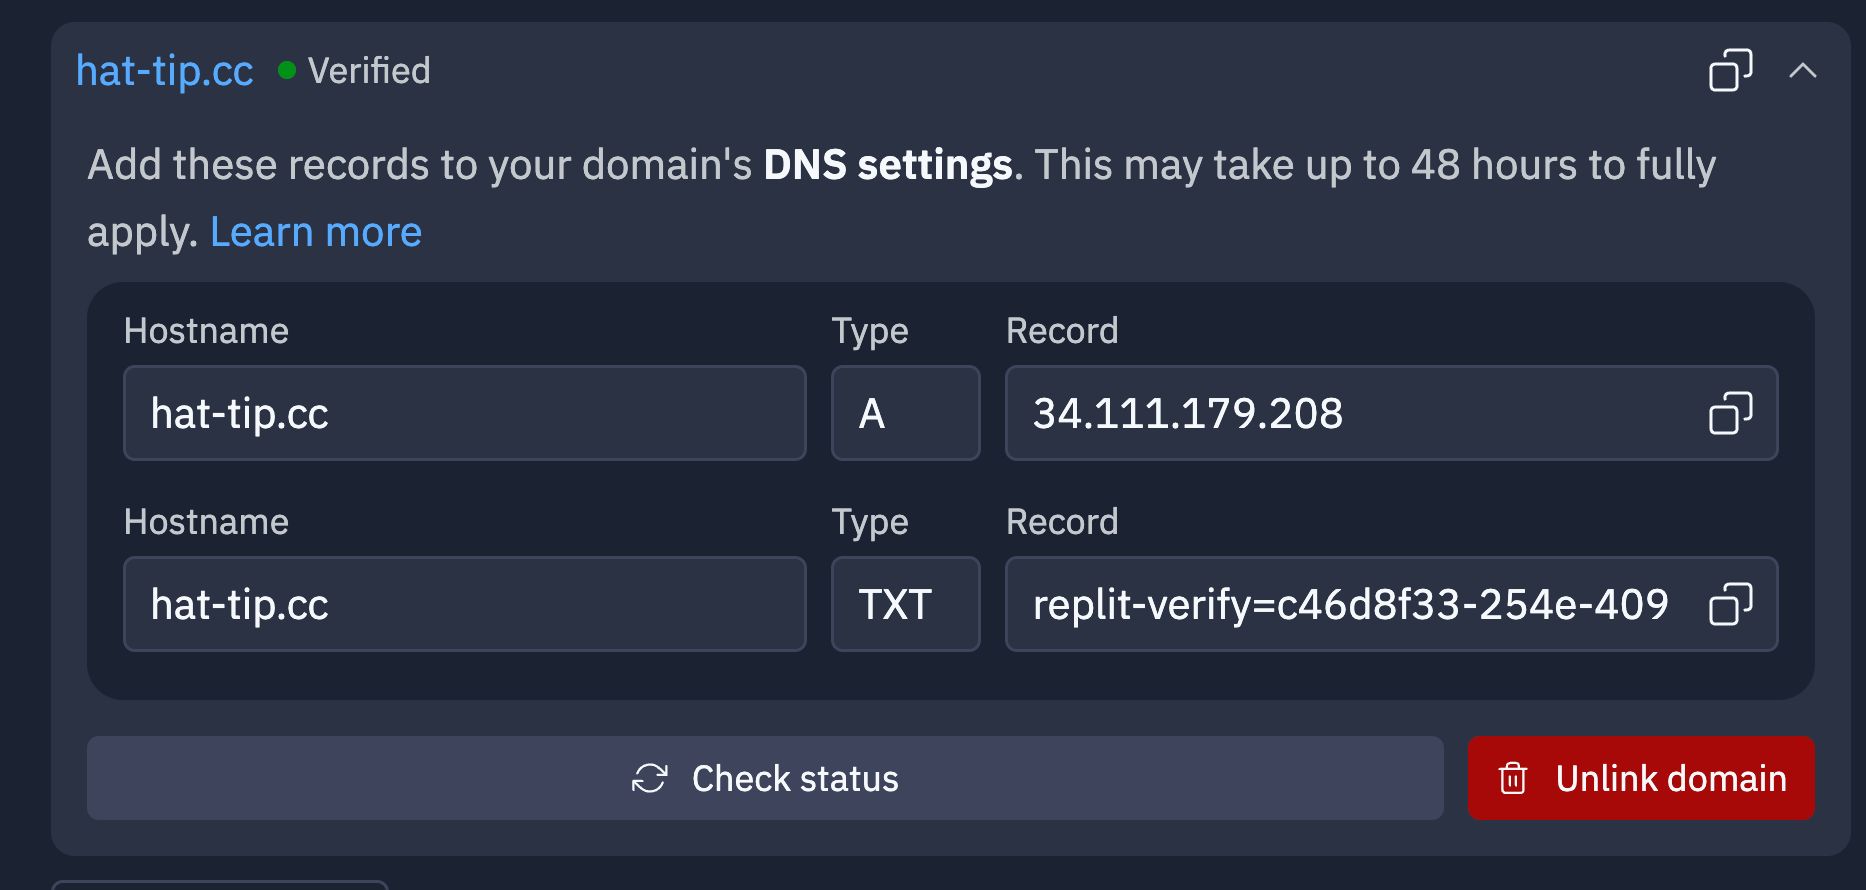
How long Replit checks your DNS records
After you add a domain, Replit checks its DNS records every 1 to 2 minutes for about 6 hours. If your records appear during that window, Replit verifies the domain and issues its SSL/TLS certificate automatically. You don’t need to do anything else. If the records aren’t in place after about 6 hours, Replit stops checking and the domain shows as Failed. Replit doesn’t pick up records you add after that point. To retry, confirm your records are correct with a DNS lookup tool, then remove the domain in the Domains tool and add it again. To avoid a failed domain:- Add your DNS records before or right after you add the domain in Replit. Have access to your DNS provider ready before you start.
- Add the
Arecord and theTXTrecord at the same time. Replit can only issue the certificate after yourArecord points to Replit.
DNS propagation and Replit’s checking window are separate. Most DNS changes are visible within minutes,
but some providers take longer. If you expect slow propagation, add the records at your DNS provider
first, then add the domain in Replit.
Connect many subdomains to one domain
Replit issues a separate certificate from Let’s Encrypt for each domain and subdomain you connect. Wildcard certificates (*.example.com) aren’t supported, so every subdomain gets
its own certificate. Let’s Encrypt limits how many certificates it issues. These limits matter when you
connect many subdomains under the same domain, such as dozens of <location>.example.com sites.
Certificate limits to plan around
Renewals of existing certificates generally don’t count toward the 50-certificate limit. For the full
details, see Let’s Encrypt rate limits.
Add subdomains in batches
To connect many subdomains without hitting the limit:- Check how many certificates your domain already has. Search your registered domain on crt.sh and count the Let’s Encrypt certificates issued in the last 7 days. Include certificates from other hosts, such as a marketing site or email provider. crt.sh often lists each certificate twice (a precertificate and the final certificate), so count unique issuances.
- Add up to your remaining allowance at once. If your domain has no recent Let’s Encrypt certificates, you can add up to 50 new subdomains at once.
- Add about 7 more subdomains per day after that. The allowance frees up gradually over 7 days.
Retry failed domains safely
Each time you remove a domain and add it again, Replit requests a new certificate. If the domain never got a certificate, the request counts toward both limits above. If it did, the request still counts toward the 5-per-hostname limit. Repeated retries can make a rate limit last longer.- Retry one domain at a time, and only after you’re back within the limit.
- Don’t remove and re-add domains that already work. They already have a certificate, and re-adding them uses part of that hostname’s allowance.
- Don’t retry the same subdomain repeatedly. Each hostname can only get 5 new certificates in 7 days.
If many subdomains fail at the same time and your DNS records are correct, you may have hit a
certificate limit. Check crt.sh for recent certificates on your domain, or
contact Replit Support with your domain name and the affected subdomains.
Manage your domains
The Domains tool lists every domain connected to your project and lets you manage each one. Select a domain and choose Manage to:- See which project the domain points to. If you try to connect a domain that’s already linked to another of your projects, Replit warns you and lets you move it to the current project instead.
- Review renewals (for domains bought on Replit). The management view shows the renewal date and renewal price, and lets you turn Auto renewal off if you don’t want the domain to renew automatically.
- Edit DNS records (for domains bought on Replit). Add custom
A,TXT, orMXrecords — for example, MX records to use your domain for email. See Custom DNS records. - Disconnect the domain. Disconnecting stops serving your app at that domain. The domain itself isn’t deleted — it stays available to link to another of your projects.
Troubleshooting
Domain link failed or stuck on pending verification
If a connection fails or the domain stays on Verifying, work through these checks:- Give DNS time to propagate. Verification can take from a few minutes up to 48 hours. Use a DNS lookup tool to confirm your records are visible globally before changing anything else.
- Remove conflicting records. Keep only one
Arecord at your root domain pointing to Replit, and remove anyAAAA(IPv6) records on the same hostname — they can block SSL. - Turn off Cloudflare proxying. Set your
Arecord to DNS only (the grey cloud). Proxy mode (the orange cloud) interferes with SSL provisioning. - Confirm the
TXTrecord is present. A missing or modifiedreplit-verify=...TXTrecord blocks verification and certificate renewal. See Keep the TXT record in place. - Disconnect and reconnect the domain once from the Domains tool to force a fresh certificate, then wait a few minutes and reload. Each reconnect requests a new certificate, so avoid repeated retries. See Retry failed domains safely.
DNS changes haven’t taken effect yet
DNS changes are not instant. After you add or change records, expect to wait anywhere from a few minutes to 48 hours for them to propagate worldwide. Your app keeps working on itsreplit.app subdomain during
this time. If the Verified status hasn’t appeared after 48 hours, recheck your records against what
Replit shows — common mistakes are a trailing dot, an extra subdomain, or a stale record.
CNAME records and authentication
You don’t need a CNAME record for sign-in or authentication to work on your custom domain. Sign-in works
across your published domain automatically once the domain is verified.
CNAME records on a custom domain are only required for email sending — for example, so that
verification or transactional emails can be sent from your domain. If the Publishing tool shows a warning
asking you to add CNAME records, that’s about email delivery, not login. Adding the records is only
necessary if you send email from your domain; it does not block your domain’s verification, SSL, or
sign-in. For the email-related setup steps, see
Clerk authentication.
Keep the TXT record in place
Replit issues and renews the SSL/TLS certificate for each custom domain through DNS validation, which depends on thereplit-verify=... TXT record you added during setup. The TXT record is not a one-time setup artifact — it must stay in your DNS for the full lifetime of the domain. If the record is removed, edited, or replaced after your domain is verified, the next renewal will fail silently and the existing certificate will eventually expire. Visitors will then see a browser security warning and the app will be unreachable.
If older domains on your account suddenly show certificate errors while newer ones work, a missing or modified TXT record is the most likely cause.
To restore an affected domain:
- Select Tools, then Domains under Replit Cloud.
- Confirm the
replit-verify=...TXTrecord Replit shows for the domain. - Add the
TXTrecord back at your domain registrar exactly as shown, including the hostname and value. - Remove the domain in Replit and add it again to trigger a fresh issuance. Do this once per domain. See Retry failed domains safely.
- Wait for DNS propagation and re-check the Verified status in the Domains tool.