Documentation Index
Fetch the complete documentation index at: https://docs.replit.com/llms.txt
Use this file to discover all available pages before exploring further.
What is SSH?
SSH, which stands for Secure Shell, is a secure protocol that facilitates remote access to your Replit App’s command line interface. With SSH, you can seamlessly transfer files and leverage your preferred local Integrated Development Environment (IDE) for editing code on Replit, enhancing collaboration and productivity in your development workflow. SSH functionality is available for Core, Pro, and all other paid plans. Here’s an overview of the process:- Generate an SSH keypair on your local machine
- Add that SSH key to the SSH pane inside any Replit App
- Connect using an SSH client or an editor which can work over SSH (like VSCode or Cursor)
SSH keys are associated with your account, not a particular Replit App. This means that you only need to add a public key once, after which you can connect to any Replit App you have access to.
Why use SSH?
- Automatic updates between Replit App and editor: Any changes made in the Replit App are reflected in your editor instantly, and any modifications in the editor are updated in the Replit App. This seamless synchronization ensures that your codebase is always up-to-date across platforms.
- File management synchronization: Whether you add, delete, or update files, these changes are synchronized in real time between your editor and the Replit App. This feature ensures that your project structure remains consistent, regardless of where the changes are initiated.
- Folder management and file moving: Moving files across folders is also synchronized between your editors and the Replit App. This ensures that organizational changes made in one environment are accurately reflected in the other, maintaining the integrity and structure of your project.
Find or create a keypair
To configure SSH for your account, you’ll need your SSH public key.Figuring out if you already have a keypair
You can check if you already have a public key by running the following command in a Terminal on your local computer:- Mac/Linux
- Windows
replit.pub, please proceed to Get the contents of your public key.
Generating a new keypair
On your machine, open a Terminal (or Command Prompt) window and paste the following command:- Mac/Linux
- Windows
Get the contents of your public key
Once you have either confirmed you have a keypair or created one, display the contents of the public key (one of the two similarly named files, suffixed with.pub), as we’ll need that for later.
- Mac/Linux
- Windows
replit.pub to use later in this article and proceed to add the SSH key to your account.
Add the SSH key to your account
Add the public key directly in a Replit App, using the SSH pane
- In your Replit App on any window, select the + button, then search for SSH.
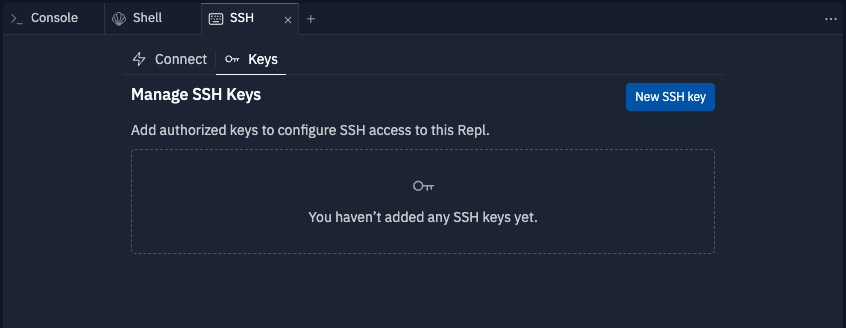
- Navigate to the Keys tab and select New SSH key.
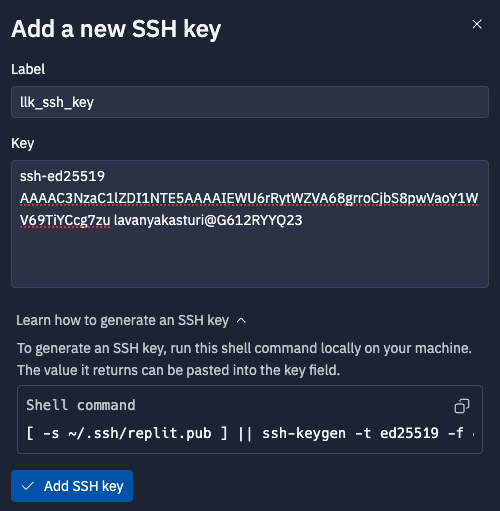
- In the popup window, enter a Label for your key (e.g., my-ssh-key) and paste the public key you copied into the Key section. Select the Add SSH Key button. Your key has been added and authorized for use.
Add the public key directly in Settings
You can also add an SSH key by opening Settings and, under Account, selecting Advanced (or the SSH keys option). Select Add SSH key and paste in the contents ofreplit.pub from the previous section, Find or create a keypair.
When you have multiple public keys on your machine, it’s important to ensure that you use the correct combination of private and public keys for your SSH configuration.
Connecting to your Replit App
Configure your SSH config
- In a terminal, ensure the
~/.sshdirectory and~/.ssh/configfile exist:
- Mac/Linux
- Windows
- Add a configuration block to use the
replitkeypair for all *.replit.dev domains:
- Mac/Linux/Windows
Connect from VSCode or Cursor
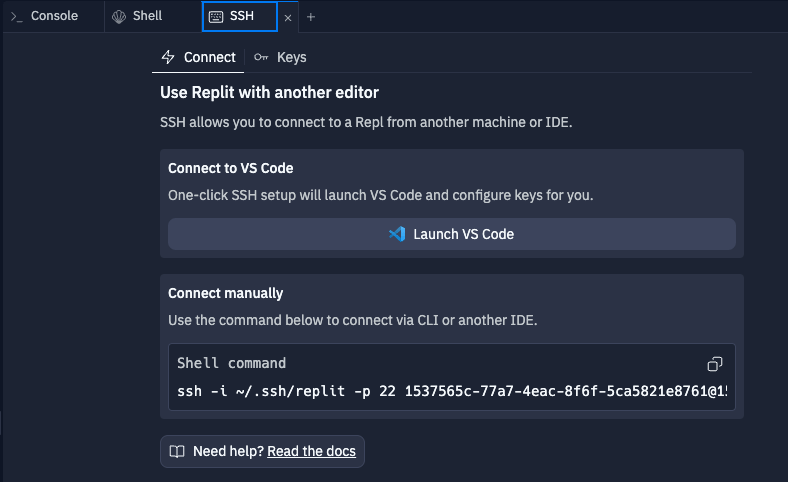
- From a Replit App, open the SSH pane
- In the SSH pane, navigate to the Connect tab and select Launch VS Code.
- Connect with VSCode
-
If you are prompted to fill out
~/.ssh/config, enter the following:Adding SSH configuration is only prompted the first time you are trying to connect to VS Code or another editor. To return to the configuration file, you will need to select Configure SSH Hosts…. - If prompted by an external application warning, select Yes to confirm you want to open your project in your preferred editor or VS Code.
- You may be asked to install or update SSH extensions periodically. Replit will endeavor to be compatible with the latest versions of these IDEs, and you may get important security updates as well.
Connect manually
At the bottom of the SSH pane’s “Connect” tab, you will find “Connect manually”. Copy that command, paste it into either a local Terminal (Mac or Linux) or local Command Prompt (Windows) in order to connect directly. This is also a good way to debug connection issues with IDEs, as well as to collect valuable “verbose” connection information when reporting bugs to Replit Support. An error indicating we are attempting to connect with a nonexistent private key:Connect via a tool not listed here
There are many SSH clients available for different platforms and operating systems, many offering different features or integrations. You can always break down the command displayed in “Connect Manually” into its constituent components to determine how to configure each client:<your_hostname>.<cluster>.replit.dev
Port: <port_number>
User: Username
Private Key: Path to the private key file on your computer. Usually next to replit.pub.