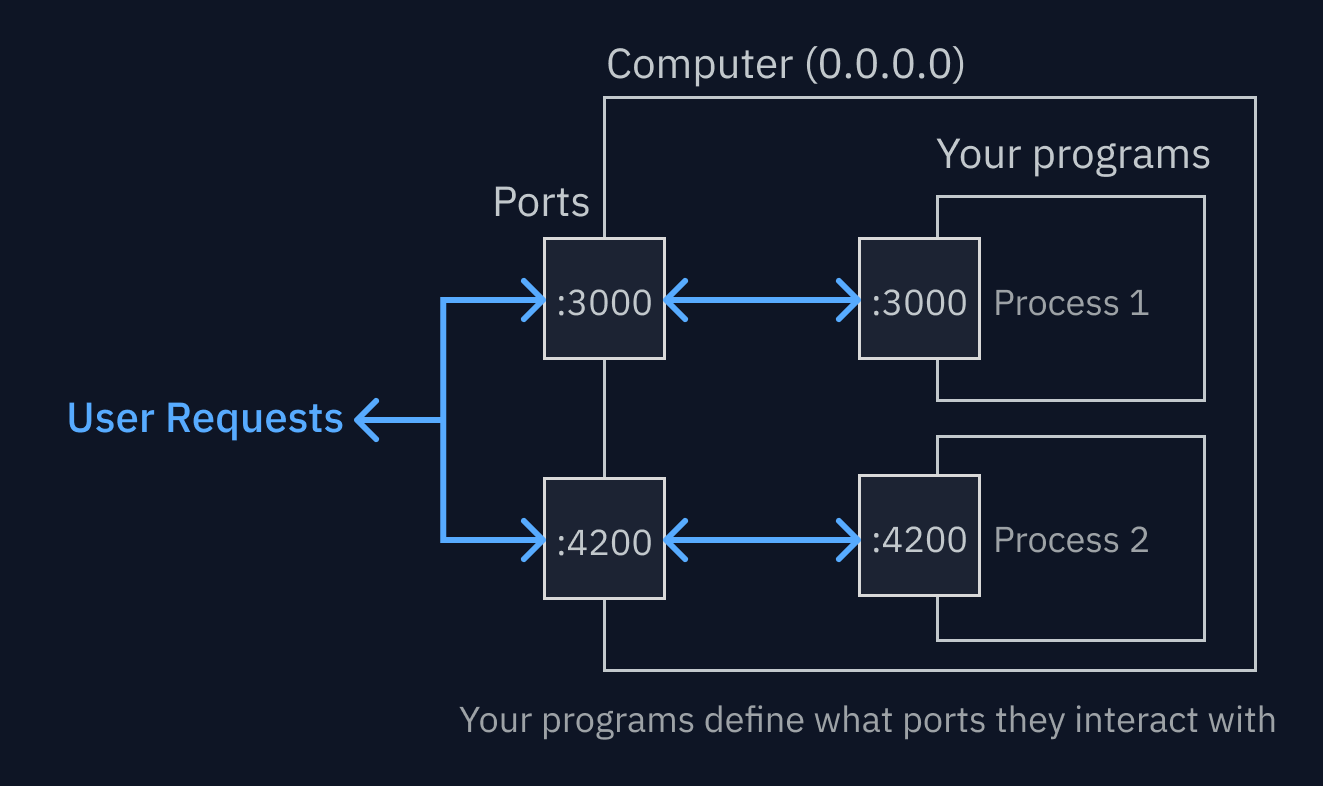
0.0.0.0 part is the address, or host. If a process is listening on 0.0.0.0, that means it should listen on every network interface — which means that if another computer (on the internet) sends a request to your computer’s IP address, it will see it. So, listening on 0.0.0.0 means those processes are accessible to the public internet (if your computer is connected.)
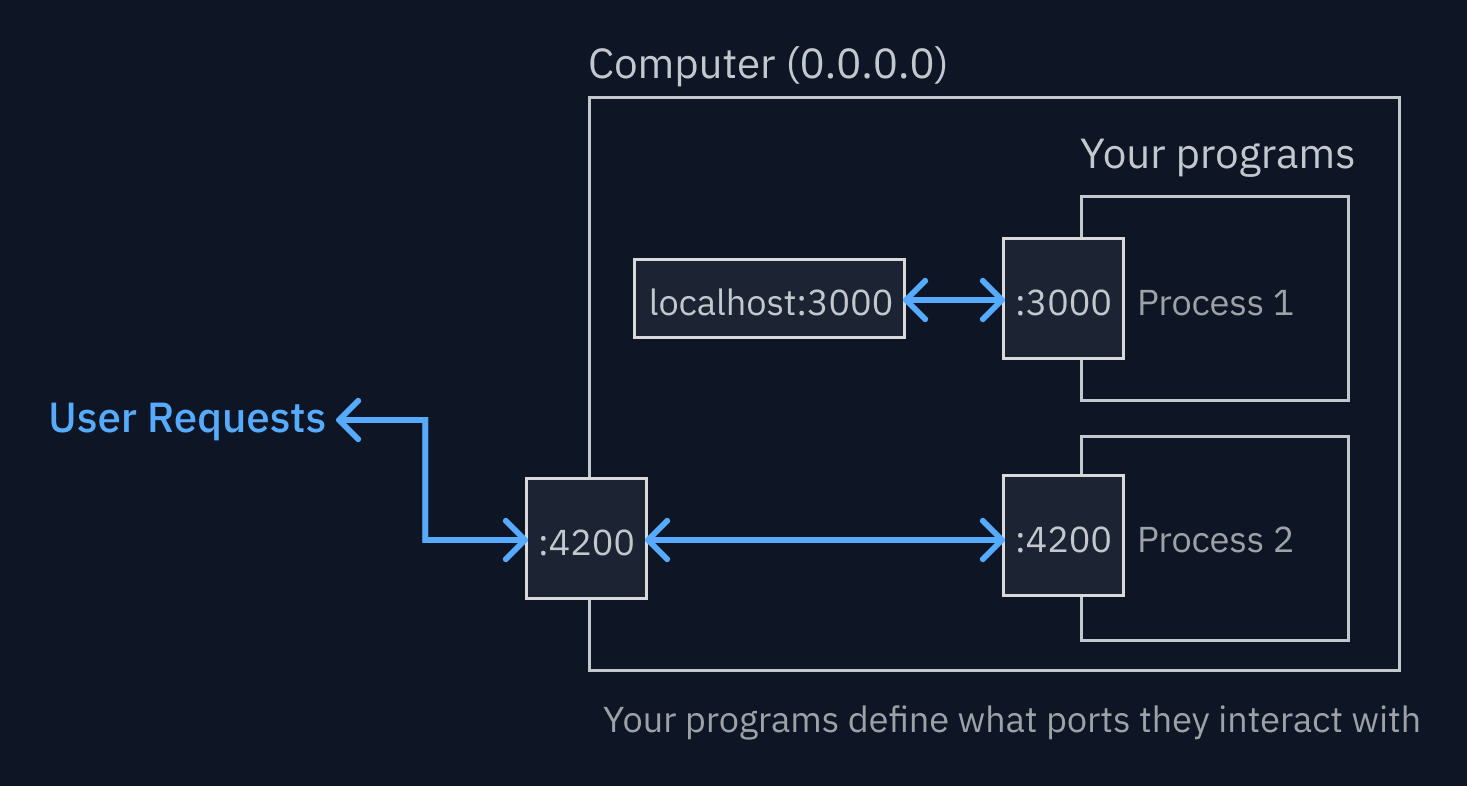
Most programming frameworks will not listen on 0.0.0.0 when you’re developing, because you don’t necessarily want your work exposed to the public while you’re working on it, for privacy & security. Instead, they’ll listen on a different address — 127.0.0.1, otherwise known as localhost. This means only that computer can make requests to that port.
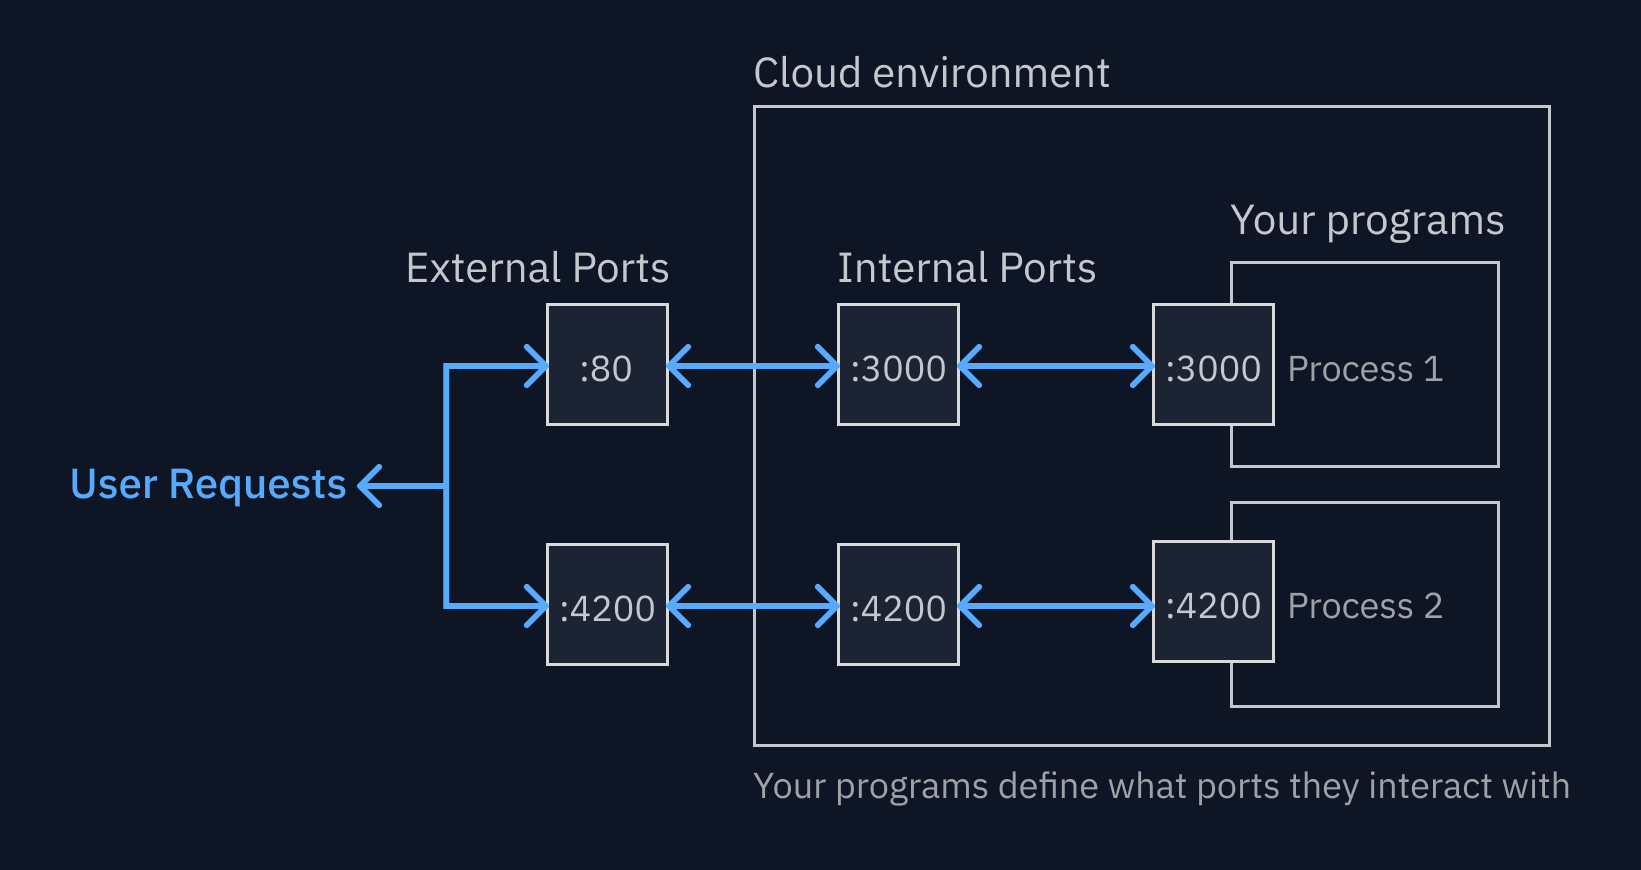
:80 is bound to the internal port :3000. That means any traffic that Replit App gets on port 80 will go to the internal port 3000.
This configuration is captured in the [[ports]] section of the .replit config file.
By default, Replit binds the first port you open to the default external port 80, which allows that process to be available at the domain without a port address (e.g. customdomain.com/ instead of customdomain.com:3000/). Additional internal ports that are opened are bound to other available external ports (see a full list below.)
Preview
In the Preview tool, you can change which external port the webview is rendering by clicking the domain and selecting a different port. You can also open the networking tool from the “gear” icon for more details.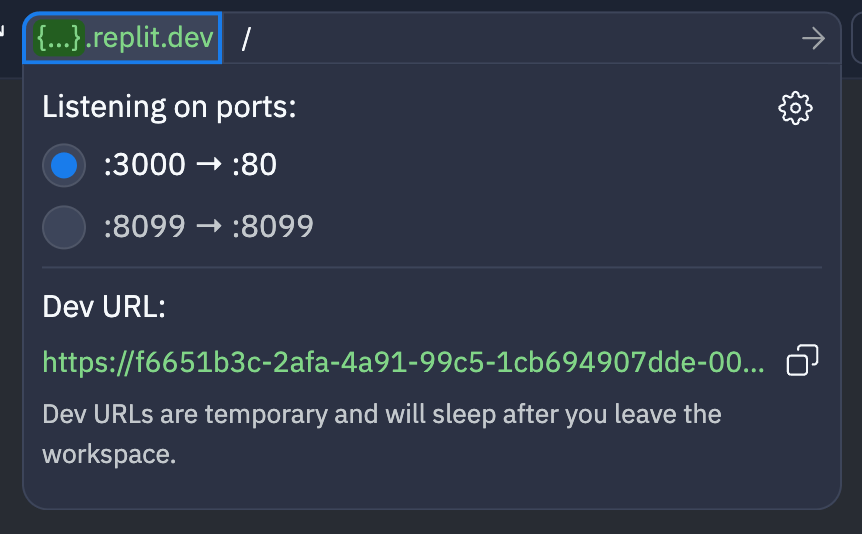
Default port
Port :80 is the “default port” for http traffic, so http traffic sent to the root domain will automatically be routed to port 80. The port path is not shown in the url for port 80 for that reason. Ports other than :80 will show up in the domain path (e.g. customdomain.com:4200/). (Replit provides TLS by default, so it will technically be over port 443, which is the default port for https. For all intents and purposes, you can treat them as interchangeable.)
Networking tool
For more details about port config and networking, you can open the networking tool. It shows the status of ports open in your Replit App, what external port they’re bound to, and lets you add or remove configuration.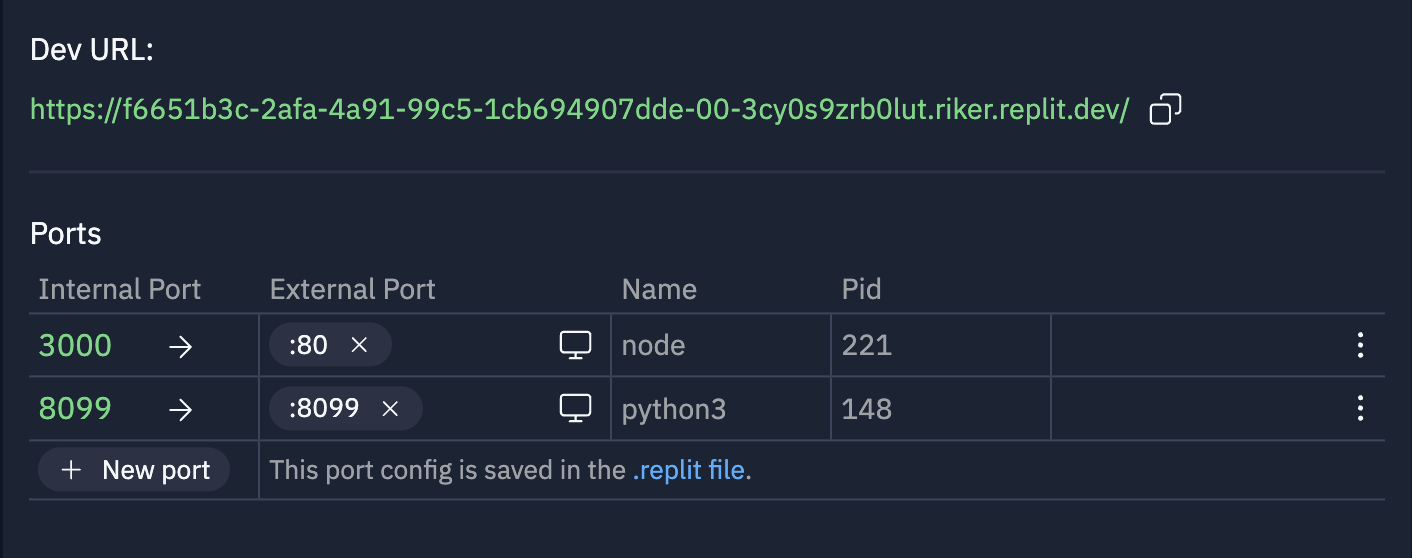
Publishing
Autoscale and Reserved VM deployments only support a single external port being exposed, and for the corresponding internal port not to be usinglocalhost. If you expose more ports, or expose a single port on localhost, your published app will fail. An easy way to make sure your Autoscale deployments work as expected is to remove all the externalPort entries for the ports in your config except the port for the service you want to interact with from the internet.
Debugging
A common reason something might not be working as you’d expect is that while your port config looks right, your program is actually looking at a different port. For example, if your config is: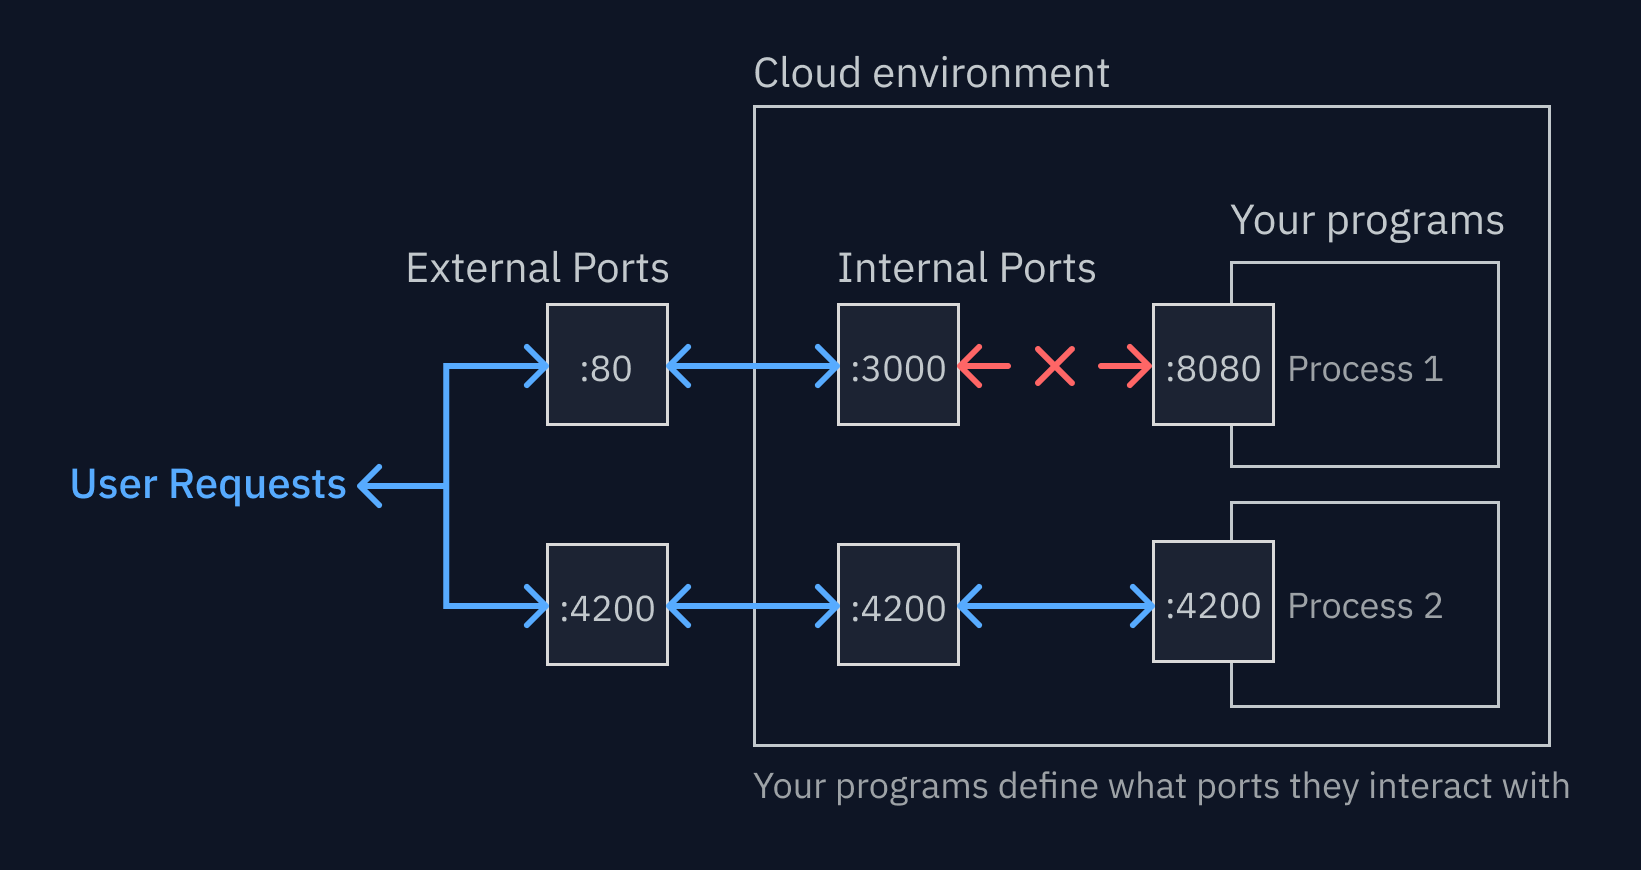
Preferences
Replit automatically binds ports that are opened in your Replit App to available external ports when they are opened, and records that binding in the .replit config file. However, this does not happen by default for internal ports that open on localhost, because services that usually run on localhost typically assume that they will only be accessible on the same computer as the process that’s running (localhost ports are only visible to the same computer running the process.) This means those services are often not as secure as services built under the assumption that they’ll be available to the public internet. You can always override this by setting theexposeLocalhost config option to true for the port you want to expose.
If you want to always expose localhost ports by default, you can set your “automatic port forwarding” setting in the User Settings tool to “All ports”.
If you want to never create config for ports that are opened, and manually control the port config for all your Replit App, you can set that to “never”.
Supported ports
Replit App will define port 80 as the external port by default when the first port opens. A Replit App can expose 3000, 3001, 3002, 3003, 4200, 5000, 5173, 6000, 6800, 8000, 8008, 8080, 8081, as extra external ports. Ports 22 and 8283 are not forwardable, as they are used internally.[[ports]] .replit config
Type: {localPort, externalPort, exposeLocalhost}
The [[ports]] config Allows you to configure which HTTP port to expose for your web output. By default, any exposed HTTP port with host 0.0.0.0 will be exposed as your Replit App’s web output.
Extra ports can be served without overriding the default port by adding a new [[ports]] entry to your .replit file. You are required to specify both a localPort and externalPort entry. You can add multiple extra ports by adding multiple [[ports]] entries to your .replit file as defined below.
localPort
Determines which port Replit will bind to an external port.externalPort
Determines which port should be exposed for that local port’s publicly accessible port.localPort config but just not add an externalPort:
exposeLocalhost
Determines whether an internal port usinglocalhost can be bound to an external port. Can be true, false, or null.