Quick examples
See the difference between vague and effective prompts:Fixing code
Fixing code
Vague: “Fix my code.”Effective: “My script fails when processing user input. The error seems to be in the validation function. Can you help debug the
validate_input part? Here’s the error message: [details]”The effective prompt identifies the problem area, suspected function, and provides context.Building features
Building features
Vague: “Make a website.”Effective: “Create a simple portfolio website with sections for Home, About Me, and Contact Form. Use a clean, modern design theme and placeholder content.”The effective prompt defines the purpose, core features, and desired aesthetic.
Performance improvements
Performance improvements
Vague: “Don’t make it slow.”Effective: “Refactor the data processing function to handle larger inputs more efficiently. Could we use a different algorithm or data structure?”Tell Agent how to improve rather than using negative constraints.
UI changes
UI changes
Vague: “Add animation.”Effective: “Animate the main image on the landing page so it gently fades in when the page first loads to create a welcoming effect.”Identify the specific element, desired effect, timing, and intended experience.
Complex systems
Complex systems
Vague: “Build the backend.”Effective: “Set up the server-side logic. Implement user authentication (signup/login) and create an API endpoint to retrieve user profile data securely.”Break large tasks into specific functionalities.
Core principles
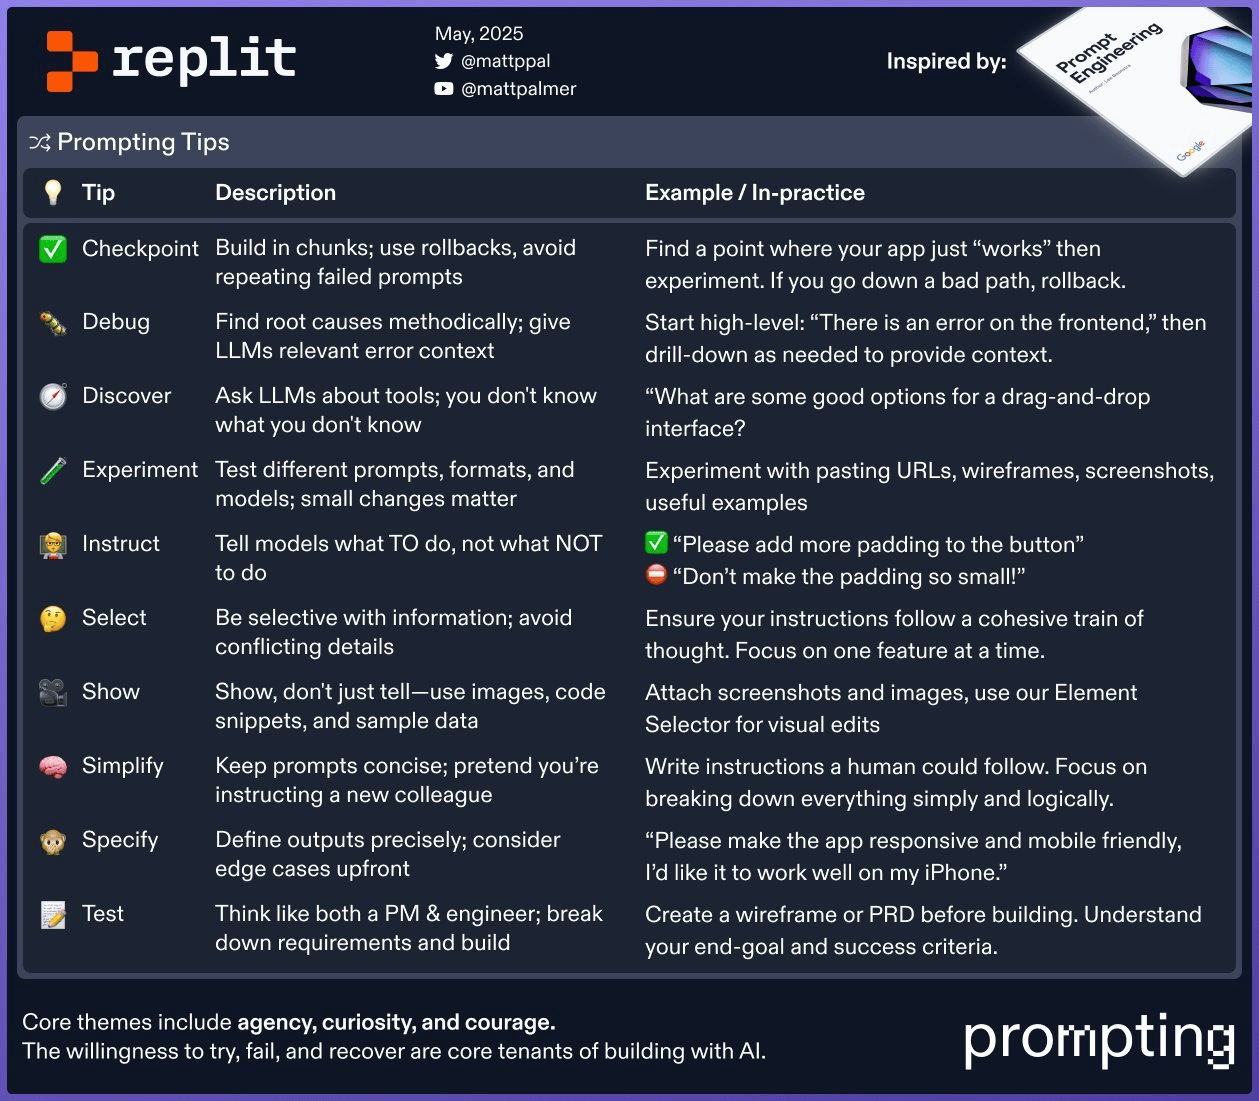
Plan first
Think through your application’s structure like a product manager would. Break the overall goal into logical stages. Instead of: “Build a task manager app.” Try: “1. Create the basic HTML structure with an input field and task list. 2. Add JavaScript to add tasks. 3. Use a database to store tasks. 4. Add functionality to mark tasks complete.” Then prompt Agent for each step.Build incrementally
Use Checkpoints to save progress after each successful step. If something breaks, you can roll back to a working state and try a different approach. Instead of: “Build a complete e-commerce platform.” Try: “Set up a basic full-stack project for an e-commerce site with user sign-up and login using Replit Auth.” Then follow with prompts for product listings, cart, and checkout.Be specific
Define exactly what you need: output formats, constraints, edge cases. Instead of: “Add a contact form.” Try: “Create a contact form page at/contact with fields for:
- Name (required)
- Email (required, must be valid format)
- Message (required, min 10 characters)
contact@mydomain.com.”
Use positive language
State what you want, not what to avoid. Instead of: “Don’t make the user profile page confusing.” Try: “Design a clean user profile page. Display the username prominently, followed by email and join date. Include an ‘Edit Profile’ button.”Keep it simple
Use clear, straightforward language. Break complex requests into bullet points. Instead of: “Implement the necessary server-side infrastructure to facilitate the dynamic generation and retrieval of user-generated content artifacts.” Try: “Create backend functionality for users to submit blog posts. Users should enter a title and body content. Store posts in the database.”Working with context
Provide relevant files
Mention specific files rather than attaching your entire project. Instead of: (Attaching everything) “Implement the user profile page based on our design system.” Try: “Create the user profile page. Fetch user data from the server endpoint. Style according to [URL to design docs] and match this mockup: [attachprofile_mockup.jpg].”
Show examples
Reduce ambiguity by providing concrete examples—code snippets, sample data, or screenshots. Instead of: “Make the product cards look better.” Try: “Redesign the product cards on the shop page. Each card should display the product image, name, price, and an ‘Add to Cart’ button, similar to this layout: [attach screenshot]. Use a light gray border.”Debugging effectively
When errors occur, provide:- The exact error message
- Relevant code snippets
- File names where the error occurs
- What you were trying to achieve
- Steps you’ve already tried
/login, I get a ‘User not found’ error in the browser console. The database check doesn’t seem to work. Here’s the login handling code in auth.js.”
Ask for guidance
Instead of: “Add payments.” Try: “What are some good options for accepting credit card payments in a web app built on Replit? I need something relatively simple to integrate.”Iterate on your prompts
Your first prompt might not be perfect—that’s normal. If the result isn’t right:- Add more detail
- Provide an example
- Simplify the instruction
- Try a different way of explaining
Summary
Effective prompting comes down to:- Planning before you prompt
- Building incrementally with Checkpoints
- Being specific about requirements
- Providing context through examples and relevant files
- Iterating when results aren’t quite right