Clerk Auth vs. Replit Auth — With Clerk Auth (this page), your app gets its own authentication tenant with fully customizable branding and user accounts independent of Replit. With Replit Auth, users sign in with Replit accounts and see Replit-branded login pages. Choose Clerk Auth when you want your own brand on the login experience or need user accounts separate from Replit.
Clerk Auth vs. Replit Auth at a glance
Getting started
To add Clerk Auth to your app, include it in your Agent prompt:How Clerk Auth works with Replit
When Agent sets up Clerk Auth for your app, it:- Creates a dedicated Clerk tenant — Your app gets its own Clerk application with separate Development and Production environments
- Provisions credentials — API keys and secrets are stored as environment variables
- Configures a proxy — Authentication works seamlessly on your published domain
- Sets up sign-in and sign-up routes — Pre-built Clerk React components are added to your app
- Adds server-side middleware — Your API routes are protected with Clerk’s Express middleware
You don’t need to create a Clerk account or manage any infrastructure. Everything is managed automatically for you by Replit.
Capabilities
What’s supported
Clerk Auth provides your app with:- Independent user accounts — Your app’s users are not Replit users; they exist only within your app’s Clerk tenant
- Fully branded sign-in pages — Your app name, logo, colors, fonts, and copy on the sign-in and sign-up pages are configured in your app’s code
- Custom-branded SSO — Supply your own OAuth credentials per provider so the provider’s OAuth consent screen displays your app’s name and branding instead of generic defaults
- Email and password authentication — Built-in sign-up and sign-in with email verification
- Social sign-in (SSO) — Let users sign in with Google, GitHub, Apple, or X (Twitter)
- User management — View, search, and moderate users from the Auth pane
- Session handling — Secure session tokens managed automatically
- Development and Production environments — Test authentication in development before going live
You can manage most Clerk Auth configuration from the Auth tool in the Project Editor — no Clerk account required, and no need to touch the Clerk dashboard.
What’s not supported
The following capabilities are not available in Clerk Auth today (compared to the external Clerk app you set up on your own). Check this FAQ for the full breakdown.- Sign-in with phone number — SMS-based sign-in and verification
- MFA support — Multi-factor authentication for end users
- Full SSO provider coverage — Only Google, GitHub, Apple, and X are supported today
- Organization tenants — Clerk’s organization and team-membership features
Development and Production environments
Every app with Clerk Auth gets two completely separate Clerk environments: a Development environment that powers your dev/preview app while you build, and a Production environment that powers your published app. These environments are isolated by design — they have separate API keys and separate user stores.Separate API keys
Each environment has its own publishable and secret API keys. The keys exposed to your app are switched automatically depending on whether the app is running in development or in production:- In your workspace, the
CLERK_PUBLISHABLE_KEYandCLERK_SECRET_KEYsecrets contain test keys (pk_test...andsk_test...) that point at the Development environment.

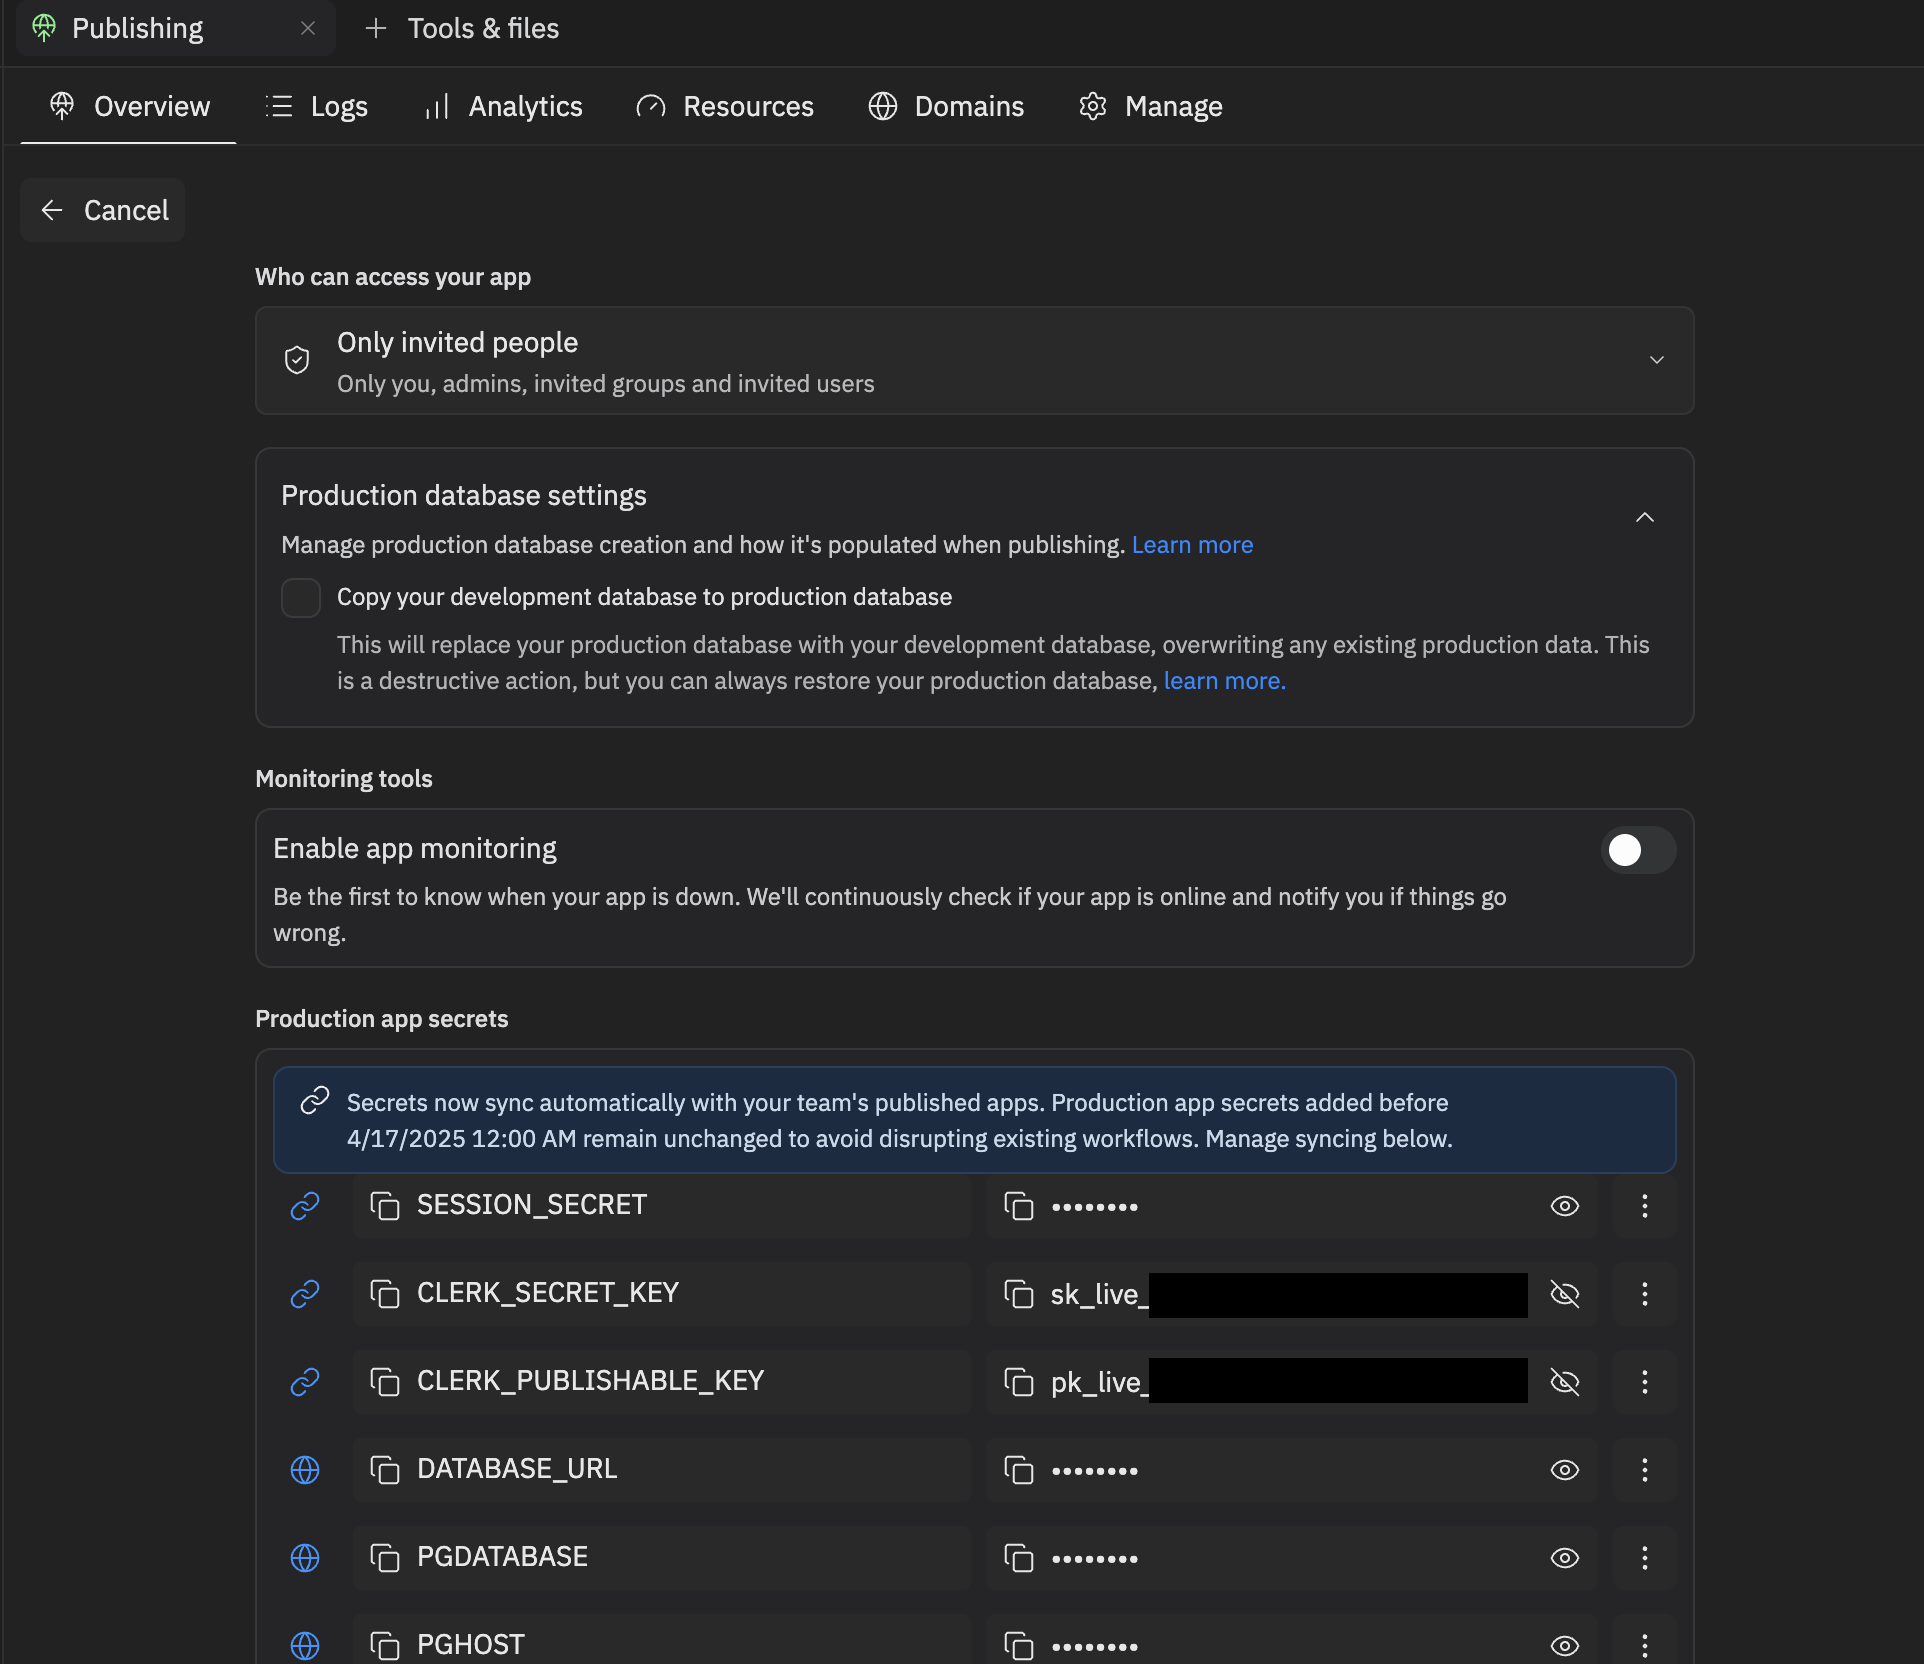
- When you publish your app, the published deployment runs with live keys (
pk_live...andsk_live...) that point at the Production environment. To verify the prefixes, open Publishing → Overview → Adjust settings and inspectCLERK_PUBLISHABLE_KEYandCLERK_SECRET_KEY.
You don’t need to do anything to switch between environments — Replit manages the keys for both Development and Production automatically. Just develop, test, and publish — you’re good to go.
Separate user stores
Each environment has its own user store. Accounts that sign up in the Development environment do not exist in the Production environment, and vice versa:- A user who signs up while testing in the dev/preview app is created only in the Development store.
- A user who signs up on your published app is created only in the Production store.
- Sessions, user metadata, and any data you key off a Clerk
userIdare likewise scoped to the environment in which the account was created.
Development is where you experiment and build; Production serves your live app’s real users. The two are intentionally isolated, so accounts and data created in Development will not appear in Production.
Managing users
The Auth pane in the Project Editor gives you a complete view of your authenticated users. Because Clerk Auth creates a separate user store for your app, the users listed here are accounts in your app — not Replit accounts.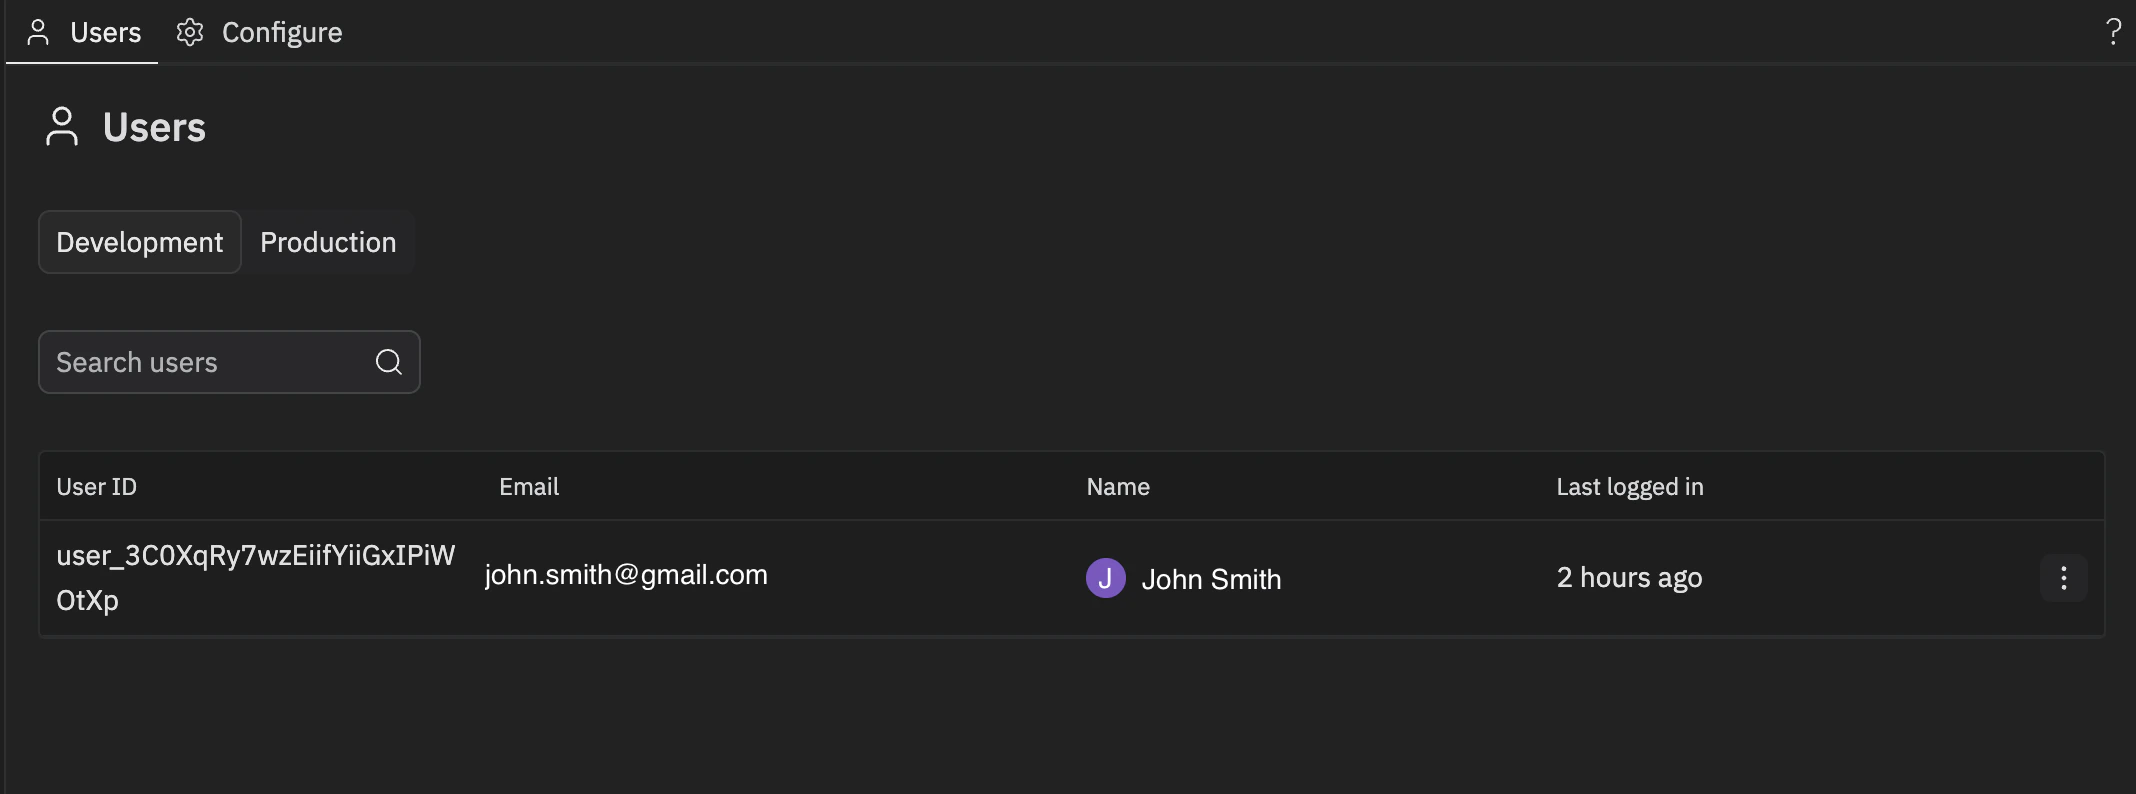
- View all users with details like email, name, last login, and account creation date
- Search and filter to find specific users
- Ban or unban users to control access to your app
- Sort users by different criteria
- Switch environments — Toggle between Development and Production to manage users in each
Customizing your sign-in page
The visual branding of your sign-in and sign-up pages — the app name, logo, colors, fonts, and copy — is configured in your app’s code, not in the Auth pane. To change it, ask Agent:appearance and localization props passed to <ClerkProvider> and the logo file in your app’s public/ directory. Agent keeps these in sync with the rest of your app’s theme.
The app name shown on Google’s, Apple’s, GitHub’s, or X’s own consent screen (the screen that appears after a user clicks “Sign in with Google”, etc.) is separate — it comes from the OAuth app registered with that provider and is not changed by editing your sign-in page code. To change it, configure custom OAuth credentials for that provider.
Configuring login providers
Clerk Auth supports Google, GitHub, Apple, and X as social sign-in providers. From the Configure tab in the Auth pane, you control which providers appear on your sign-in page and — in Production — whether each provider uses Replit-managed OAuth credentials or your own custom credentials for branded sign-in.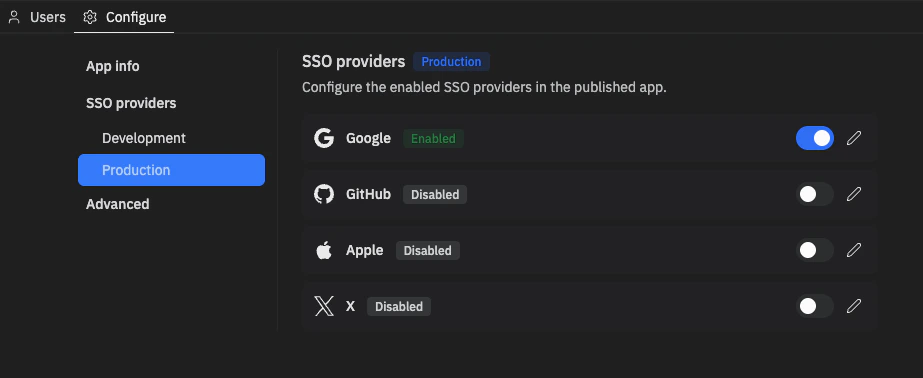
- Enable or disable a provider — Use the toggle to control whether the provider appears on your sign-in page. Disabled providers are hidden from users.
- Configure custom OAuth credentials (Production only) — See Configuring OAuth credentials for an SSO provider below.
Configuring OAuth credentials for an SSO provider
By default, providers use Replit-managed credentials — sign-in works out of the box, but the OAuth consent screen shows Replit branding. Switch to Custom credentials to use your own OAuth client from the provider’s developer console so the consent screen displays your app’s name and branding.- Open the Auth pane from the Project Editor. Go to the Configure tab, then under SSO providers in the sidebar select Production.
- Select the Edit icon next to the provider you want to configure. Replit-managed credentials are selected by default.
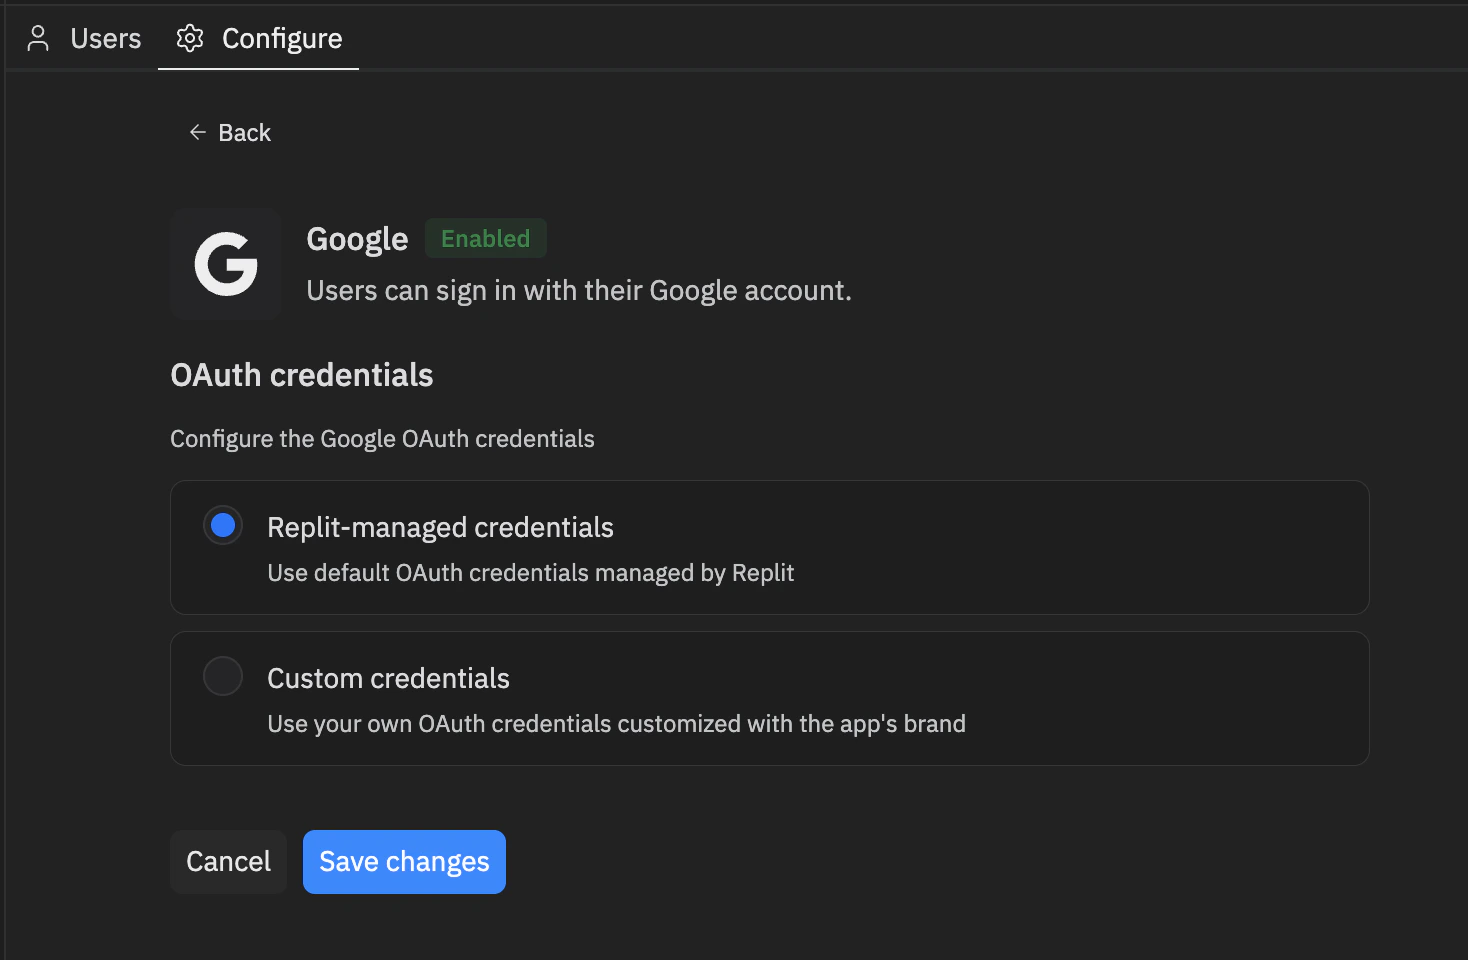
- Select Custom credentials. The panel expands to show the credential fields and a Provider setup checklist with the values you need to register on the provider’s side.
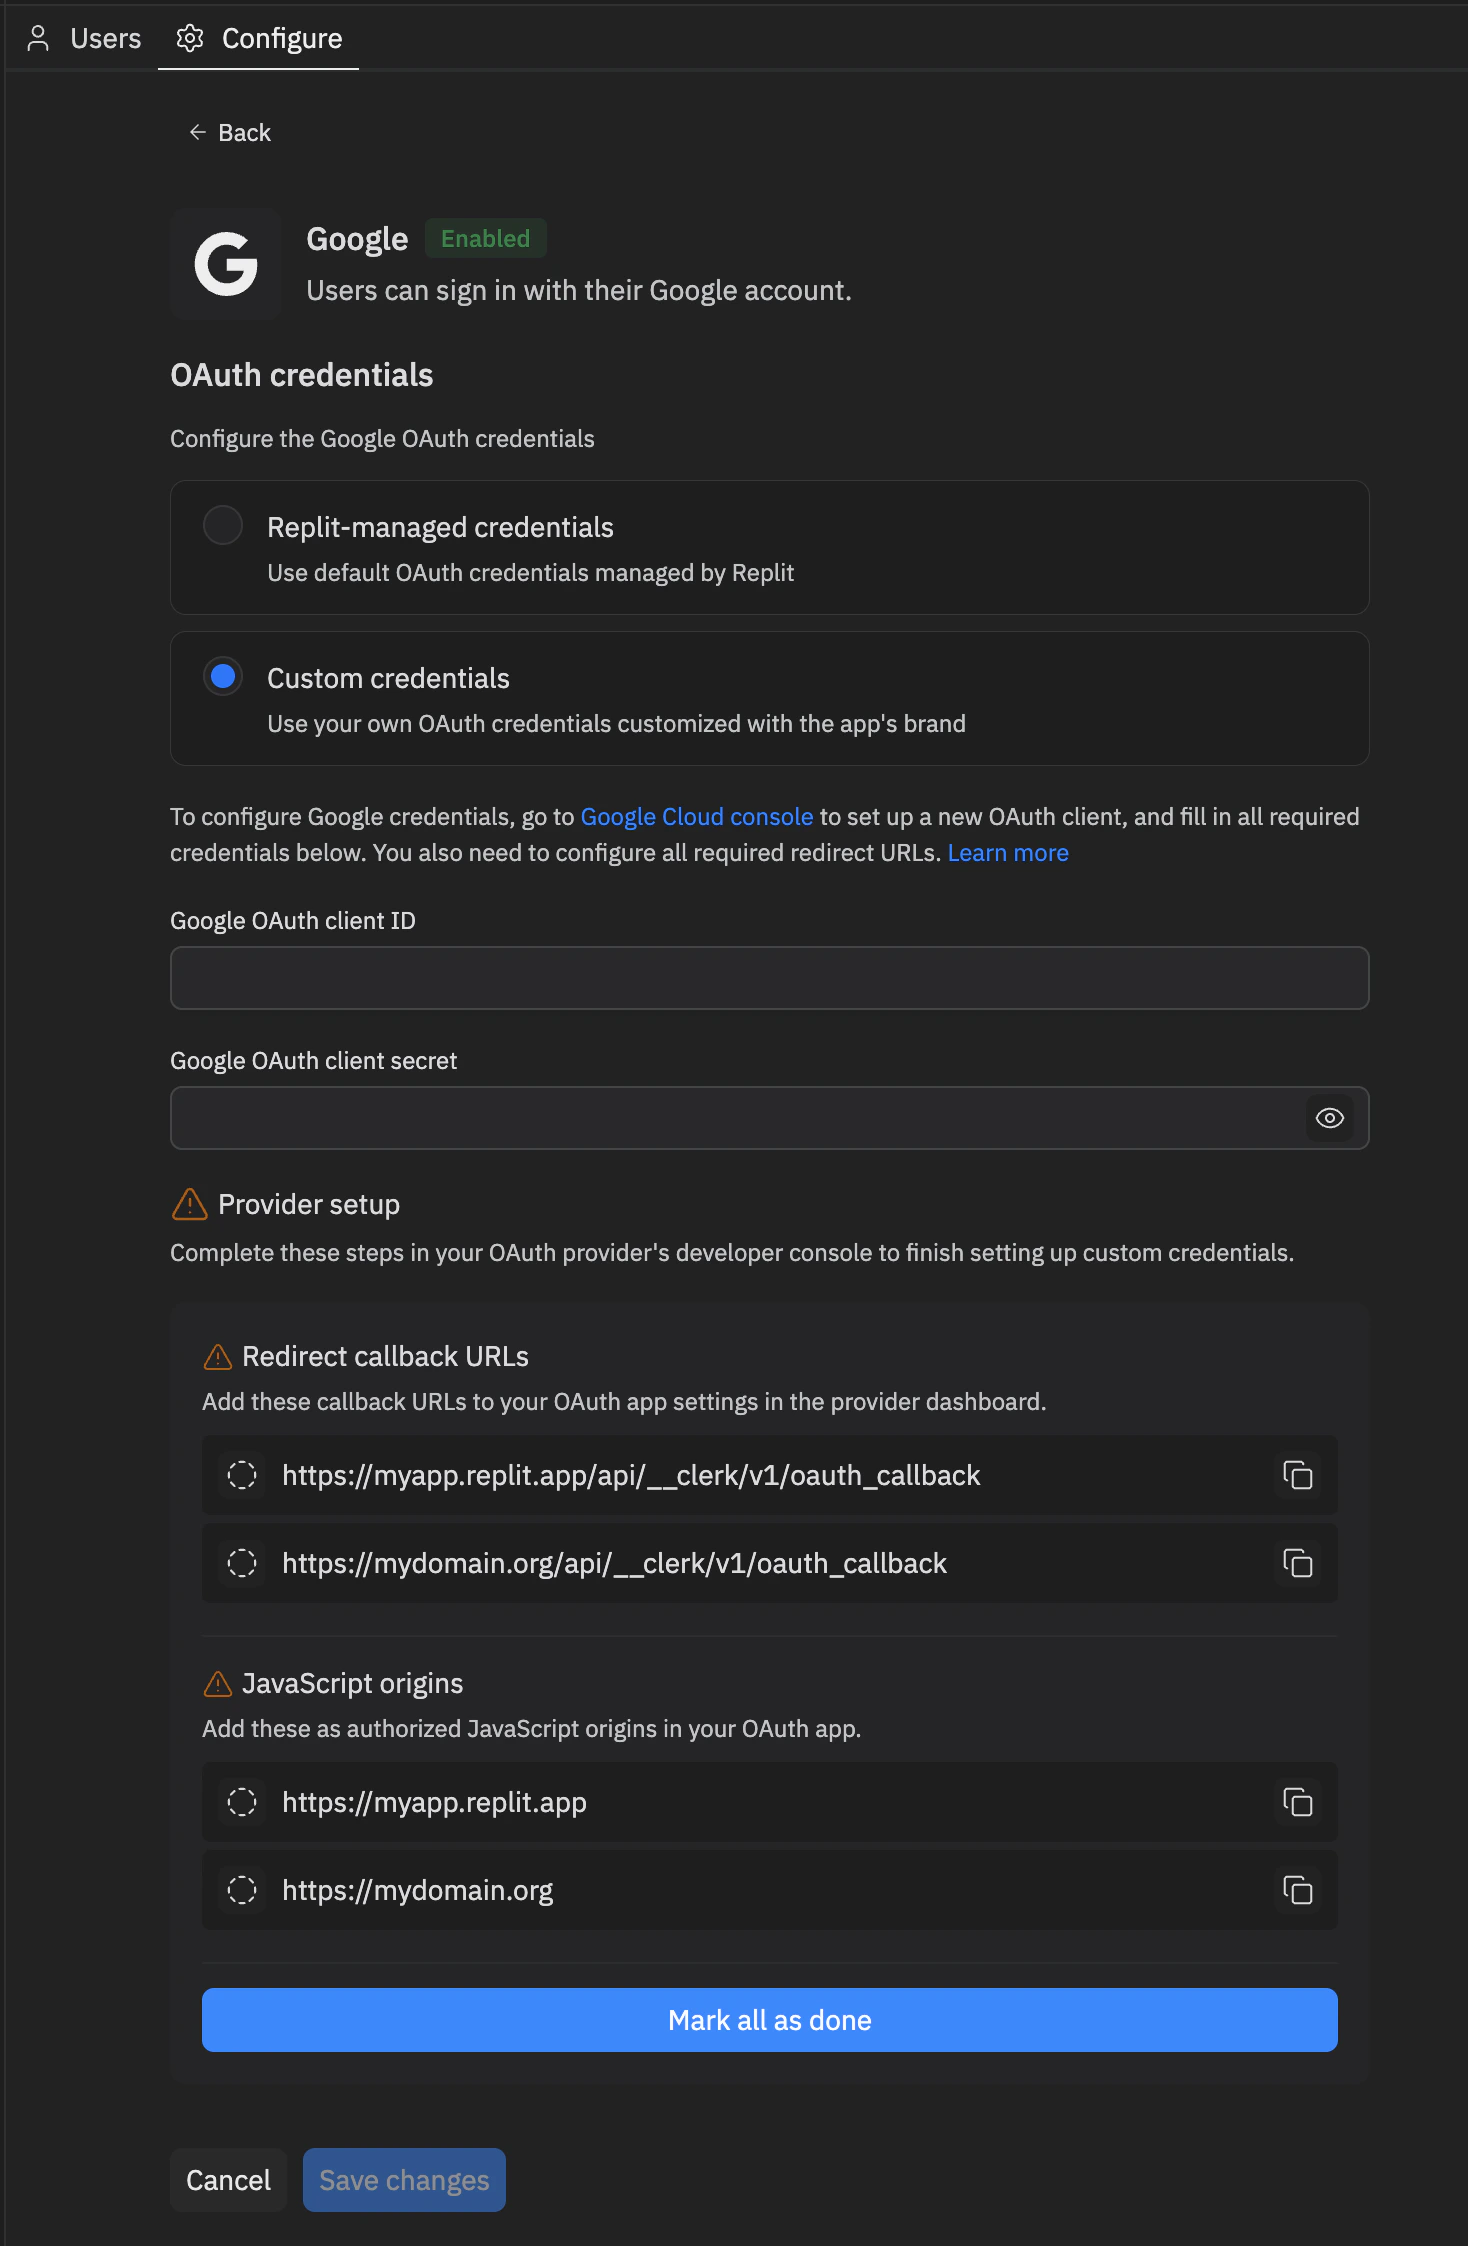
- Follow the instructions to finish configuration. The instructions contain links directly to the console and relevant helper docs. You can also find these helper docs under Additional resources for your provider.
- Fill in all the required credential values.
- In the provider’s developer console, register every entry listed under the Provider setup checklist in the provider’s developer portal. Use the copy icons to copy each value exactly, and tick items off as you complete them or select Mark all as done when finished.
- Select Save changes.
Rechecking setup after domain changes
Domain-related operations — such as linking a new external domain or purchasing a domain through Replit — can change your app’s redirect callback URLs and JavaScript origins. When that happens, any provider configured with custom credentials may need the new values registered in its developer console. After a domain change, return to the Configure tab. Setup reminders appear as warning icons on the tab, in the sidebar, and next to providers in the SSO providers list. A warning icon and setup steps remaining next to a provider mean its Provider setup checklist has new items to complete.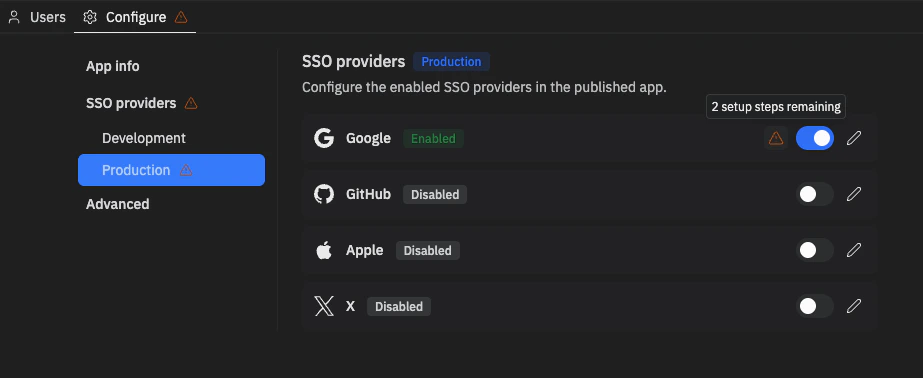
Domain setup for email verification
If your app offers email and password sign-up, Clerk sends a verification code to each new user’s inbox. Configuring your domain for email delivery ensures those codes arrive from your app’s URL instead of being delayed or blocked by spam filters.When you need this setup
You only need to configure DNS records when your app links an external domain managed by another provider (for example, a domain you registered with Cloudflare, GoDaddy, Namecheap, or similar). No setup is required if your app is served from:- A
.replit.appsubdomain - A domain purchased through Replit
Add DNS records for email sending
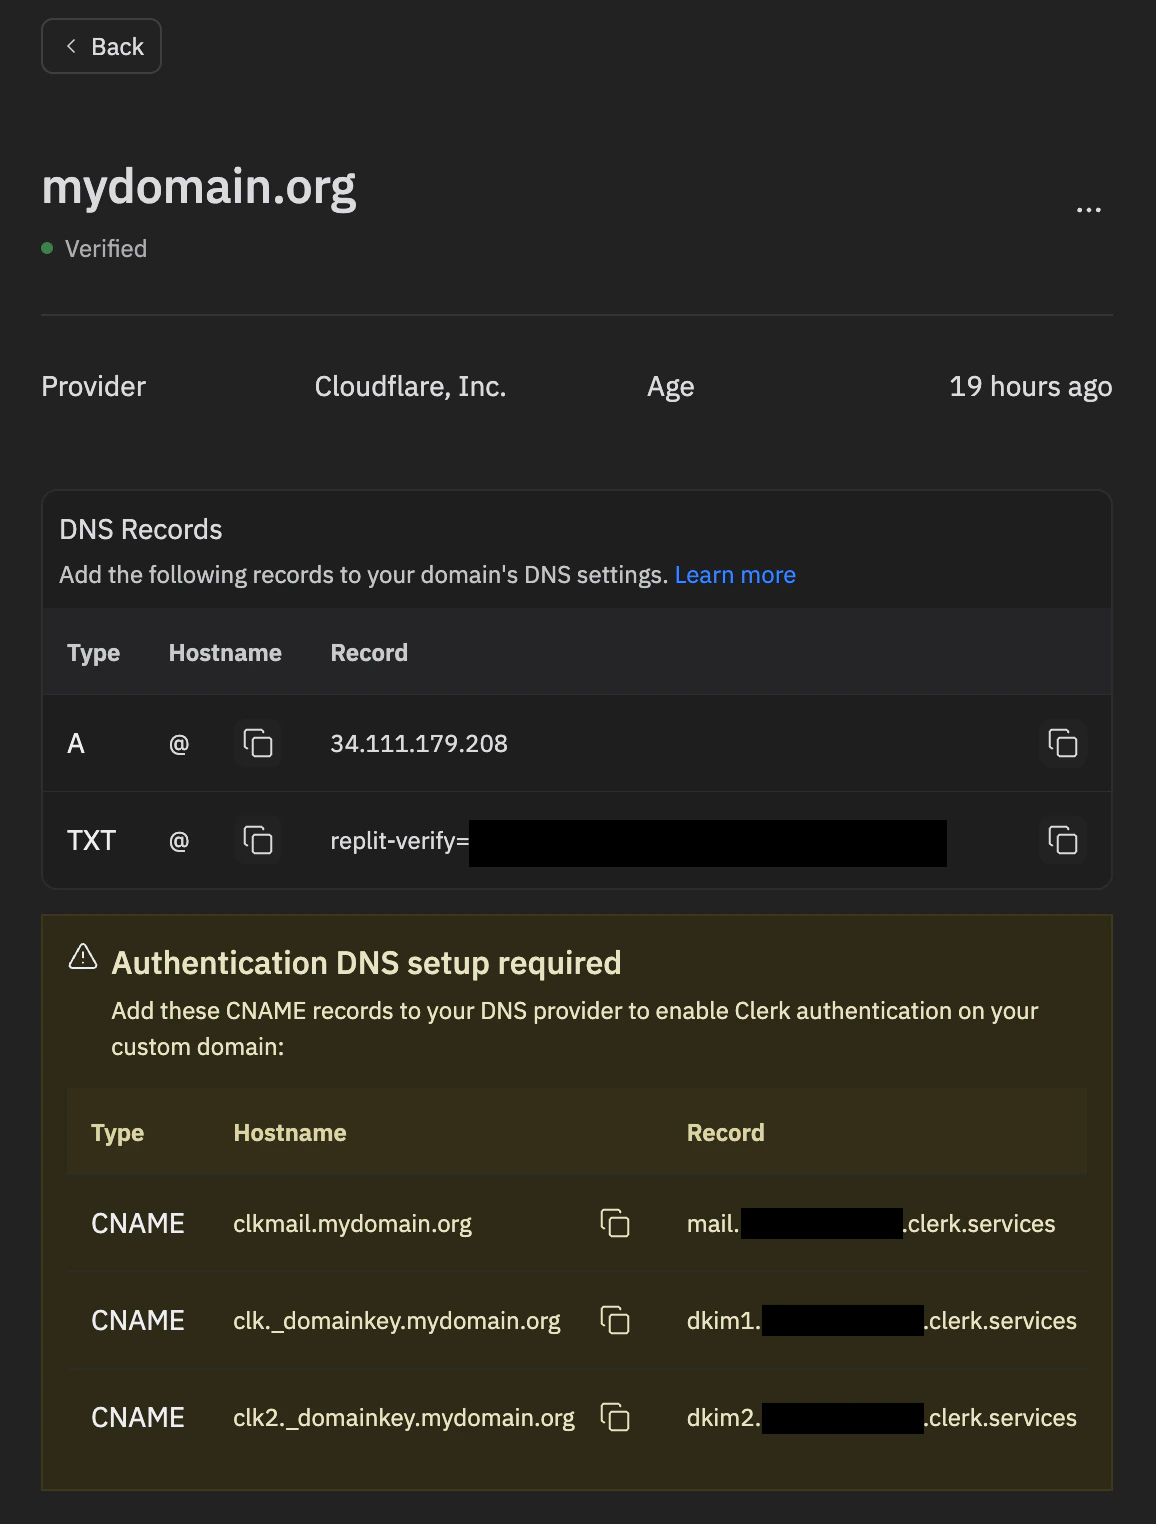
To authorize your app to send verification emails from your external domain, add a set of DNS records at your domain provider.- In the Project Editor, open Publishing.
- Select Domains.
- Find your linked external domain and select Manage.
- Under Authentication DNS setup required, copy the CNAME records Replit displays — these are the records Clerk needs in order to send verification emails from your domain.
- Sign in to your DNS provider (Cloudflare, GoDaddy, Namecheap, etc.) and add each record exactly as shown.
Troubleshooting
- Verification emails not arriving — Confirm every record was added exactly as shown in the Manage panel, including trailing dots where required by your DNS provider. Check the recipient’s spam folder.
- Records still not detected — Allow time for DNS propagation (up to 48 hours) and re-check the Manage panel for any records still flagged as missing.
Security best practices
- Always validate server-side — Check authentication in your API routes, not just in the UI
- Use environment variables — Never hardcode keys or secrets in your code
- Keep the proxy middleware first — The Clerk proxy must be mounted before body parsers in your Express app
- Don’t redirect the homepage to sign-in — Keep your landing page accessible to unauthenticated visitors
FAQ
Do I need a Clerk account to use Clerk Auth?
No. The Clerk tenant behind Clerk Auth is created and managed automatically by Replit when Agent sets up your app — you don’t need to sign up for Clerk or manage any Clerk infrastructure yourself.Can I access the Clerk dashboard for the Replit-managed Clerk instance?
No. The Replit-managed Clerk instance is not exposed through the Clerk dashboard. Manage it from the Auth tool in the Project Editor instead — that’s where you configure providers, view users, and switch between Development and Production environments.My Clerk publishable key starts with pk_test. How do I switch to a live key?
You don’t need to. The pk_test... and sk_test... keys you see in the workspace Secrets pane belong to your app’s Development Clerk environment and are used while you build. When you publish your app, the deployment runs with pk_live... and sk_live... keys for the Production environment automatically. To verify, open Publishing → Overview → Adjust settings in your Workspace and check the CLERK_PUBLISHABLE_KEY value for the published app — it will start with pk_live. Don’t edit these keys manually. See Development and Production environments for the full breakdown.
Why can’t I sign in to my published app with the account I created during development?
Clerk Auth’s Development and Production environments have separate user stores. An account you create on the dev/preview app exists only in the Development environment and is not copied to Production when you publish — you’ll need to sign up again on the published app. The same is true for any data you’ve keyed off a ClerkuserId. Open the Auth pane in your Workspace and use the environment toggle on the Users tab to inspect users in each environment. See Separate user stores for details.
Is Clerk Auth free to use?
Clerk Auth is free for now. Usage-based pricing may be introduced later, in line with other usage-based services on Replit. Any future charges will be applied through your existing Replit billing — you won’t need a separate Clerk invoice or payment method.Does Clerk Auth have an MAU limit like external Clerk plans?
No. Clerk Auth does not impose a monthly active user (MAU) limit, unlike external Clerk plans, which cap MAUs by tier.How does Clerk Auth compare to external Clerk?
The Replit-managed Clerk tenant behind Clerk Auth has some nuances compared with Clerk apps you create in your own Clerk account (external Clerk). The table below highlights where the two differ today — this reflects the current state of Clerk Auth, and the set of supported features will keep evolving.What common Clerk Auth setup do I need to handle manually?
Most Clerk Auth setup is automated, but a few configurations require you to take action outside the Auth tool:- Custom OAuth credentials for SSO providers — If you want the provider’s consent screen to display your app’s name and branding (instead of Replit’s defaults), register an OAuth app in the provider’s developer console and paste the credentials back into the Auth pane. See Configuring OAuth credentials for an SSO provider.
- DNS records for email verification on external domains — If your app links an external domain managed by another provider, you’ll need to add DNS records so verification emails deliver from your domain. See Domain setup for email verification.
Can I bring my own Clerk app instead of using the Replit-managed one?
Yes. If your app already has a Replit-managed Clerk app provisioned, delete it first before wiring up your own external Clerk app:- Open the Auth pane in the Project Editor.
- Go to the Configure tab.
- Scroll to the bottom of the page and click Delete Clerk app.
Additional resources
- Migrate from Replit Auth to Clerk — Use Agent to move an existing Replit Auth app onto Clerk Auth
- Configure Google SSO — Set up custom Google OAuth credentials
- Configure GitHub SSO — Set up custom GitHub OAuth credentials
- Configure Apple SSO — Set up custom Apple Sign In credentials
- Configure X (Twitter) SSO — Set up custom X OAuth credentials
- Clerk documentation — Reference for builders integrating an external Clerk app