> ## Documentation Index
> Fetch the complete documentation index at: https://docs.replit.com/llms.txt
> Use this file to discover all available pages before exploring further.

# 도구 통합하기

> 지원되는 서비스를 연결하고, Conversation에 필요한 정보나 작업을 파악하고, 설정을 위한 공식 통합 문서를 따르세요.

export const IntegrateYourToolsCover = () => <div className="chat-mkt" role="img" aria-label="Supported service context connecting into a central Replit workspace" style={{
  margin: "28px 0 42px",
  borderTop: 0,
  paddingTop: 0
}}>
    <div className="chat-use-case-visual" style={{
  aspectRatio: "auto",
  minHeight: "clamp(220px, 34vw, 320px)",
  overflow: "hidden",
  background: "radial-gradient(circle at 50% -16%, rgba(255,255,255,.82), transparent 42%), radial-gradient(circle at 4% 96%, rgba(255,184,146,.47), transparent 38%), linear-gradient(140deg, #ff764d, #ff3c00 60%, #c92d00)"
}}>
      <div aria-hidden="true" style={{
  position: "absolute",
  inset: 0,
  background: "linear-gradient(180deg, rgba(255,255,255,.13), rgba(255,255,255,0) 50%, rgba(111,24,0,.2))"
}} />
      <div aria-hidden="true" style={{
  position: "relative",
  zIndex: 1,
  display: "grid",
  width: "100%",
  minHeight: "inherit",
  placeItems: "center",
  padding: "clamp(14px, 3vw, 28px)",
  boxSizing: "border-box"
}}>
        <div style={{
  position: "absolute",
  left: "clamp(13px, 8%, 82px)",
  top: "26%",
  display: "grid",
  width: "clamp(42px, 8vw, 64px)",
  height: "clamp(42px, 8vw, 64px)",
  placeItems: "center",
  border: "1px solid rgba(255,255,255,.58)",
  borderRadius: 16,
  background: "linear-gradient(180deg, rgba(255,255,255,.31), rgba(255,255,255,.12))",
  boxShadow: "0 12px 24px rgba(55,27,18,.16)",
  backdropFilter: "blur(5px)"
}}>
          <svg viewBox="0 0 24 24" width="56%" fill="rgba(255,255,255,.88)">
            <path d="M5.042 15.165a2.528 2.528 0 0 1-2.52 2.523A2.528 2.528 0 0 1 0 15.165a2.527 2.527 0 0 1 2.522-2.52h2.52v2.52zM6.313 15.165a2.527 2.527 0 0 1 2.521-2.52 2.527 2.527 0 0 1 2.521 2.52v6.313A2.528 2.528 0 0 1 8.834 24a2.528 2.528 0 0 1-2.521-2.522v-6.313zM8.834 5.042a2.528 2.528 0 0 1-2.521-2.52A2.528 2.528 0 0 1 8.834 0a2.528 2.528 0 0 1 2.521 2.522v2.52H8.834zM8.834 6.313a2.528 2.528 0 0 1 2.521 2.521 2.528 2.528 0 0 1-2.521 2.521H2.522A2.528 2.528 0 0 1 0 8.834a2.527 2.527 0 0 1 2.522-2.521h6.312zM18.956 8.834a2.528 2.528 0 0 1 2.522-2.521A2.528 2.528 0 0 1 24 8.834a2.528 2.528 0 0 1-2.522 2.521h-2.522V8.834zM17.688 8.834a2.528 2.528 0 0 1-2.523 2.521 2.527 2.527 0 0 1-2.52-2.521V2.522A2.527 2.527 0 0 1 15.165 0a2.528 2.528 0 0 1 2.523 2.522v6.312zM15.165 18.956a2.528 2.528 0 0 1 2.523 2.522A2.528 2.528 0 0 1 15.165 24a2.527 2.527 0 0 1-2.52-2.522v-2.522h2.52zM15.165 17.688a2.527 2.527 0 0 1-2.52-2.523 2.526 2.526 0 0 1 2.52-2.52h6.313A2.527 2.527 0 0 1 24 15.165a2.528 2.528 0 0 1-2.522 2.523h-6.313z" />
          </svg>
        </div>
        <div style={{
  position: "absolute",
  left: "clamp(22px, 12%, 112px)",
  bottom: "clamp(18px, 9%, 44px)",
  display: "grid",
  width: "clamp(38px, 7vw, 58px)",
  height: "clamp(38px, 7vw, 58px)",
  placeItems: "center",
  border: "1px solid rgba(255,255,255,.52)",
  borderRadius: 15,
  background: "rgba(255,255,255,.16)",
  boxShadow: "0 12px 24px rgba(55,27,18,.14)",
  backdropFilter: "blur(5px)"
}}>
          <div style={{
  display: "grid",
  gap: 3,
  width: "48%"
}}>
            {[0, 1, 2].map(line => <span key={line} style={{
  display: "block",
  height: 4,
  borderRadius: 999,
  background: line === 0 ? "rgba(255,255,255,.84)" : "rgba(255,255,255,.44)"
}} />)}
          </div>
        </div>
        <div style={{
  position: "absolute",
  right: "clamp(13px, 8%, 82px)",
  top: "26%",
  display: "grid",
  width: "clamp(42px, 8vw, 64px)",
  height: "clamp(42px, 8vw, 64px)",
  placeItems: "center",
  border: "1px solid rgba(255,255,255,.58)",
  borderRadius: 16,
  background: "linear-gradient(180deg, rgba(255,255,255,.31), rgba(255,255,255,.12))",
  boxShadow: "0 12px 24px rgba(55,27,18,.16)",
  backdropFilter: "blur(5px)"
}}>
          <div style={{
  width: "46%",
  height: "40%",
  border: "1px solid rgba(255,255,255,.86)",
  borderRadius: 4,
  boxSizing: "border-box"
}} />
        </div>
        <div style={{
  position: "absolute",
  right: "clamp(22px, 12%, 112px)",
  bottom: "clamp(18px, 9%, 44px)",
  display: "grid",
  width: "clamp(38px, 7vw, 58px)",
  height: "clamp(38px, 7vw, 58px)",
  placeItems: "center",
  border: "1px solid rgba(255,255,255,.52)",
  borderRadius: 15,
  background: "rgba(255,255,255,.16)",
  boxShadow: "0 12px 24px rgba(55,27,18,.14)",
  backdropFilter: "blur(5px)"
}}>
          <div style={{
  display: "grid",
  gridTemplateColumns: "repeat(2, 1fr)",
  gap: 3,
  width: "48%",
  height: "48%"
}}>
            {[0, 1, 2, 3].map(cell => <span key={cell} style={{
  borderRadius: 3,
  background: cell === 0 ? "rgba(255,255,255,.84)" : "rgba(255,255,255,.38)"
}} />)}
          </div>
        </div>
        <div style={{
  position: "relative",
  display: "grid",
  width: "clamp(124px, 24vw, 194px)",
  height: "clamp(124px, 24vw, 194px)",
  placeItems: "center",
  border: "1px solid rgba(255,255,255,.68)",
  borderRadius: 28,
  background: "linear-gradient(145deg, rgba(255,255,255,.4), rgba(255,255,255,.12))",
  boxShadow: "0 24px 44px rgba(67,21,7,.24)",
  backdropFilter: "blur(8px)"
}}>
          <div style={{
  display: "grid",
  gridTemplateColumns: "repeat(2, 16px)",
  gap: 7
}}>
            {[0, 1, 2, 3].map(tile => <span key={tile} style={{
  width: 16,
  height: 16,
  borderRadius: 5,
  background: tile === 0 ? "rgba(255,255,255,.9)" : "rgba(255,255,255,.46)",
  boxShadow: tile === 0 ? "0 0 14px rgba(255,255,255,.42)" : "none"
}} />)}
          </div>
          <div style={{
  position: "absolute",
  bottom: "16%",
  display: "flex",
  gap: 5
}}>
            {[0, 1, 2].map(node => <span key={node} style={{
  width: 5,
  height: 5,
  borderRadius: 999,
  background: "rgba(255,255,255,.52)"
}} />)}
          </div>
        </div>
      </div>
    </div>
  </div>;

<IntegrateYourToolsCover />

Integrations는 지원되는 서비스의 컨텍스트와 기능을 Replit에 추가합니다.

* **Slack**을 사용하면 Replit이 Slack 메시지와 스레드를 읽을 수 있습니다.
* **Google Drive**는 Replit에 파일 및 폴더에 대한 액세스 권한을 제공하며, Google Slides는 프레젠테이션을 지원합니다.
* **Salesforce**는 Replit에 CRM 데이터와 지원되는 작업에 대한 액세스 권한을 제공합니다.

커넥터 카탈로그에는 사용 중인 플랜에서 이용 가능한 서비스가 표시됩니다.

## 통합 연결하기

<Steps>
  <Step title="Integrations 열기">
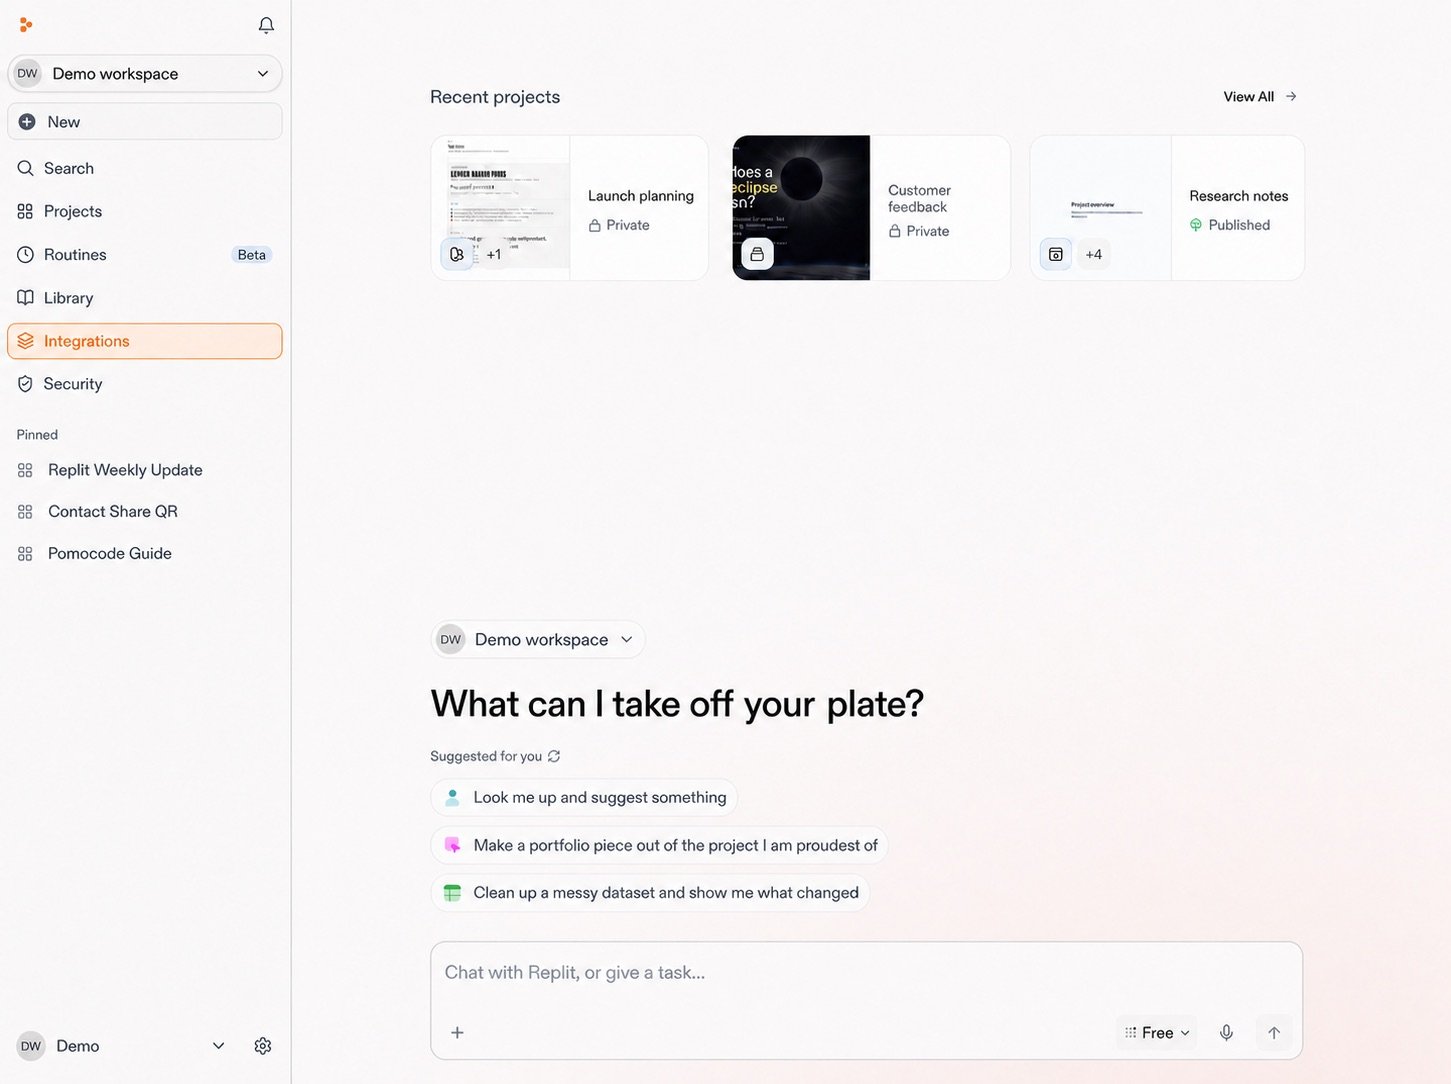
    Workspace에서 사이드바의 **Integrations**를 선택합니다.

    <Frame>
      <img src="https://mintcdn.com/replit/teDUL4A-lNO7dv1O/images/chat/integrations-open-from-workspace.jpg?fit=max&auto=format&n=teDUL4A-lNO7dv1O&q=85&s=c0febc56b64d0ae9223249a2f8bb7cf9" alt="왼쪽 사이드바에서 Integrations가 강조 표시된, 정보가 제거된 Replit Workspace 홈 화면" width="1451" height="1084" data-path="images/chat/integrations-open-from-workspace.jpg" />
    </Frame>
  </Step>

  <Step title="통합 선택">
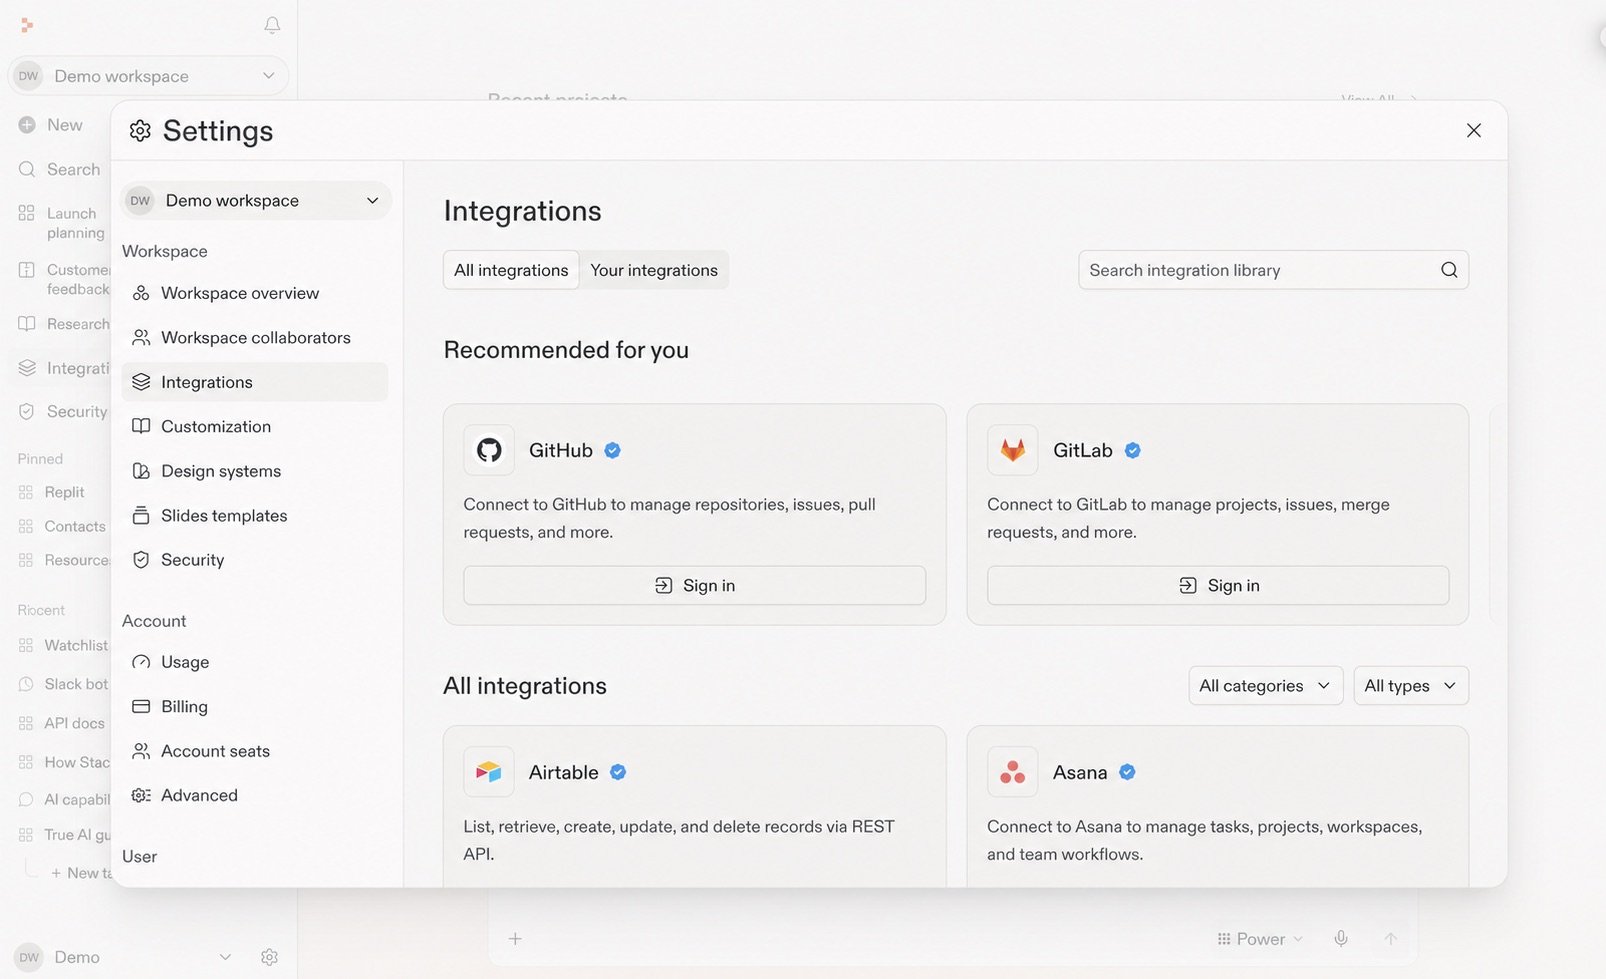
    통합 라이브러리를 탐색하거나 검색한 다음 필요한 서비스를 선택합니다.

    <Frame>
      <img src="https://mintcdn.com/replit/teDUL4A-lNO7dv1O/images/chat/integrations-library-sanitized.jpg?fit=max&auto=format&n=teDUL4A-lNO7dv1O&q=85&s=c7c02cdd6628fda3018d08ee7a05ab8f" alt="추천 및 사용 가능한 통합을 보여주는, 정보가 제거된 Replit 통합 라이브러리" width="1606" height="979" data-path="images/chat/integrations-library-sanitized.jpg" />
    </Frame>
  </Step>

  <Step title="연결하기">
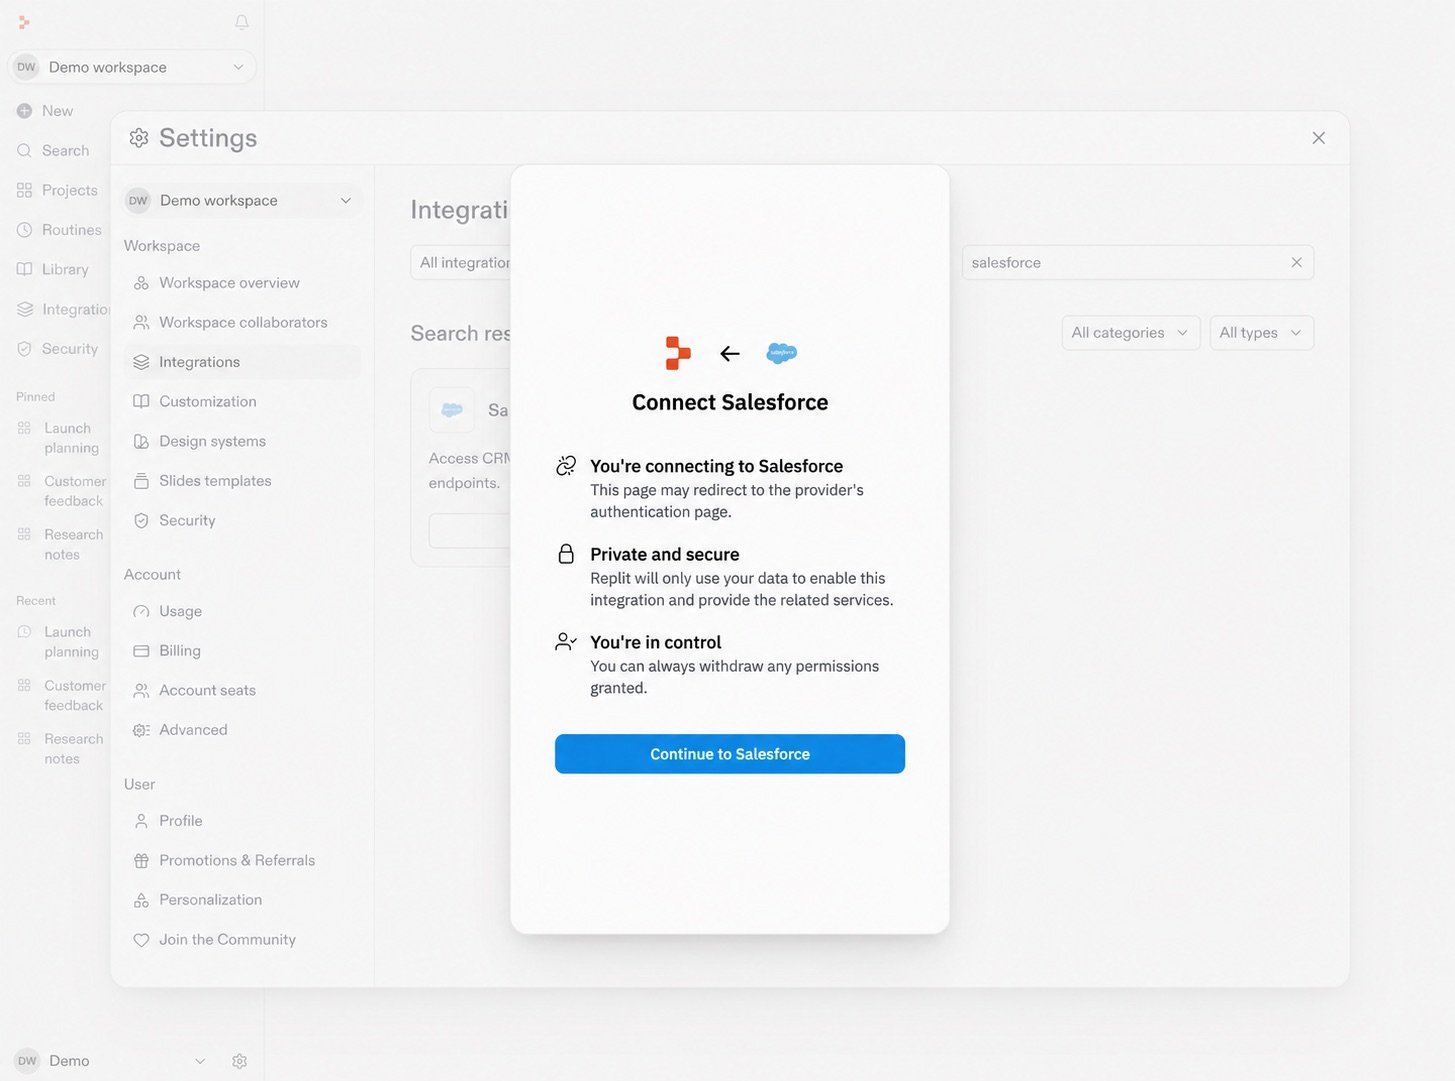
    통합이 액세스할 수 있는 항목을 검토한 다음, 프로바이더의 로그인 및 권한 부여 플로우를 계속 진행합니다. 여기서는 Salesforce를 예시로 보여줍니다. 다른 통합은 다를 수 있습니다.

    <Frame>
      <img src="https://mintcdn.com/replit/teDUL4A-lNO7dv1O/images/chat/salesforce-connect-permissions-sanitized.jpg?fit=max&auto=format&n=teDUL4A-lNO7dv1O&q=85&s=428570b45b627f40db0ba56dc4579254" alt="인증, 개인정보 보호, 권한, Continue to Salesforce 버튼을 설명하는, 정보가 제거된 Salesforce 연결 대화 상자" width="1455" height="1081" data-path="images/chat/salesforce-connect-permissions-sanitized.jpg" />
    </Frame>
  </Step>
</Steps>

프롬프트 박스에서 **plus** 메뉴를 선택한 다음 **Add an integration**을 선택할 수도 있습니다.

## 익숙한 도구로 시작하기

<section className="chat-mkt chat-workflow-grid has-visuals catalog-three-up">
  <a className="chat-example has-visual" href="/ko/features/integrations/overview#connectors">
    <div className="chat-use-case-visual palette-ink">
      <div className="chat-use-case-window">
        <b />

        <b />

        <b />
      </div>

      <div className="chat-use-case-icon">
        <img src="https://mintcdn.com/replit/ULLdJVk-FThFx3Hf/images/icons/slack.svg?fit=max&auto=format&n=ULLdJVk-FThFx3Hf&q=85&s=8d842525c111e3534251b55944402629" alt="" style={{ filter: "brightness(0) invert(1)" }} width="24" height="24" data-path="images/icons/slack.svg" />
      </div>
    </div>

    <span>
      <Icon icon="plug" size={19} />
    </span>

    <div className="chat-card-title">Slack</div>
    <p>대화와 스레드를 검색한 다음 그 컨텍스트를 작업에 활용하세요.</p>
    <div className="chat-card-link">커넥터 살펴보기 →</div>
  </a>

  <a className="chat-example has-visual" href="/ko/features/integrations/overview#connectors">
    <div className="chat-use-case-visual palette-blush">
      <div className="chat-use-case-window">
        <b />

        <b />

        <b />
      </div>

      <div className="chat-use-case-icon">
        <Icon icon="folder-open" size={24} />
      </div>
    </div>

    <span>
      <Icon icon="folder-open" size={19} />
    </span>

    <div className="chat-card-title">Google Drive</div>
    <p>관련 파일과 폴더를 Conversation의 컨텍스트로 가져오세요.</p>
    <div className="chat-card-link">커넥터 살펴보기 →</div>
  </a>

  <a className="chat-example has-visual" href="/ko/features/integrations/overview#connectors">
    <div className="chat-use-case-visual palette-stone">
      <div className="chat-use-case-window">
        <b />

        <b />

        <b />
      </div>

      <div className="chat-use-case-icon">
        <Icon icon="building" size={24} />
      </div>
    </div>

    <span>
      <Icon icon="building" size={19} />
    </span>

    <div className="chat-card-title">Salesforce</div>
    <p>Conversation에서 관련 고객 및 계정 정보를 활용하세요.</p>
    <div className="chat-card-link">커넥터 살펴보기 →</div>
  </a>
</section>

## 연결된 워크플로 살펴보기

<section className="chat-mkt chat-workflow-grid has-visuals">
  <a className="chat-example has-visual" href="/ko/use-cases/prepare-for-a-customer-call">
    <div className="chat-use-case-visual palette-blush">
      <div className="chat-use-case-window">
        <i />

        <i />

        <i />

        <b />

        <b />

        <b />
      </div>

      <em>
        <Icon icon="chart-line" size={24} />
      </em>
    </div>

    <div className="chat-example-tag">조사 및 분석</div>

    <div className="chat-card-title" style={{ marginTop: 11, fontSize: 20 }}>
      고객 통화 준비하기
    </div>

    <p>Salesforce, Slack, Google Drive의 컨텍스트를 하나로 모으세요.</p>
    <div className="chat-card-link">사용 사례 살펴보기 →</div>
  </a>
</section>

## MCP를 이용한 커스텀 통합

네이티브 통합은 Replit의 커넥터 카탈로그에서 지원되는 서비스 연결입니다. 지원되지 않는 서비스가 있다면 커스텀 MCP를 만들어 Replit에 통합으로 추가할 수 있습니다.

[MCP를 통한 연결 방법 알아보기.](/ko/chat/connect-through-mcp)

커넥터 유형, 가용성, 설정, 지원되는 서비스, 권한에 대해서는 [Integrations 기능 가이드](/ko/features/integrations/overview)를 따르세요.

Conversation에 충분한 컨텍스트가 쌓여 본격적인 작업이 가능해지면, [이를 Project로 전환하는 방법](/ko/chat/continue-or-create-a-project)을 알아보세요.