> ## Documentation Index
> Fetch the complete documentation index at: https://docs.replit.com/llms.txt
> Use this file to discover all available pages before exploring further.
# SAML
> Set up SAML single sign-on for your Replit Enterprise Organization directly from your workspace settings, including IdP configuration and email domain claims.
## Introduction
Only organizations with an Enterprise plan are able to use SAML SSO. You can [purchase the Enterprise plan directly from the pricing page](https://replit.com/pricing) or [contact us](https://replit.com/teams#inlineForm) for a guided walkthrough.
[SAML](https://en.wikipedia.org/wiki/Security_Assertion_Markup_Language) SSO lets you use your Identity Provider (IdP) to authenticate users logging into replit.com. Users in your Organization are redirected to your IdP to authenticate, and your IdP returns a response to Replit that verifies the user's identity and signs them in.
Enterprise admins can configure SAML SSO directly from **Enterprise settings → Authentication** without contacting Replit. The wizard generates your Service Provider (SP) values, accepts your IdP credentials, and provisions SSO automatically. The same self-serve flow is used at sign-up when you purchase the Enterprise plan online, so you'll be guided through SSO setup as part of onboarding.
## Set up SAML SSO
 The setup wizard takes you through five steps. You'll need admin access to both your Replit Organization and your Identity Provider.
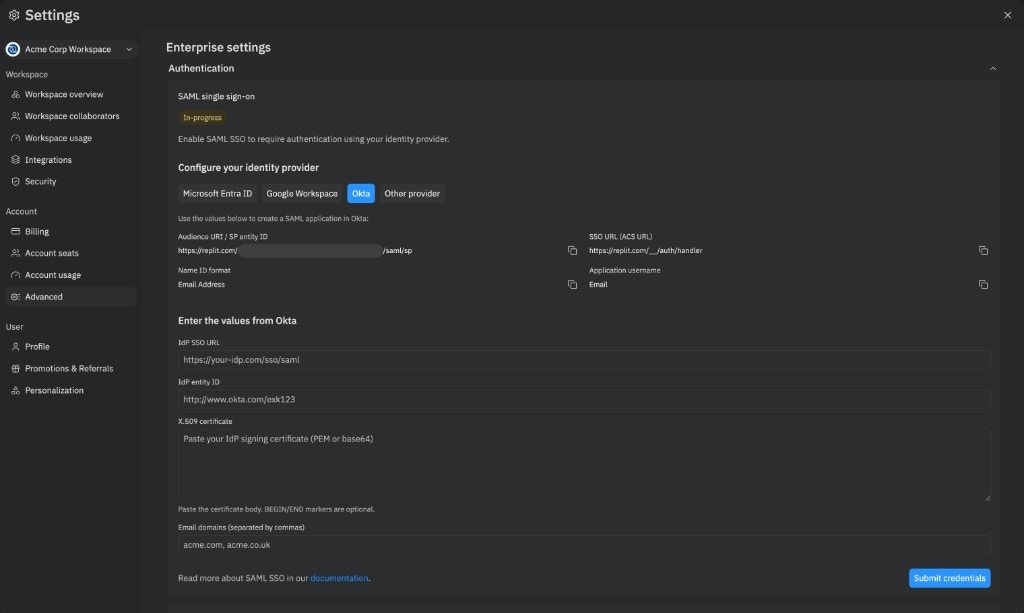
Open the workspace switcher, choose your Enterprise workspace, and open **Settings**. Select **Advanced**, expand the **Authentication** section, and click **Enable SSO** on the **SAML single sign-on** card.
The status pill changes to **In-progress** and the wizard reveals the values you need for your IdP.
Select your IdP under **Configure your identity provider**:
* **Microsoft Entra ID**
* **Google Workspace**
* **Okta**
* **Other provider**
Each option tailors the field labels and provides a deep link to your IdP's admin console so you can create the SAML application in a new tab.
In your IdP's admin console, create a new SAML application using the values shown by Replit:
| Field | Value |
| --------------------------- | ---------------------------------------------------------------------------------------------------------------------- |
| Audience URI / SP entity ID | Copy the value shown in the wizard (unique to your Organization, in the form `https://replit.com//saml/sp`) |
| SSO URL (ACS URL) | `https://replit.com/__/auth/handler` |
| Name ID format | Email Address |
| Application username | Email |
Once the SAML application is created in your IdP, copy the following values back into the **Enter the values from your provider** section in Replit:
* **IdP SSO URL** — the URL Replit redirects users to when authenticating.
* **IdP entity ID** — identifies your IdP to Replit.
* **X.509 certificate** — the IdP signing certificate in PEM or base64. `BEGIN/END` markers are optional.
* **Email domains** — comma-separated list of the domains your users sign in with (for example, `acme.com, acme.co.uk`). Include all aliases and subdomains your IdP may report.
Click **Submit credentials**. Replit synchronously validates the URL, parses the certificate (rejecting expired or not-yet-valid certificates), and verifies the claimed email domains. Each domain must match the email of at least one billing admin on your Organization, and public domains (such as `gmail.com`) cannot be claimed.
The status pill changes to **Provisioning…** while Replit creates the underlying SAML tenant. This usually takes about a minute. When it completes, the status pill becomes **Active** and your Organization can sign in with SSO.
If provisioning fails, the status pill becomes **Setup failed** and Replit automatically cleans up any partial state. Click **Try again** to restart the wizard.
## Choose your email domains
You can claim multiple email domains and subdomains for your Organization. Any user that attempts to sign up with an email domain that matches your claimed domain is required to use SAML SSO. Your claimed domains should match what your IdP reports for your users. If you use email domain aliases, include them as well to prevent users from signing up without using SSO.
For example, if your company uses email domains matching `acmeco.com`, `foo.acmeco.com`, and `acmebiz.com`, claim all three when you submit credentials.
Replit validates each claimed domain against the email addresses of your admins. To add or remove domains after activation, edit the **Email domains** field on the **Authentication** card. To claim a domain that doesn't match an existing admin's email, contact [support@replit.com](mailto:support@replit.com).
## Using SAML SSO
Signing up with SAML doesn't automatically invite users to your Organization. For automated user management and bulk operations, see [SCIM](/teams/identity-and-access-management/scim) instead.
Once SAML SSO is **Active**, your users can log in to [replit.com](https://replit.com) using the **Continue with SSO** button.
## FAQ
### What happens to users who already have accounts on replit.com before SAML SSO was set up?
Once SAML SSO is enabled for your Organization, all users with claimed SSO email domains are required to use SSO to log in. Existing users can no longer use their previous authentication methods (email or social login) if their email matches the SSO domain. They aren't automatically added to your Organization.
### Are users automatically deprovisioned in Replit when my IdP removes access?
No, SAML SSO only handles authentication. For automated user provisioning and deprovisioning, you can use [SCIM](/teams/identity-and-access-management/scim) integration, which is available for Enterprise customers. SCIM lets you sync your IdP's directory to automatically manage user roles and provisioning.
### Are Organization seats automatically consumed when users are given access in our IdP?
No, seats are only consumed once a user accepts the invitation to your Organization.
### What if SAML setup fails?
The wizard reports the failure with a **Setup failed** pill, and Replit automatically rolls back any partial provisioning. Click **Try again** to restart the wizard, double-check your IdP values, and resubmit credentials. If the error persists, contact your account manager.
### How do I disable SAML SSO?
Self-service disable isn't supported yet. Contact your account manager to turn off SSO for your Organization. You can still self-serve edits to claimed email domains from the **Authentication** card after activation.
## Related Resources
Learn about automating user management with SCIM integration
Understand how to manage user roles and access
The setup wizard takes you through five steps. You'll need admin access to both your Replit Organization and your Identity Provider.
Open the workspace switcher, choose your Enterprise workspace, and open **Settings**. Select **Advanced**, expand the **Authentication** section, and click **Enable SSO** on the **SAML single sign-on** card.
The status pill changes to **In-progress** and the wizard reveals the values you need for your IdP.
Select your IdP under **Configure your identity provider**:
* **Microsoft Entra ID**
* **Google Workspace**
* **Okta**
* **Other provider**
Each option tailors the field labels and provides a deep link to your IdP's admin console so you can create the SAML application in a new tab.
In your IdP's admin console, create a new SAML application using the values shown by Replit:
| Field | Value |
| --------------------------- | ---------------------------------------------------------------------------------------------------------------------- |
| Audience URI / SP entity ID | Copy the value shown in the wizard (unique to your Organization, in the form `https://replit.com//saml/sp`) |
| SSO URL (ACS URL) | `https://replit.com/__/auth/handler` |
| Name ID format | Email Address |
| Application username | Email |
Once the SAML application is created in your IdP, copy the following values back into the **Enter the values from your provider** section in Replit:
* **IdP SSO URL** — the URL Replit redirects users to when authenticating.
* **IdP entity ID** — identifies your IdP to Replit.
* **X.509 certificate** — the IdP signing certificate in PEM or base64. `BEGIN/END` markers are optional.
* **Email domains** — comma-separated list of the domains your users sign in with (for example, `acme.com, acme.co.uk`). Include all aliases and subdomains your IdP may report.
Click **Submit credentials**. Replit synchronously validates the URL, parses the certificate (rejecting expired or not-yet-valid certificates), and verifies the claimed email domains. Each domain must match the email of at least one billing admin on your Organization, and public domains (such as `gmail.com`) cannot be claimed.
The status pill changes to **Provisioning…** while Replit creates the underlying SAML tenant. This usually takes about a minute. When it completes, the status pill becomes **Active** and your Organization can sign in with SSO.
If provisioning fails, the status pill becomes **Setup failed** and Replit automatically cleans up any partial state. Click **Try again** to restart the wizard.
## Choose your email domains
You can claim multiple email domains and subdomains for your Organization. Any user that attempts to sign up with an email domain that matches your claimed domain is required to use SAML SSO. Your claimed domains should match what your IdP reports for your users. If you use email domain aliases, include them as well to prevent users from signing up without using SSO.
For example, if your company uses email domains matching `acmeco.com`, `foo.acmeco.com`, and `acmebiz.com`, claim all three when you submit credentials.
Replit validates each claimed domain against the email addresses of your admins. To add or remove domains after activation, edit the **Email domains** field on the **Authentication** card. To claim a domain that doesn't match an existing admin's email, contact [support@replit.com](mailto:support@replit.com).
## Using SAML SSO
Signing up with SAML doesn't automatically invite users to your Organization. For automated user management and bulk operations, see [SCIM](/teams/identity-and-access-management/scim) instead.
Once SAML SSO is **Active**, your users can log in to [replit.com](https://replit.com) using the **Continue with SSO** button.
## FAQ
### What happens to users who already have accounts on replit.com before SAML SSO was set up?
Once SAML SSO is enabled for your Organization, all users with claimed SSO email domains are required to use SSO to log in. Existing users can no longer use their previous authentication methods (email or social login) if their email matches the SSO domain. They aren't automatically added to your Organization.
### Are users automatically deprovisioned in Replit when my IdP removes access?
No, SAML SSO only handles authentication. For automated user provisioning and deprovisioning, you can use [SCIM](/teams/identity-and-access-management/scim) integration, which is available for Enterprise customers. SCIM lets you sync your IdP's directory to automatically manage user roles and provisioning.
### Are Organization seats automatically consumed when users are given access in our IdP?
No, seats are only consumed once a user accepts the invitation to your Organization.
### What if SAML setup fails?
The wizard reports the failure with a **Setup failed** pill, and Replit automatically rolls back any partial provisioning. Click **Try again** to restart the wizard, double-check your IdP values, and resubmit credentials. If the error persists, contact your account manager.
### How do I disable SAML SSO?
Self-service disable isn't supported yet. Contact your account manager to turn off SSO for your Organization. You can still self-serve edits to claimed email domains from the **Authentication** card after activation.
## Related Resources
Learn about automating user management with SCIM integration
Understand how to manage user roles and access