> ## Documentation Index
> Fetch the complete documentation index at: https://docs.replit.com/llms.txt
> Use this file to discover all available pages before exploring further.
# Custom Templates
> Set up and manage custom templates on Replit Enterprise to standardize how your organization builds with Agent.
## Getting started
Replit is a cloud development environment capable of writing and running any framework or stack. To build a custom template, there are two recommended paths:
1. **[Import](https://replit.com/import) from a Git provider** — Import your existing starter stack (or one matching your preferences) from GitHub, GitLab, or Bitbucket.
2. **Fork the Blank template** — Fork the [Blank template](https://replit.com/@replit/Nothing?v=1) to start from scratch with a completely empty development environment.
Customers have successfully built templates matching Rust, Python, Java, C++, and many other stacks — if it runs at all, it can run on Replit.
We recommend working with Replit's **Field Engineering team** when building your first templates. They have extensive experience setting up custom templates across a wide range of stacks and are available to help. Reach out to your Account Executive to get connected.
Custom templates let Enterprise admins create pre-configured starting points that appear directly in the Agent input box for every member of your organization. When a builder selects a custom template, Agent forks it and uses the template's configuration, instructions, and skills to guide all subsequent work. No extra setup required.
Custom templates are available exclusively on the **Enterprise** plan. Only org admins can pin and manage templates.
## How custom templates work
A custom template is a standard Replit App in your organization that has been **pinned to the Agent input box**. When a builder selects it:
1. Agent creates a new app by forking the template (all files are copied)
2. Agent skips the planning phase and goes straight to building
3. The template's `custom_instruction/instructions.md` file is injected into Agent's context
4. Custom [skills](/references/agent/skills) from `.agents/skills/` are discovered and made available
5. The [`replit.md`](/references/project-setup/replit-dot-md) file provides ongoing project context
This means your organization's standards, patterns, and tooling are baked in from the very first interaction.
## Template file structure
Here is the recommended layout for a custom template:
```
my-template/
├── .replit # App configuration (run commands, ports, modules)
├── replit.md # Agent memory: project overview and preferences
├── custom_instruction/
│ └── instructions.md # Company instructions injected into Agent's prompt
├── .agents/
│ └── skills/
│ └── my-skill/
│ └── SKILL.md # Custom skills Agent can invoke on demand
└── ... # The rest of your repo structure
```
Each file serves a distinct purpose. The sections below walk through how to configure each one.
## Set up a custom template
### Create the base app
Create a new Replit App in your organization. Set up the project with all the files, dependencies, and configuration your builders need as a starting point. This includes:
* Source code scaffolding (components, utilities, config files)
* Pre-installed dependencies (`package.json`, `requirements.txt`, etc.)
* Environment configuration in the [`.replit` file](/replit-app/configuration)
### Configure shared secrets
If your template relies on API keys, tokens, or other credentials, add them to the template's **Secrets** (under the Tools pane) before pinning. When a builder creates a new app from the template, all secrets are copied into the new app automatically, so builders can start working without configuring credentials themselves.
Document every secret in `custom_instruction/instructions.md` (or in a dedicated skill) so builders know what is available and what each key is used for.
Secrets are copied at fork time, not dynamically synced. If you rotate a key or add a new secret to the template, existing apps that were previously forked are not updated. Builders must add or update secrets manually in those apps.
### Write custom instructions
Create a file at `custom_instruction/instructions.md` in the project root. This is the most important file in your template — it tells Agent how your organization builds software.
The folder name must be `custom_instruction` (singular), not `custom_instructions`.
Agent injects this file directly into its system prompt with a preamble that frames it as company-provided guidance. Write it in Markdown and include:
* **Architecture patterns**: How your apps should be structured
* **Coding standards**: Naming conventions, file organization rules, linting expectations
* **Component usage**: Which libraries and components to use (and which to avoid)
* **API patterns**: How to call your backend services, handle authentication, manage errors
* **Testing requirements**: What tests are expected and how to run them
* **Deployment guidelines**: Environment-specific configuration and deploy workflows
````markdown theme={null}
# Company Engineering Standards
## Architecture
All web applications use React with TypeScript. Use functional components
with hooks exclusively. State management uses Zustand for local state
and React Query for server state.
## Component Library
Use our internal design system package `@acme/ui`. Never use raw HTML
elements for buttons, inputs, forms, or modals — always use the
corresponding component from `@acme/ui`.
Import components like this:
```tsx
import { Button, TextField, Modal } from '@acme/ui';
```
## API Integration
All API calls go through the `@acme/api-client` package. Never use
raw fetch or axios directly. Authentication is handled automatically
by the client.
## Testing
Every component must have a corresponding test file. Use Vitest
for unit tests and Playwright for integration tests.
````
**Size limit**: Content is soft-limited to approximately 25 KB. Content beyond this limit may be progressively truncated. As your instructions grow, move detailed reference material into [skills](/references/agent/skills) in `.agents/skills/` rather than keeping everything in `instructions.md`. Skills are loaded on demand when relevant, so they do not count against the instruction size limit and keep your main instructions focused on high-level rules.
### Add custom skills
Create skills in the `.agents/skills/` directory for specialized workflows that Agent should follow. Each skill is a directory containing a `SKILL.md` file with YAML frontmatter.
```
.agents/skills/
├── use-design-system/
│ └── SKILL.md
├── api-integration/
│ └── SKILL.md
└── run-tests/
└── SKILL.md
```
Each `SKILL.md` needs a `name` and `description` in its frontmatter:
```markdown theme={null}
---
name: use-design-system
description: Use when building UI components. Provides component patterns, theming rules, and accessibility requirements for the Acme design system.
---
# Acme Design System
## Available components
- `Button` — Primary, secondary, and ghost variants
- `TextField` — Text input with validation support
- `Modal` — Dialog overlay with focus trapping
...
```
| Field | Required | Details |
| ------------- | -------- | ----------------------------------------------------------------------- |
| `name` | Yes | Max 64 characters. Lowercase letters, numbers, and hyphens only. |
| `description` | Yes | Max 1,024 characters. Describes what the skill does and when to use it. |
| `enabled` | No | Defaults to `true`. Set to `false` to disable without deleting. |
**How skills load**: Agent sees only the `name` and `description` in its prompt. It reads the full `SKILL.md` content on demand when the skill is relevant to the current task. This means the `description` is critical — write it to match the scenarios where Agent should use the skill.
Skills can also include supporting files alongside `SKILL.md`:
```
.agents/skills/use-design-system/
├── SKILL.md
├── references/
│ └── component-api.md
└── assets/
└── theme-tokens.json
```
For more about skills, see [Agent Skills](/references/agent/skills) and [Use a skill](/build/use-agent-skills).
### Configure replit.md
Pre-populate `replit.md` in the project root with your template's architecture overview. This file is always loaded into Agent's context and serves as ongoing project memory.
The file should have these four sections:
```markdown theme={null}
# Overview
Task management application built with React, TypeScript, and the Acme
design system. Uses Express.js backend with PostgreSQL.
# User Preferences
- Use TypeScript for all files
- Prefer functional components with hooks
- Follow Acme coding standards
# System Architecture
- Frontend: React + TypeScript + @acme/ui
- Backend: Express.js + TypeScript
- Database: PostgreSQL with Drizzle ORM
- Auth: Acme SSO via @acme/auth
# External Dependencies
- @acme/ui: Internal design system
- @acme/api-client: API integration layer
- @acme/auth: Authentication SDK
```
Agent updates `replit.md` as the project evolves. If the file grows beyond approximately 4,000 tokens, Agent automatically summarizes it to keep it focused and useful.
For more details, see [replit.md](/references/project-setup/replit-dot-md).
### Pin the template to your organization
Once your template is ready:
1. Navigate to the template app in your organization
2. Open the app's action menu (three-dot menu)
3. Select **Pin to Agent input box**
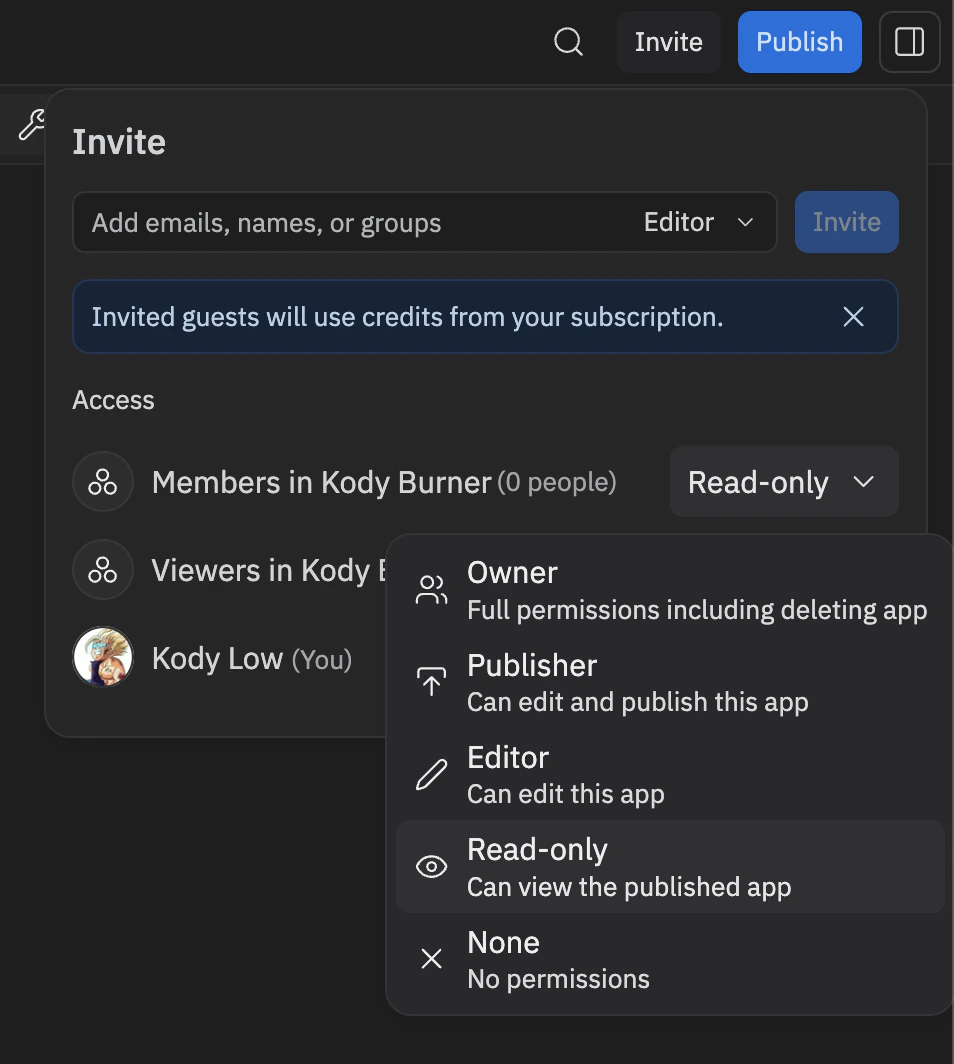
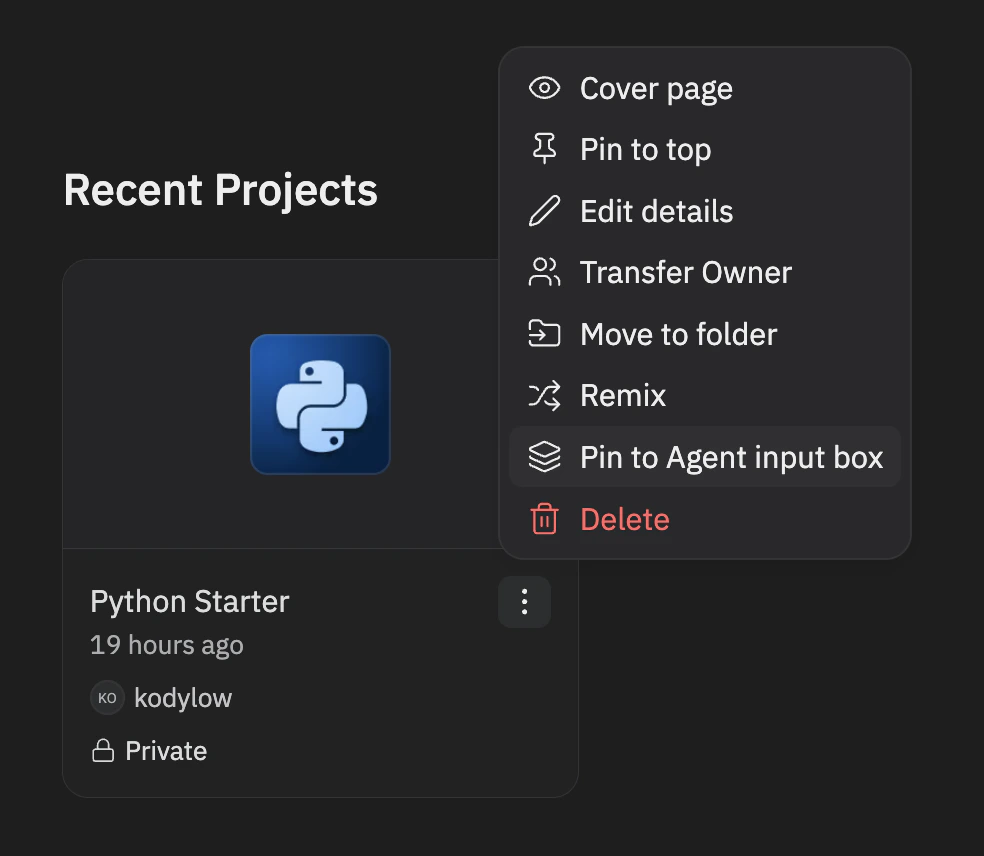 Only org admins (members of the `system_admins` role) can pin and unpin templates.
Set member access to **Read-only** so that members can see and use the pinned template without being able to edit it.
Only org admins (members of the `system_admins` role) can pin and unpin templates.
Set member access to **Read-only** so that members can see and use the pinned template without being able to edit it.
 The template now appears as a selectable pill below the Agent input box for every member of your organization. To remove it, open the same menu and select **Unpin from Agent input box**.
### Control template access
Pinning makes a template visible to every org member. For more targeted distribution, use the **Invite** button on the template app to share it with specific [Groups or individual users](/teams/identity-and-access-management/groups-and-permissions). This lets you limit which teams or people can see and fork the template while keeping it unpinned from the org-wide input box.
## What happens when a builder selects a template
The template now appears as a selectable pill below the Agent input box for every member of your organization. To remove it, open the same menu and select **Unpin from Agent input box**.
### Control template access
Pinning makes a template visible to every org member. For more targeted distribution, use the **Invite** button on the template app to share it with specific [Groups or individual users](/teams/identity-and-access-management/groups-and-permissions). This lets you limit which teams or people can see and fork the template while keeping it unpinned from the org-wide input box.
## What happens when a builder selects a template
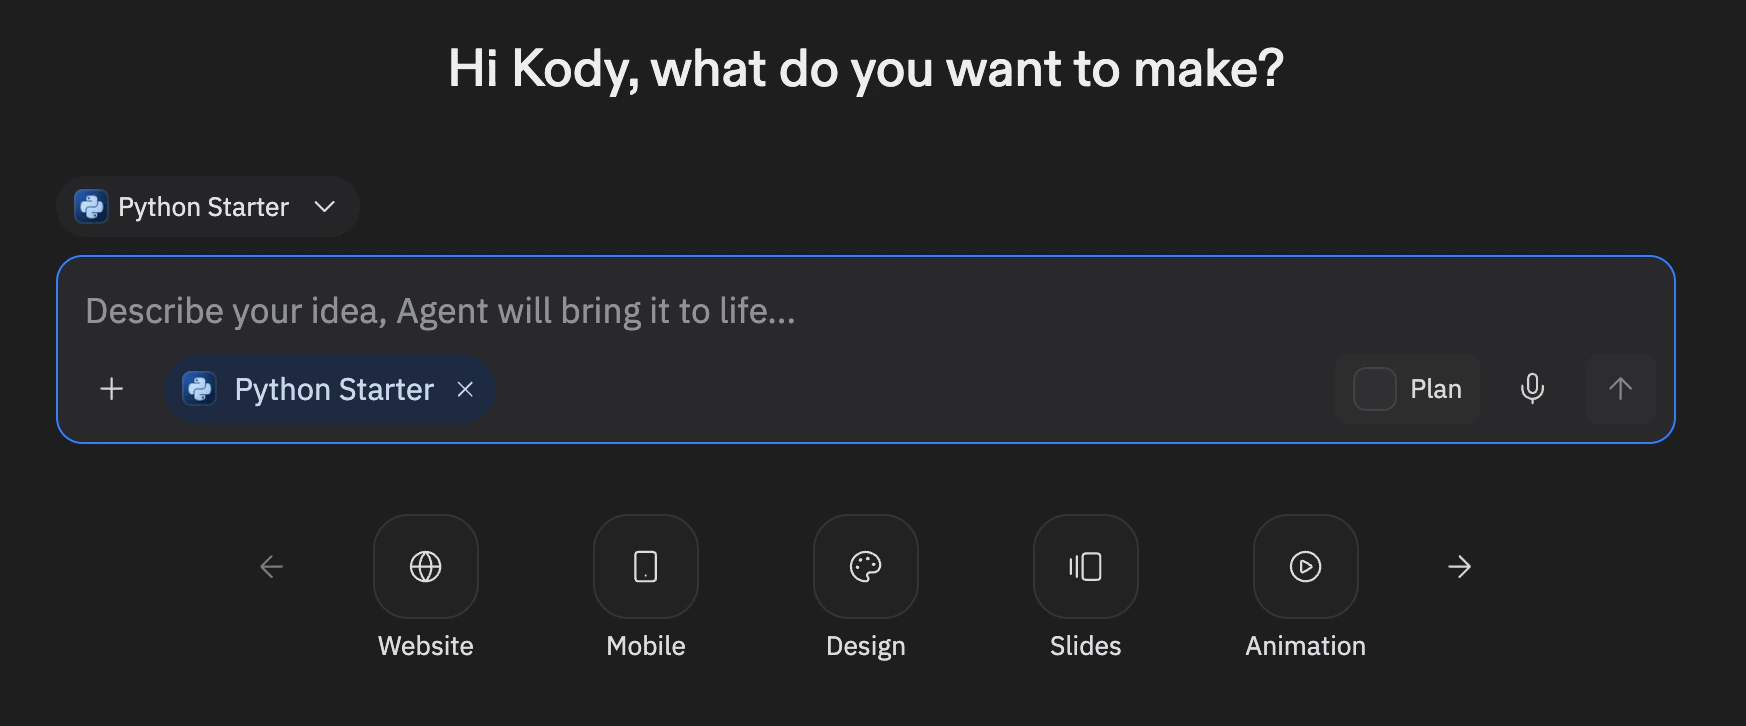 When an org member picks a pinned template from the Agent input box:
1. **Fork**: A new app is created as a copy of the template, with all files included
2. **Skip planning**: Agent bypasses the initial planning conversation and goes directly into building mode
3. **Load instructions**: `custom_instruction/instructions.md` is read and injected into Agent's system prompt as company-provided guidance
4. **Discover skills**: Skills in `.agents/skills/` are identified and listed in Agent's context for on-demand loading
5. **Load project context**: `replit.md` is read and injected into Agent's context (or auto-generated if missing)
6. **Inherit configuration**: The `.replit` file, dependencies, and all template files carry over to the new app
The builder can immediately start prompting Agent with their specific requirements, and Agent operates within the guardrails established by the template.
## How files work together
Each configuration file serves a distinct role:
| File | Purpose | When Agent reads it | Mutable by Agent |
| ------------------------------------ | ---------------------------------- | ------------------------------------ | --------------------------------- |
| `custom_instruction/instructions.md` | Organization standards and rules | Always (injected into system prompt) | No |
| `.agents/skills/*/SKILL.md` | Specialized workflows and patterns | On demand (when relevant) | Yes (Agent can create skills too) |
| `replit.md` | Project overview and preferences | Always (injected into system prompt) | Yes (Agent updates it over time) |
| `.replit` | Runtime configuration | When configuring the app | Yes |
**Key distinction**: `custom_instruction/instructions.md` is your static, authoritative source for organizational standards. `replit.md` is the living document that Agent maintains as the project evolves. Skills are on-demand reference material for specific workflows.
## Best practices
### Keep instructions focused
Write `custom_instruction/instructions.md` for the patterns that matter most. Focus on:
* Decisions that are hard to reverse (architecture, data models)
* Patterns that must be consistent (component usage, API conventions)
* Standards the builder might not know about (internal libraries, team conventions)
Avoid including changelogs, implementation details, or information that changes frequently.
### Write discoverable skill descriptions
The `description` field in `SKILL.md` frontmatter is what Agent uses to decide when to load a skill. Write descriptions that match the tasks where the skill is relevant:
```yaml theme={null}
# Good — describes when to use it
description: Use when building forms or handling user input. Provides validation patterns, error display conventions, and accessible form layouts.
# Less effective — too vague
description: Form utilities and helpers.
```
### Organize skills by workflow
Group skills around workflows rather than technical categories:
| Approach | Example |
| --------------------- | -------------------------------------------- |
| **By workflow** | `build-a-form`, `connect-to-api`, `add-auth` |
| **By technical area** | `react-utils`, `api-helpers`, `auth-config` |
The workflow approach helps Agent discover skills at the right moment.
### Iterate on your template
Templates improve with use. After your team starts building with a template:
1. Watch for patterns Agent gets wrong and add them to `instructions.md`
2. Create new skills when Agent solves a problem well — capture the solution
3. Update base dependencies and configurations as your stack evolves
4. Test changes by creating a new app from the template to verify the experience
### Template updates and existing apps
Changes to the template app are reflected in **new** apps created from it. Existing apps that were previously forked from the template are independent copies and do not receive updates.
## Related resources
* [Agent Skills](/references/agent/skills) — Learn how skills work and how to create them
* [Use a skill](/build/use-agent-skills) — Hands-on guide to using and building skills
* [replit.md](/references/project-setup/replit-dot-md) — Customize Agent's behavior with project-level context
* [Design Systems](/teams/custom-design-system) — Set up your organization's design system for Agent
* [App configuration](/replit-app/configuration) — Configure your `.replit` file
* [Developer Frameworks](/replit-workspace/templates) — Community templates and how to publish them
* [Enterprise overview](/category/teams) — Learn about Enterprise features
When an org member picks a pinned template from the Agent input box:
1. **Fork**: A new app is created as a copy of the template, with all files included
2. **Skip planning**: Agent bypasses the initial planning conversation and goes directly into building mode
3. **Load instructions**: `custom_instruction/instructions.md` is read and injected into Agent's system prompt as company-provided guidance
4. **Discover skills**: Skills in `.agents/skills/` are identified and listed in Agent's context for on-demand loading
5. **Load project context**: `replit.md` is read and injected into Agent's context (or auto-generated if missing)
6. **Inherit configuration**: The `.replit` file, dependencies, and all template files carry over to the new app
The builder can immediately start prompting Agent with their specific requirements, and Agent operates within the guardrails established by the template.
## How files work together
Each configuration file serves a distinct role:
| File | Purpose | When Agent reads it | Mutable by Agent |
| ------------------------------------ | ---------------------------------- | ------------------------------------ | --------------------------------- |
| `custom_instruction/instructions.md` | Organization standards and rules | Always (injected into system prompt) | No |
| `.agents/skills/*/SKILL.md` | Specialized workflows and patterns | On demand (when relevant) | Yes (Agent can create skills too) |
| `replit.md` | Project overview and preferences | Always (injected into system prompt) | Yes (Agent updates it over time) |
| `.replit` | Runtime configuration | When configuring the app | Yes |
**Key distinction**: `custom_instruction/instructions.md` is your static, authoritative source for organizational standards. `replit.md` is the living document that Agent maintains as the project evolves. Skills are on-demand reference material for specific workflows.
## Best practices
### Keep instructions focused
Write `custom_instruction/instructions.md` for the patterns that matter most. Focus on:
* Decisions that are hard to reverse (architecture, data models)
* Patterns that must be consistent (component usage, API conventions)
* Standards the builder might not know about (internal libraries, team conventions)
Avoid including changelogs, implementation details, or information that changes frequently.
### Write discoverable skill descriptions
The `description` field in `SKILL.md` frontmatter is what Agent uses to decide when to load a skill. Write descriptions that match the tasks where the skill is relevant:
```yaml theme={null}
# Good — describes when to use it
description: Use when building forms or handling user input. Provides validation patterns, error display conventions, and accessible form layouts.
# Less effective — too vague
description: Form utilities and helpers.
```
### Organize skills by workflow
Group skills around workflows rather than technical categories:
| Approach | Example |
| --------------------- | -------------------------------------------- |
| **By workflow** | `build-a-form`, `connect-to-api`, `add-auth` |
| **By technical area** | `react-utils`, `api-helpers`, `auth-config` |
The workflow approach helps Agent discover skills at the right moment.
### Iterate on your template
Templates improve with use. After your team starts building with a template:
1. Watch for patterns Agent gets wrong and add them to `instructions.md`
2. Create new skills when Agent solves a problem well — capture the solution
3. Update base dependencies and configurations as your stack evolves
4. Test changes by creating a new app from the template to verify the experience
### Template updates and existing apps
Changes to the template app are reflected in **new** apps created from it. Existing apps that were previously forked from the template are independent copies and do not receive updates.
## Related resources
* [Agent Skills](/references/agent/skills) — Learn how skills work and how to create them
* [Use a skill](/build/use-agent-skills) — Hands-on guide to using and building skills
* [replit.md](/references/project-setup/replit-dot-md) — Customize Agent's behavior with project-level context
* [Design Systems](/teams/custom-design-system) — Set up your organization's design system for Agent
* [App configuration](/replit-app/configuration) — Configure your `.replit` file
* [Developer Frameworks](/replit-workspace/templates) — Community templates and how to publish them
* [Enterprise overview](/category/teams) — Learn about Enterprise features