> ## Documentation Index
> Fetch the complete documentation index at: https://docs.replit.com/llms.txt
> Use this file to discover all available pages before exploring further.
# 디자인 시스템 설정하기
> 조직의 디자인 시스템(컴포넌트 라이브러리, 브랜드 에셋, 디자인 토큰, 시각적 표준)을 Agent에 설정하여 모든 앱, 사이트, 아티팩트가 디자인 언어를 따르도록 하세요.
디자인 시스템은 Agent에게 Replit에서 조직이 만드는 모든 것(웹 앱, 모바일 앱, 슬라이드, 기타 아티팩트)에 걸쳐 브랜드에 맞는 UI를 구축하는 데 필요한 지식을 제공합니다. 표준 Replit pnpm 모노레포 내에 컴포넌트 라이브러리, 디자인 토큰, 브랜드 에셋, 사용 규칙을 설정하면 Agent가 첫 번째 프롬프트부터 시각적 언어를 적용합니다.
디자인 시스템은 **Enterprise** 플랜에서만 사용 가능합니다. 조직 관리자만 디자인 시스템을 설정하고 관리할 수 있습니다.
## 디자인 시스템을 설정하는 이유
디자인 시스템 없이는 모든 빌더가 컴포넌트 라이브러리, 색상 토큰, 레이아웃 규칙을 Agent에게 수동으로 설명해야 합니다. 디자인 시스템을 설정하면 다음과 같은 방식으로 이 문제를 해결합니다:
* **시각적 표준 인코딩**: Agent가 일반적인 기본값이 아닌 정확한 컴포넌트, 색상, 간격을 사용합니다.
* **일관성 보장**: 모든 앱이 동일한 디자인 언어를 따릅니다.
* **온보딩 시간 단축**: 새 빌더가 즉시 브랜드에 맞는 결과물을 만들어냅니다.
* **암묵적 지식 포착**: 팀원들의 머릿속에 있는 디자인 결정과 컴포넌트 사용 패턴이 Agent를 위해 문서화됩니다.
## 필요한 것
* tarfile 또는 tarfile 세트로 패키지된 프론트엔드 코드 컴포넌트 라이브러리
* 디자인 시스템에서 사용하는 폰트 에셋과 아이콘
* 디자인 시스템에 대한 AI 문서 (MCP, Agent Skills)
## 설정 가능한 항목
디자인 시스템 설정은 세 가지 부분으로 구성됩니다:
1. **커스텀 지침**. `custom_instruction/instructions.md` 파일은 모든 프로젝트에 적용되는 고수준 규칙을 Agent에게 제공합니다: 사용할 컴포넌트 라이브러리, 참조할 디자인 토큰, 따를 패턴. Agent는 항상 이 파일을 컨텍스트로 갖습니다.
2. **Skills**. `.agents/skills/`의 Skills는 Agent가 필요에 따라 로드하는 상세 참조 자료를 제공합니다. 컴포넌트 API 문서, 테마 가이드, 레이아웃 패턴 라이브러리, 기타 메인 지침 파일에 넣기에는 너무 큰 심층 참조 콘텐츠에 사용하세요.
3. **디자인 및 브랜드 에셋**. 로고, 아이콘, 폰트 및 기타 브랜드 에셋을 전용 폴더(예: `src/assets/brand/`)에 배치하세요. `@brand/logo.svg`와 같은 깔끔한 임포트로 참조할 수 있도록 Vite 경로 별칭을 설정하여 취약한 상대 경로 대신 일관된 에셋 참조를 유지하세요.
## 단계별 가이드
이 가이드는 tarfile로 패키지된 기존 컴포넌트 라이브러리를 사용하여 디자인 시스템을 처음부터 끝까지 설정하는 방법을 안내합니다:
1. **새 Replit 앱을 만들고** tarfile을 업로드하세요.
2. **Replit Agent에게 패키지를 설치하고 모든 컴포넌트를 표시하도록 지시하세요.** Agent가 프로젝트를 설정하고 컴포넌트 라이브러리를 렌더링합니다.
3. **출력물을 검토하세요.** 모든 컴포넌트가 올바르게 보이고 기대에 부합하는지 확인하세요. 모든 것이 확인되면 [디자인 시스템 스킬 만들기](#creating-the-design-system-skill)로 진행하세요.
### 디자인 시스템 스킬 만들기
컴포넌트가 준비되면 마지막 단계는 Agent가 모든 프로젝트에서 컴포넌트, 토큰, 사용 패턴을 참조할 수 있도록 디자인 시스템 스킬을 만드는 것입니다.
아래 프롬프트 전체를 복사하여 Agent에 붙여넣으세요. ``을 디자인 시스템 이름으로 교체하세요:
````
Create a `` design system skill from the components and packages in this project.
Use the file structure shown below with a `SKILL.md` at the root, a `references/` directory for guides and component docs, and a `packages/` directory containing all dependencies needed to function.
Go through every component in the project and document each one in its own file under `references/components/`, including its props, variants, and example usage.
Format `SKILL.md` as an index that links out to the guide and component reference files, with a "General Guidance" section and a "Components" section, following the example shown below.
File structure:
.agents/skills/your-design-system/
├── SKILL.md
├── references/
│ ├── guides/
│ │ ├── setup.md
│ │ ├── guardrails.md
│ │ ├── layout-and-spacing.md
│ │ └── ...
│ └── components/
│ ├── component-index.md
│ ├── button.md
│ ├── checkbox.md
│ └── ...
└── packages/
└── (Tar files or code components)
The `SKILL.md` file acts as an index that links out to separate markdown files for guides and component references. Each linked file covers one topic in detail. Here is an example of what the generated `SKILL.md` looks like:
```markdown
---
name: your-design-system
description: Use when building or modifying any UI. Provides component API references, layout guidance, and visual style rules for your design system.
---
# Your Design System
## General Guidance
- [Setup](references/guides/setup.md) — Installation, project configuration, and provider setup
- [Guardrails](references/guides/guardrails.md) — Hard rules that must never be broken (banned patterns, required tokens, accessibility minimums)
- [Layout & Spacing](references/guides/layout-and-spacing.md) — Grid system, spacing scale, responsive breakpoints, and page templates
- ...
## Components
- [Component Index](references/components/component-index.md) — Full list of available components with status and category
Individual component references (props, variants, examples):
- [Button](references/components/button.md)
- [Checkbox](references/components/checkbox.md)
- ...
```
Guide files cover one topic each — setup and installation steps, best practices and rules, reference tables for token values, and short code examples showing correct usage.
Component files document a single component each, including the component name, a brief description, a props table, usage examples, and any guidelines or constraints. The more complete these files are, the better Agent's output will be.
````
### Agent에 스킬 연결하기
스킬이 만들어지면 `custom_instruction/instructions.md`가 Agent를 스킬로 가리키도록 하세요:
```markdown theme={null}
# Design System
Read and follow the design system skill at `.agents/skills/your-design-system/`.
Always apply the design system when building or modifying UI.
```
마지막으로 `replit.md`에 디자인 시스템별 컨텍스트를 미리 채워 Agent가 처음부터 시각적 표준을 이해하도록 하세요. 프로젝트 개요, 선호하는 컴포넌트 라이브러리, 주요 디자인 선호 사항(간격 스케일, 접근성 요구 사항), 아키텍처 스택을 포함하세요.
### 설정 검증하기
디자인 시스템을 배포하기 전에 다음 필수 사항을 확인하세요:
* `custom_instruction/instructions.md`가 Agent를 디자인 시스템 스킬로 가리키는지
* `.agents/skills/`에 컴포넌트 참조, 가이드, 패키지가 포함된 스킬이 있는지
* `replit.md`에 프로젝트 개요, 선호 사항, 아키텍처가 미리 채워져 있는지
* 디자인 토큰 파일이 포함되어 있는지(`tokens.css` 또는 동등한 파일)
* 디자인 시스템 패키지가 `package.json`에 사전 설치되어 있는지
* 새 테스트 앱을 만들어 Agent가 디자인 시스템을 올바르게 사용하는지 확인하기
### 조직에 디자인 시스템 고정하기
디자인 시스템이 준비되면 모든 조직 멤버가 사용할 수 있도록 고정하세요:
1. 조직의 디자인 시스템 앱으로 이동하세요.
2. 앱의 작업 메뉴(점 세 개 메뉴)를 여세요.
3. **Pin to Agent input box**를 선택하세요.
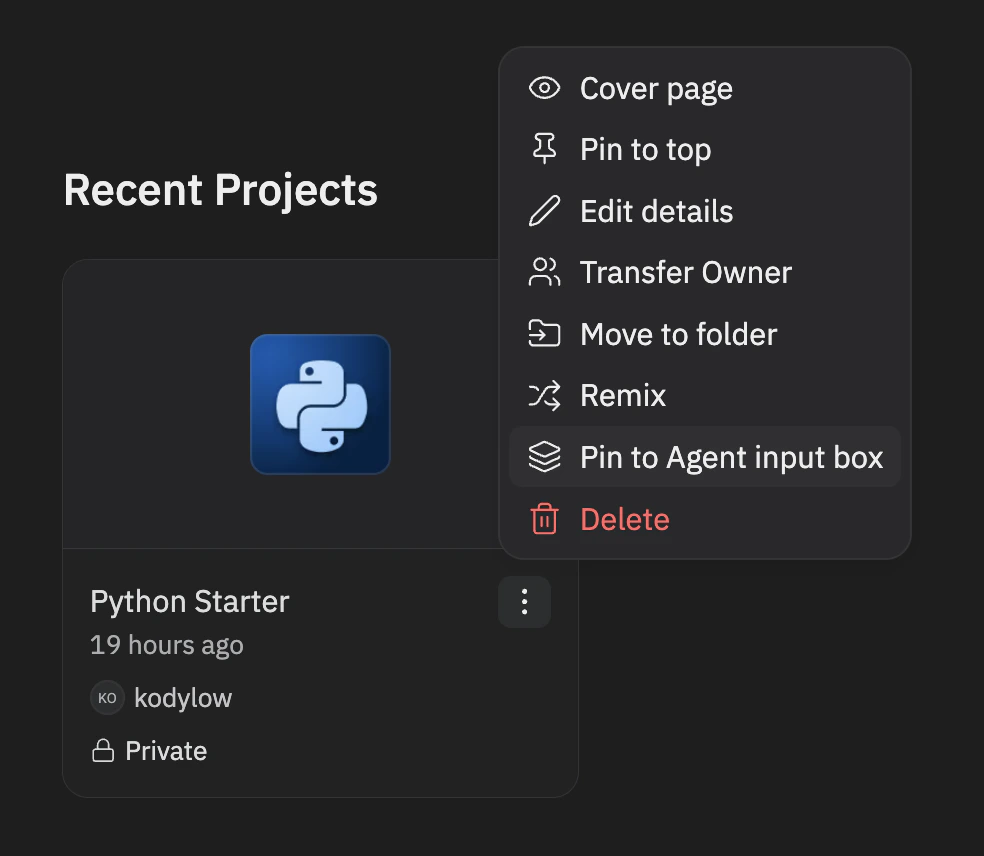 조직 관리자(`system_admins` 역할 멤버)만 디자인 시스템을 고정하거나 고정 해제할 수 있습니다.
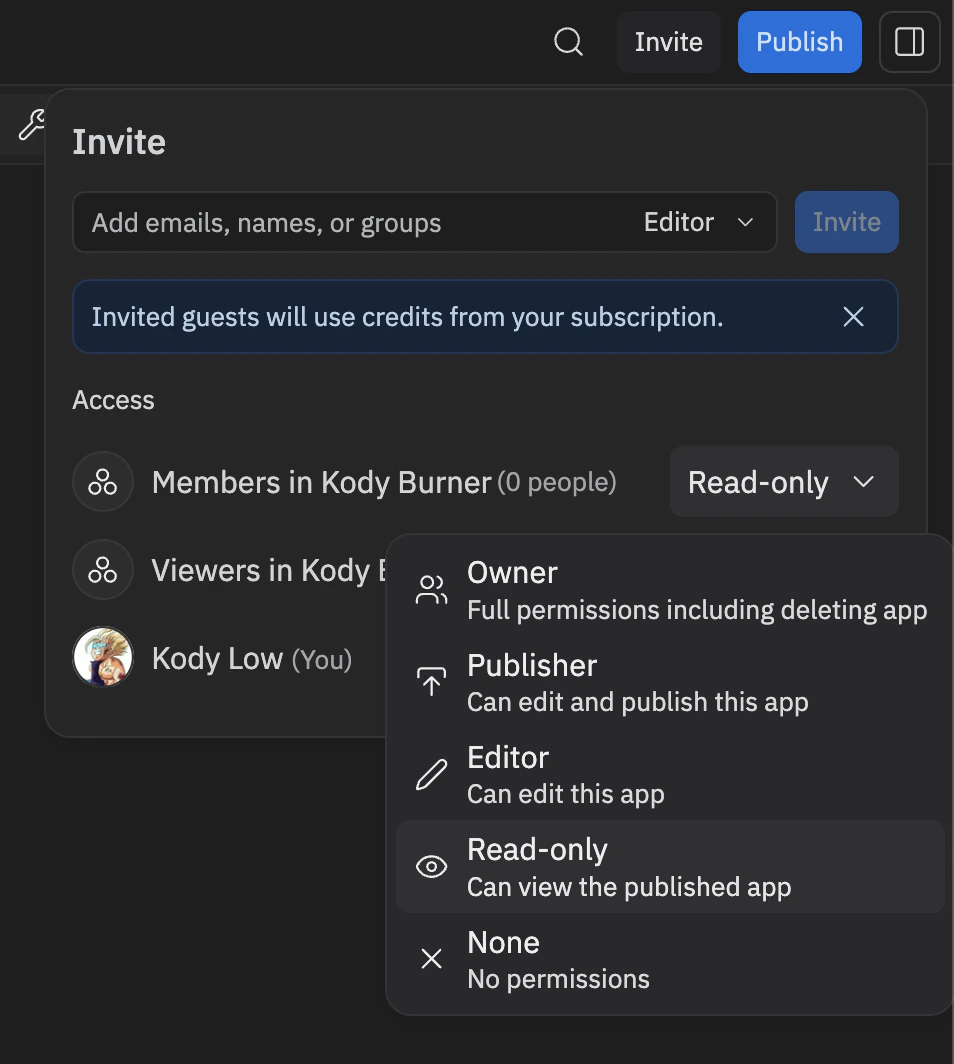
멤버 액세스를 **Read-only**로 설정하여 멤버가 편집하지 않고 고정된 디자인 시스템을 보고 사용할 수 있도록 하세요.
조직 관리자(`system_admins` 역할 멤버)만 디자인 시스템을 고정하거나 고정 해제할 수 있습니다.
멤버 액세스를 **Read-only**로 설정하여 멤버가 편집하지 않고 고정된 디자인 시스템을 보고 사용할 수 있도록 하세요.
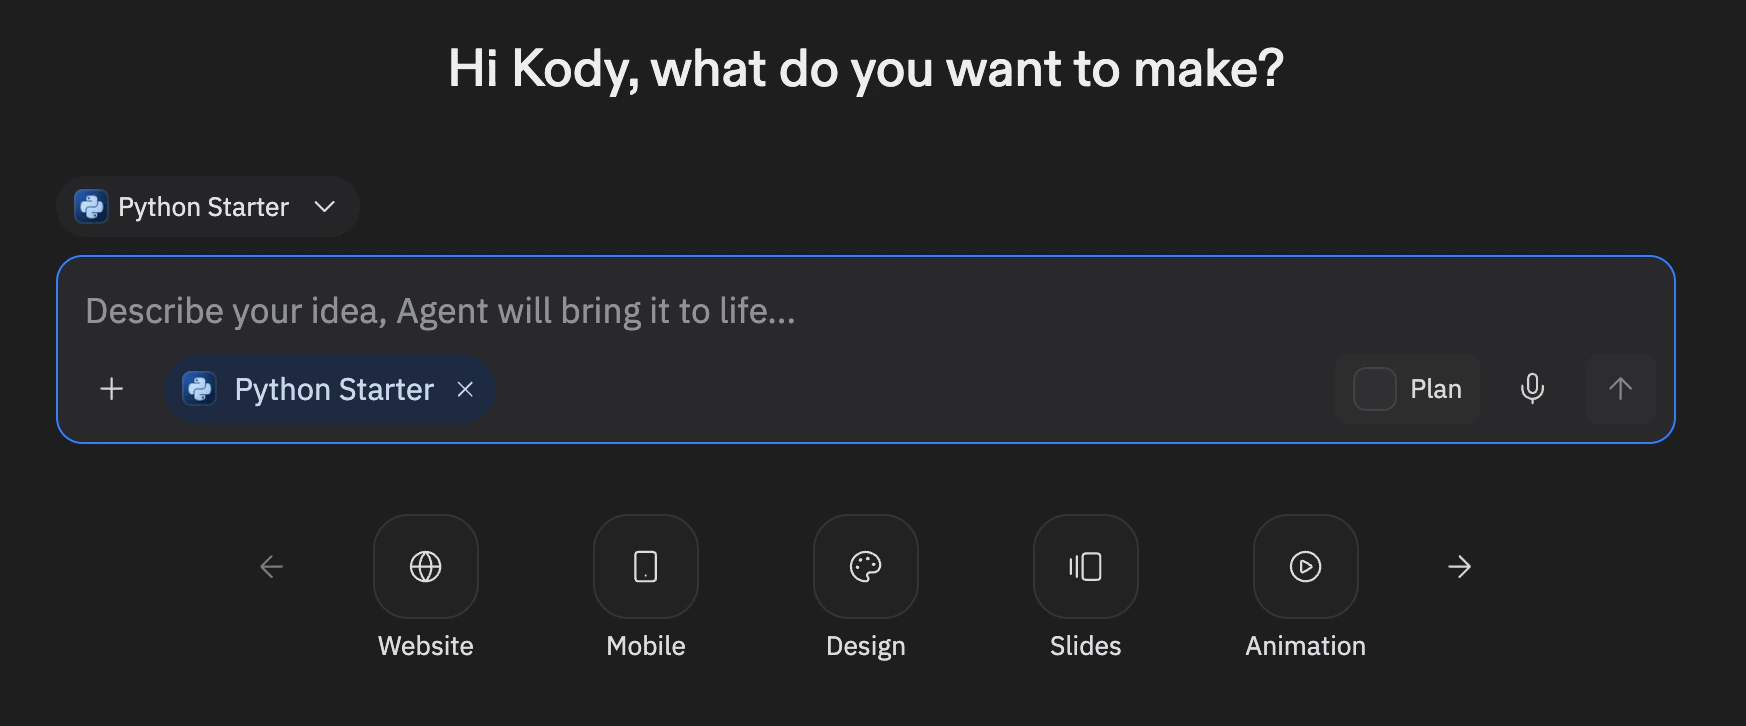
 이제 디자인 시스템이 조직의 모든 멤버를 위해 Agent 입력 창 아래에 선택 가능한 pill로 표시됩니다. 제거하려면 동일한 메뉴를 열고 **Unpin from Agent input box**를 선택하세요.
 ## 디자인 시스템 유지 관리하기
디자인 시스템은 진화합니다. 최신 상태를 유지하세요:
* **토큰 파일 업데이트**: 디자인 시스템에 새 색상, 간격, 타이포그래피 값이 추가될 때
* **스킬 업데이트**: 컴포넌트에 새 props, 변형, 사용 패턴이 추가될 때
* **지침 업데이트**: 디자인 원칙이나 표준이 변경될 때
* **패키지 버전 업데이트**: 디자인 시스템의 새 릴리스가 출시될 때
* **정기적 테스트**: 새 앱을 만들고 Agent가 올바른 출력물을 생성하는지 확인
## 디자인 시스템 vs. 커스텀 템플릿
디자인 시스템과 [커스텀 템플릿](/teams/custom-templates)은 서로 다른 목적을 가집니다:
| | 디자인 시스템 | 커스텀 템플릿 |
| --------- | ----------------------------------------- | ------------------------------------------ |
| **목적** | 팀의 프론트엔드 스택으로 변경하고 코드 컴포넌트 활용 | 기본 스택을 완전히 교체(예: Rust, Go, C++) |
| **스택** | 표준 Replit pnpm 모노레포 내에서 작동 | 완전히 커스텀 프로젝트 구조 정의 |
| **제공 내용** | 컴포넌트 라이브러리 규칙, 디자인 토큰, 브랜드 에셋, 시각적 스킬 | 런타임, 빌드 설정, 의존성, 프로젝트 레이아웃을 포함한 전체 보일러플레이트 |
| **적용 대상** | 웹 앱, 모바일 앱, 슬라이드, 아티팩트 - Agent가 빌드하는 모든 것 | 해당 특정 템플릿으로 만들어진 앱에만 |
일반 Replit 경험 전반에서 Agent가 시각적 표준을 따르길 원할 때는 디자인 시스템을 사용하세요. 근본적으로 다른 스택이 필요할 때는 커스텀 템플릿을 사용하세요.
## 관련 리소스
* [커스텀 템플릿](/teams/custom-templates) - 조직을 위한 완전한 커스텀 스택 설정
* [Agent Skills](/references/agent/skills) - 스킬의 작동 방식과 만드는 방법
* [스킬 사용하기](/build/use-agent-skills) - 스킬 사용에 대한 실습 가이드
* [replit.md](/references/project-setup/replit-dot-md) - 프로젝트 컨텍스트로 Agent 동작 커스터마이징
* [Enterprise 개요](/category/teams) - Enterprise 기능에 대해 알아보기
## 디자인 시스템 유지 관리하기
디자인 시스템은 진화합니다. 최신 상태를 유지하세요:
* **토큰 파일 업데이트**: 디자인 시스템에 새 색상, 간격, 타이포그래피 값이 추가될 때
* **스킬 업데이트**: 컴포넌트에 새 props, 변형, 사용 패턴이 추가될 때
* **지침 업데이트**: 디자인 원칙이나 표준이 변경될 때
* **패키지 버전 업데이트**: 디자인 시스템의 새 릴리스가 출시될 때
* **정기적 테스트**: 새 앱을 만들고 Agent가 올바른 출력물을 생성하는지 확인
## 디자인 시스템 vs. 커스텀 템플릿
디자인 시스템과 [커스텀 템플릿](/teams/custom-templates)은 서로 다른 목적을 가집니다:
| | 디자인 시스템 | 커스텀 템플릿 |
| --------- | ----------------------------------------- | ------------------------------------------ |
| **목적** | 팀의 프론트엔드 스택으로 변경하고 코드 컴포넌트 활용 | 기본 스택을 완전히 교체(예: Rust, Go, C++) |
| **스택** | 표준 Replit pnpm 모노레포 내에서 작동 | 완전히 커스텀 프로젝트 구조 정의 |
| **제공 내용** | 컴포넌트 라이브러리 규칙, 디자인 토큰, 브랜드 에셋, 시각적 스킬 | 런타임, 빌드 설정, 의존성, 프로젝트 레이아웃을 포함한 전체 보일러플레이트 |
| **적용 대상** | 웹 앱, 모바일 앱, 슬라이드, 아티팩트 - Agent가 빌드하는 모든 것 | 해당 특정 템플릿으로 만들어진 앱에만 |
일반 Replit 경험 전반에서 Agent가 시각적 표준을 따르길 원할 때는 디자인 시스템을 사용하세요. 근본적으로 다른 스택이 필요할 때는 커스텀 템플릿을 사용하세요.
## 관련 리소스
* [커스텀 템플릿](/teams/custom-templates) - 조직을 위한 완전한 커스텀 스택 설정
* [Agent Skills](/references/agent/skills) - 스킬의 작동 방식과 만드는 방법
* [스킬 사용하기](/build/use-agent-skills) - 스킬 사용에 대한 실습 가이드
* [replit.md](/references/project-setup/replit-dot-md) - 프로젝트 컨텍스트로 Agent 동작 커스터마이징
* [Enterprise 개요](/category/teams) - Enterprise 기능에 대해 알아보기