> ## Documentation Index
> Fetch the complete documentation index at: https://docs.replit.com/llms.txt
> Use this file to discover all available pages before exploring further.
# Workflows
> Workflows — 원하는 명령을 실행하는 구성 가능한 실행 버튼을 설정하는 방법을 알아보세요.
export const YouTubeEmbed = ({videoId, title = "YouTube video", startAt}) => {
if (!videoId) {
return null;
}
let url = "https://www.youtube.com/embed/" + videoId;
if (startAt) {
url = url + "?start=" + startAt;
}
return
;
};
이는 Replit 앱 내에서 실행할 수 있는 재사용 가능하고 커스터마이징 가능한 단계 시퀀스입니다. `python main.py`를 실행하는 것처럼 간단할 수도 있고, 여러 단계로 이루어진 절차를 실행하는 것처럼 복잡할 수도 있습니다.
 사용 사례 예시:
* 여러 서비스를 병렬로 실행합니다(예: 프런트엔드 + 백엔드)
* 파일이나 명령을 순차적으로 실행합니다(예: 린터 실행 → 테스트 실행, 컴파일 → 코드 실행)
[워크플로 생성하기](#creating-workflows)를 시작하려면 도구 사이드바 메뉴를 사용하여 Workflows 창으로 이동하거나 `Command + K`를 사용하여 Workflows 창을 검색하세요.
## 사용 가능한 작업 유형
현재 `Execute Shell Command`, `Install Packages`, `Run Workflow`의 3가지 작업 유형을 사용할 수 있습니다.
### Execute Shell Command
`Execute Shell Command`는 shell 명령을 저장하고 Shell 창과 동일한 환경을 사용하여 실행합니다. 이 작업 유형은 개별 파일 실행부터
```text theme={null}
python main.py
```
복잡한 저장된 데이터베이스 쿼리 명령 실행까지 광범위한 사용 사례를 제공합니다:
```text theme={null}
psql -h 0.0.0.0 -U your_username -d your_database -c "SELECT * FROM your_table;"
```
사용 사례 예시:
사용 사례 예시:
* 여러 서비스를 병렬로 실행합니다(예: 프런트엔드 + 백엔드)
* 파일이나 명령을 순차적으로 실행합니다(예: 린터 실행 → 테스트 실행, 컴파일 → 코드 실행)
[워크플로 생성하기](#creating-workflows)를 시작하려면 도구 사이드바 메뉴를 사용하여 Workflows 창으로 이동하거나 `Command + K`를 사용하여 Workflows 창을 검색하세요.
## 사용 가능한 작업 유형
현재 `Execute Shell Command`, `Install Packages`, `Run Workflow`의 3가지 작업 유형을 사용할 수 있습니다.
### Execute Shell Command
`Execute Shell Command`는 shell 명령을 저장하고 Shell 창과 동일한 환경을 사용하여 실행합니다. 이 작업 유형은 개별 파일 실행부터
```text theme={null}
python main.py
```
복잡한 저장된 데이터베이스 쿼리 명령 실행까지 광범위한 사용 사례를 제공합니다:
```text theme={null}
psql -h 0.0.0.0 -U your_username -d your_database -c "SELECT * FROM your_table;"
```
사용 사례 예시:
 ### Install Packages

`Install Packages`는 Replit의 내장 종속성 관리 시스템을 활용하여 프로젝트 종속성을 자동으로 감지하고 프로젝트에 필요한 패키지를 설치합니다. UPM이 프로젝트에 설치할 패키지를 추측하는 방식에 대한 자세한 내용은 [종속성 관리](/ko/features/project-setup/dependency-management#the-universal-package-manager)를 참조하세요.
사용 사례 예시:
### Install Packages
`Install Packages`는 Replit의 내장 종속성 관리 시스템을 활용하여 프로젝트 종속성을 자동으로 감지하고 프로젝트에 필요한 패키지를 설치합니다. UPM이 프로젝트에 설치할 패키지를 추측하는 방식에 대한 자세한 내용은 [종속성 관리](/ko/features/project-setup/dependency-management#the-universal-package-manager)를 참조하세요.
사용 사례 예시:
 ### Run Workflow
`Run Workflow`는 현재 워크플로에서 다른 워크플로를 실행할 수 있게 해줍니다. 이를 통해 워크플로를 재사용하고 결합하여 더 복잡한 워크플로를 만들 수 있습니다.
사용 사례 예시:
### Run Workflow
`Run Workflow`는 현재 워크플로에서 다른 워크플로를 실행할 수 있게 해줍니다. 이를 통해 워크플로를 재사용하고 결합하여 더 복잡한 워크플로를 만들 수 있습니다.
사용 사례 예시:
 이 작업 유형을 사용하여 워크플로 간 종속성을 만들면, 하나의 워크플로를 편집할 때 그것을 참조하는 다른 워크플로가 자동으로 최신 변경 사항을 사용하게 됩니다. 깊이 중첩된 워크플로 호출에는 깊이 제한이 있다는 점에 유의하세요.
## 워크플로 실행 모드
Workflows는 순차 실행과 병렬 실행이라는 두 가지 실행 모드를 제공합니다.
### 순차 실행
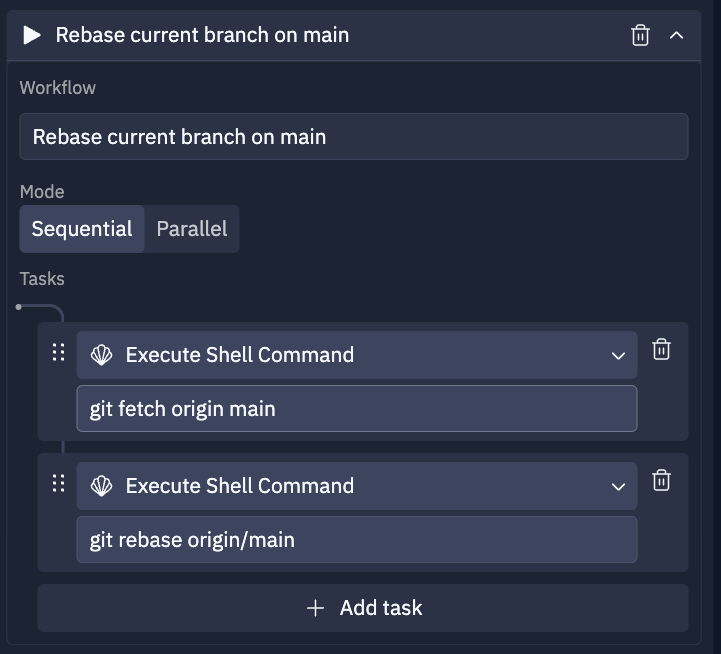
순차 실행은 정의된 순서대로 각 작업을 실행하며, 다음 단계로 넘어가기 전에 각 작업이 완료되기를 기다리고, 워크플로 내의 작업이 실패하면 시퀀스 실행을 중단합니다.
이 모드를 사용하는 예로는 메인 브랜치에서 최신 변경 사항을 가져온 다음 현재 브랜치를 메인 브랜치 위에 리베이스하는 것과 같이 논리적으로 연결된 명령을 정의하는 경우가 있습니다:
이 작업 유형을 사용하여 워크플로 간 종속성을 만들면, 하나의 워크플로를 편집할 때 그것을 참조하는 다른 워크플로가 자동으로 최신 변경 사항을 사용하게 됩니다. 깊이 중첩된 워크플로 호출에는 깊이 제한이 있다는 점에 유의하세요.
## 워크플로 실행 모드
Workflows는 순차 실행과 병렬 실행이라는 두 가지 실행 모드를 제공합니다.
### 순차 실행
순차 실행은 정의된 순서대로 각 작업을 실행하며, 다음 단계로 넘어가기 전에 각 작업이 완료되기를 기다리고, 워크플로 내의 작업이 실패하면 시퀀스 실행을 중단합니다.
이 모드를 사용하는 예로는 메인 브랜치에서 최신 변경 사항을 가져온 다음 현재 브랜치를 메인 브랜치 위에 리베이스하는 것과 같이 논리적으로 연결된 명령을 정의하는 경우가 있습니다:
 ### 병렬 실행
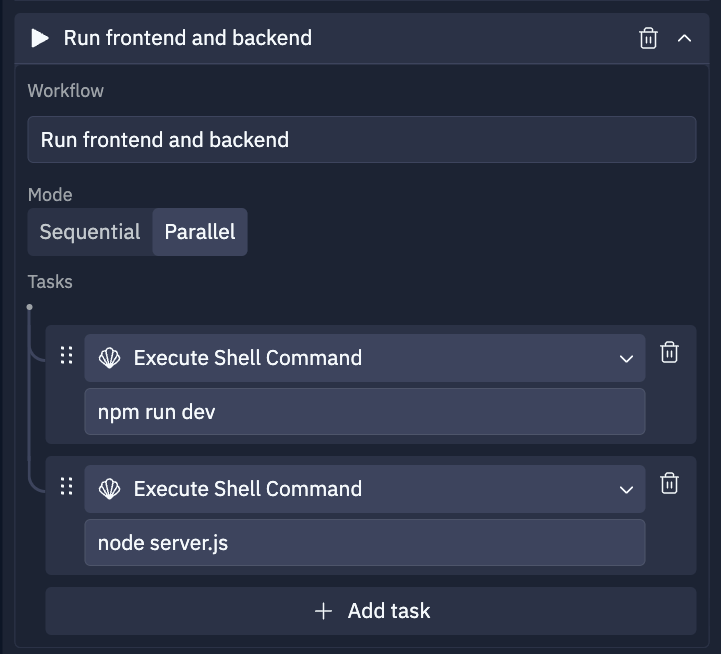
병렬 실행은 각 작업을 병렬로 실행하여 각 작업이 워크플로 내의 다른 작업과 독립적으로 시작되고 실행됩니다. 하나의 작업이 실패해도 다른 작업의 실행은 중단되지 않습니다.
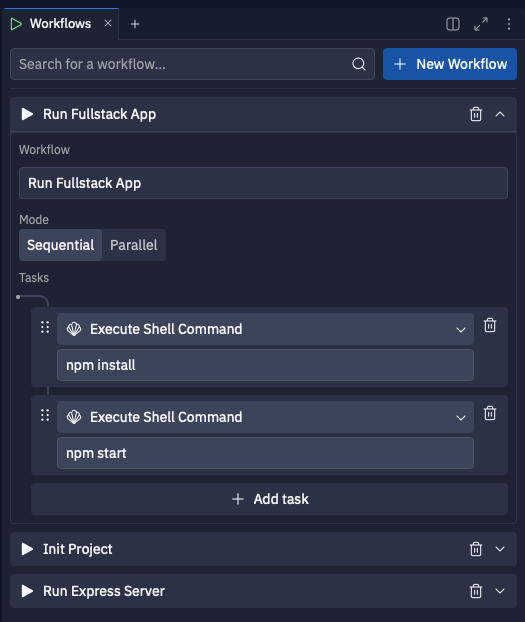
이 모드를 사용하는 예로는 프런트엔드와 백엔드 서버를 모두 시작해야 하는 풀스택 프로젝트를 실행하는 경우가 있습니다:
### 병렬 실행
병렬 실행은 각 작업을 병렬로 실행하여 각 작업이 워크플로 내의 다른 작업과 독립적으로 시작되고 실행됩니다. 하나의 작업이 실패해도 다른 작업의 실행은 중단되지 않습니다.
이 모드를 사용하는 예로는 프런트엔드와 백엔드 서버를 모두 시작해야 하는 풀스택 프로젝트를 실행하는 경우가 있습니다:
 ## 워크플로 생성하기
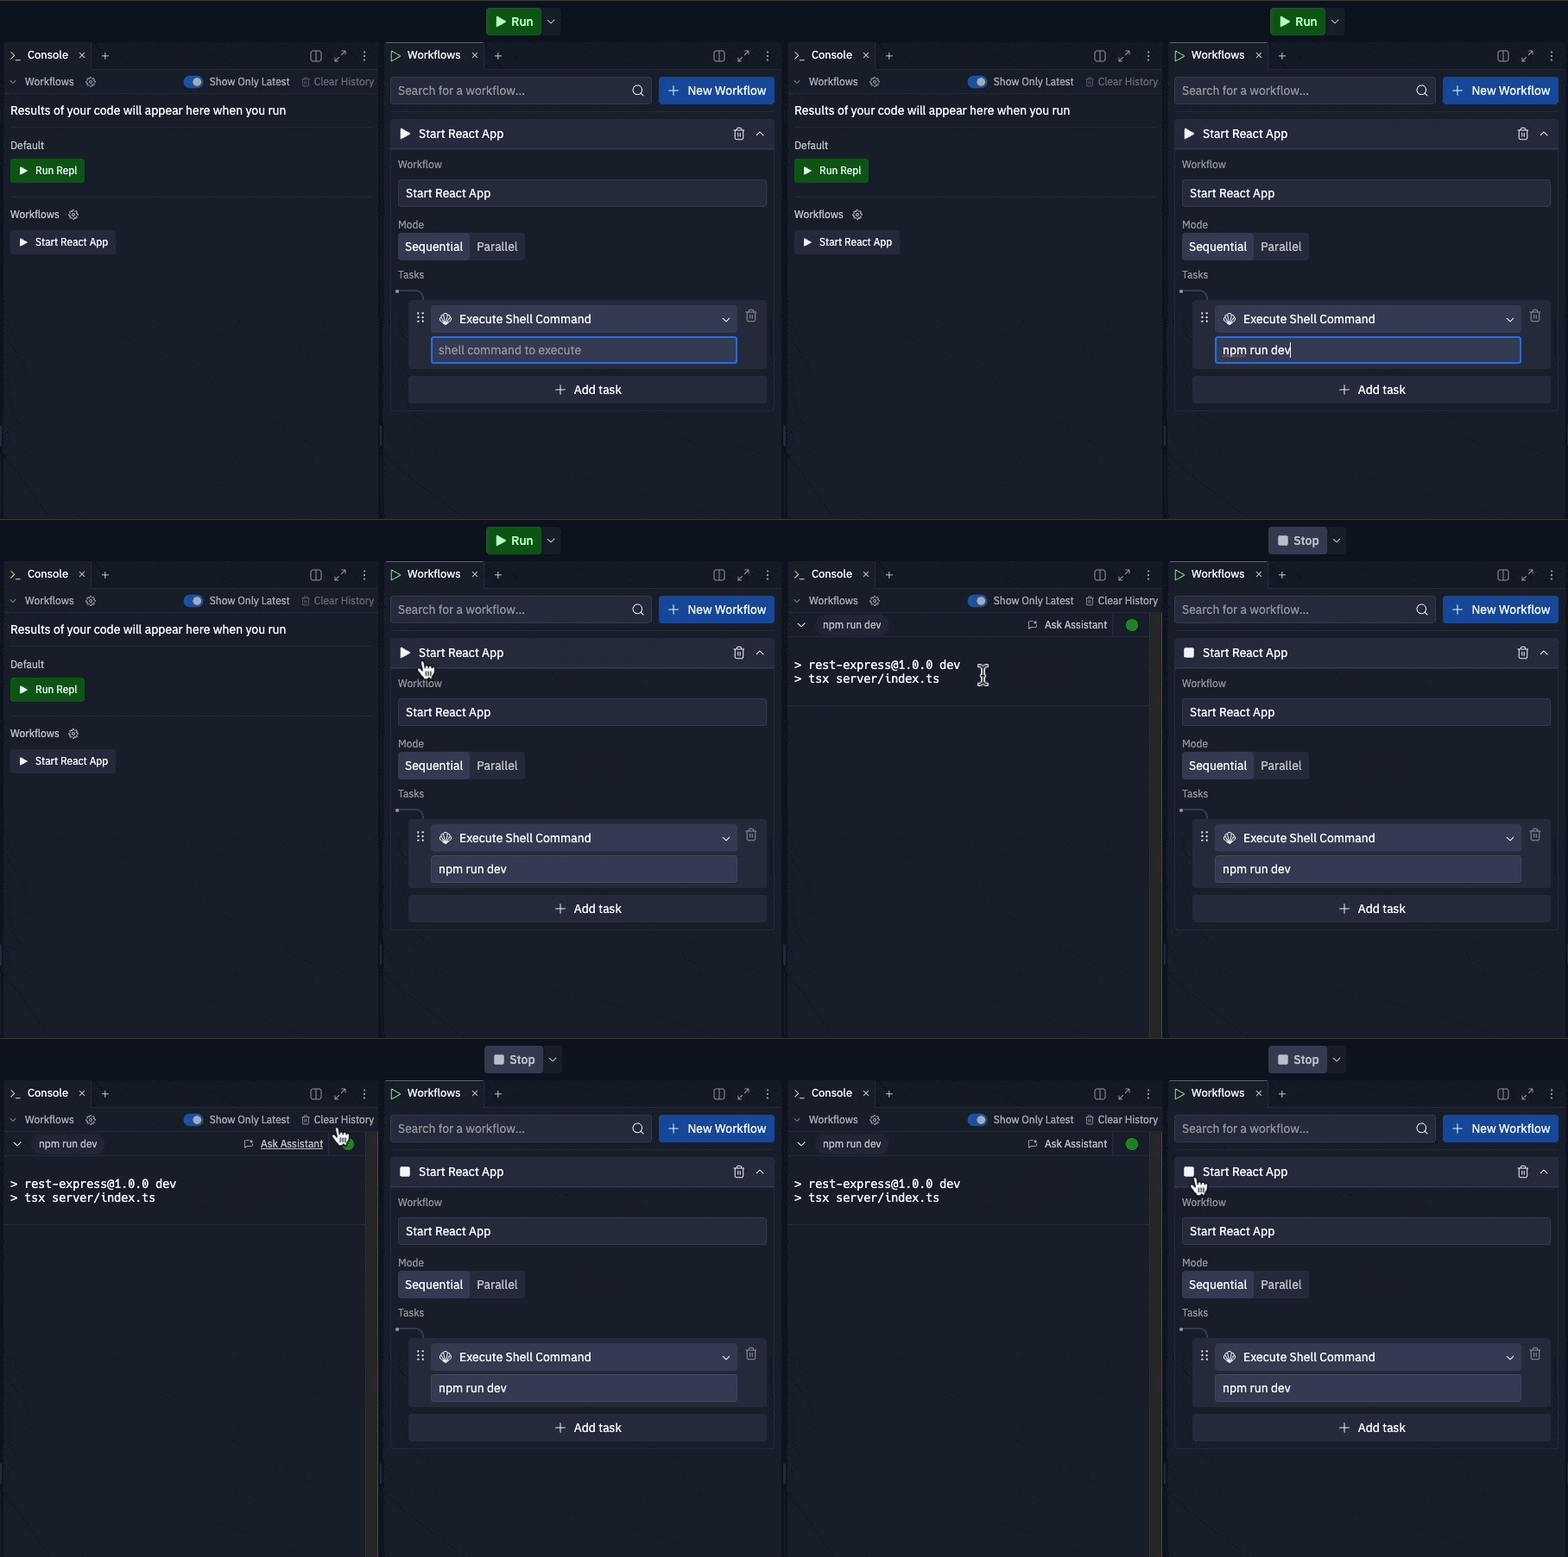

`+ New Workflow` 버튼을 클릭하여 Workflows 창을 사용해 워크플로를 만들 수 있습니다. 워크플로에 설명적인 이름을 지정하고 적절한 실행 모드를 선택한 다음 작업을 추가하기 시작하세요. 작업은 드래그 앤 드롭으로 원하는 순서로 재정렬할 수 있습니다.
## 워크플로 생성하기
`+ New Workflow` 버튼을 클릭하여 Workflows 창을 사용해 워크플로를 만들 수 있습니다. 워크플로에 설명적인 이름을 지정하고 적절한 실행 모드를 선택한 다음 작업을 추가하기 시작하세요. 작업은 드래그 앤 드롭으로 원하는 순서로 재정렬할 수 있습니다.
 ## 워크플로를 Run 버튼에 할당하기
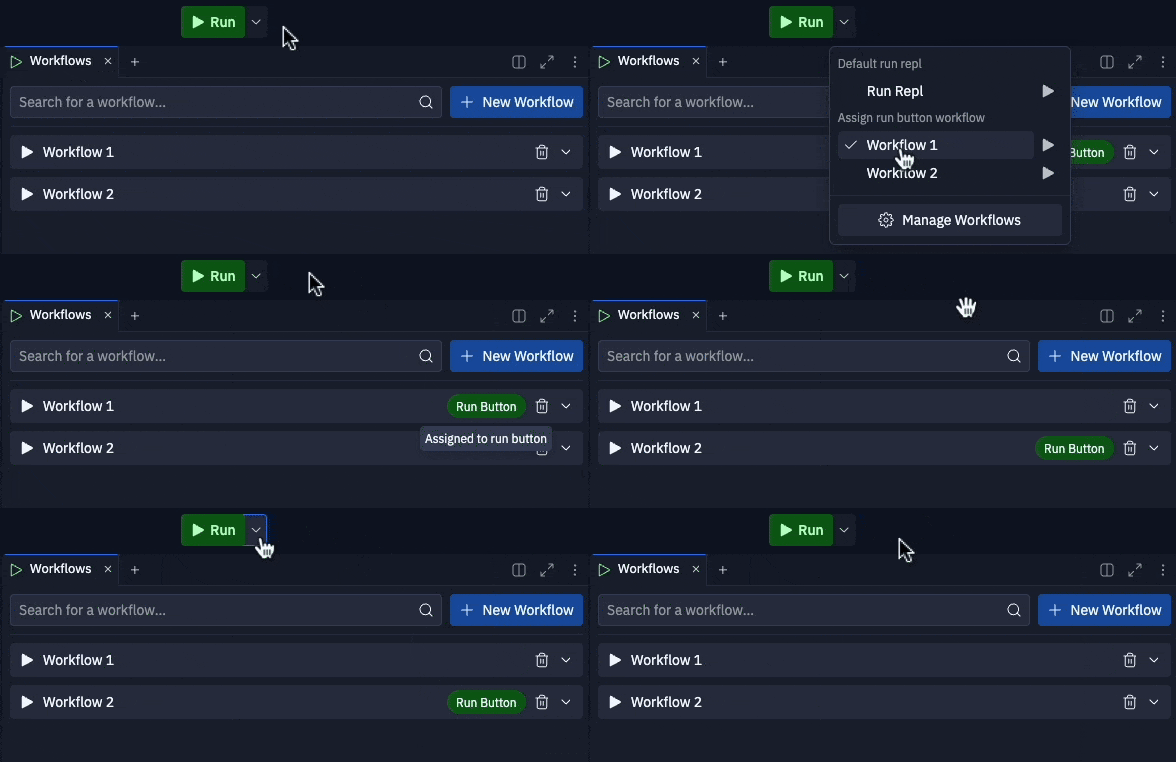
워크플로를 실행 버튼에 할당하여 기본 실행 버튼 동작을 대체할 수도 있습니다(([Replit 앱 구성](/ko/features/project-setup/configuration)) 참조). `.replit`에 구성된 기본 실행 명령을 유지하려면 드롭다운에서 기본 "Run Replit App" 옵션을 선택하세요.
Run 버튼을 클릭하면 드롭다운 메뉴에서 선택한 워크플로가 실행됩니다. Run 버튼으로 실행할 워크플로를 변경하려면 드롭다운 메뉴에서 원하는 워크플로를 클릭하세요.
## 워크플로를 Run 버튼에 할당하기
워크플로를 실행 버튼에 할당하여 기본 실행 버튼 동작을 대체할 수도 있습니다(([Replit 앱 구성](/ko/features/project-setup/configuration)) 참조). `.replit`에 구성된 기본 실행 명령을 유지하려면 드롭다운에서 기본 "Run Replit App" 옵션을 선택하세요.
Run 버튼을 클릭하면 드롭다운 메뉴에서 선택한 워크플로가 실행됩니다. Run 버튼으로 실행할 워크플로를 변경하려면 드롭다운 메뉴에서 원하는 워크플로를 클릭하세요.
 ## 워크플로 출력 보기
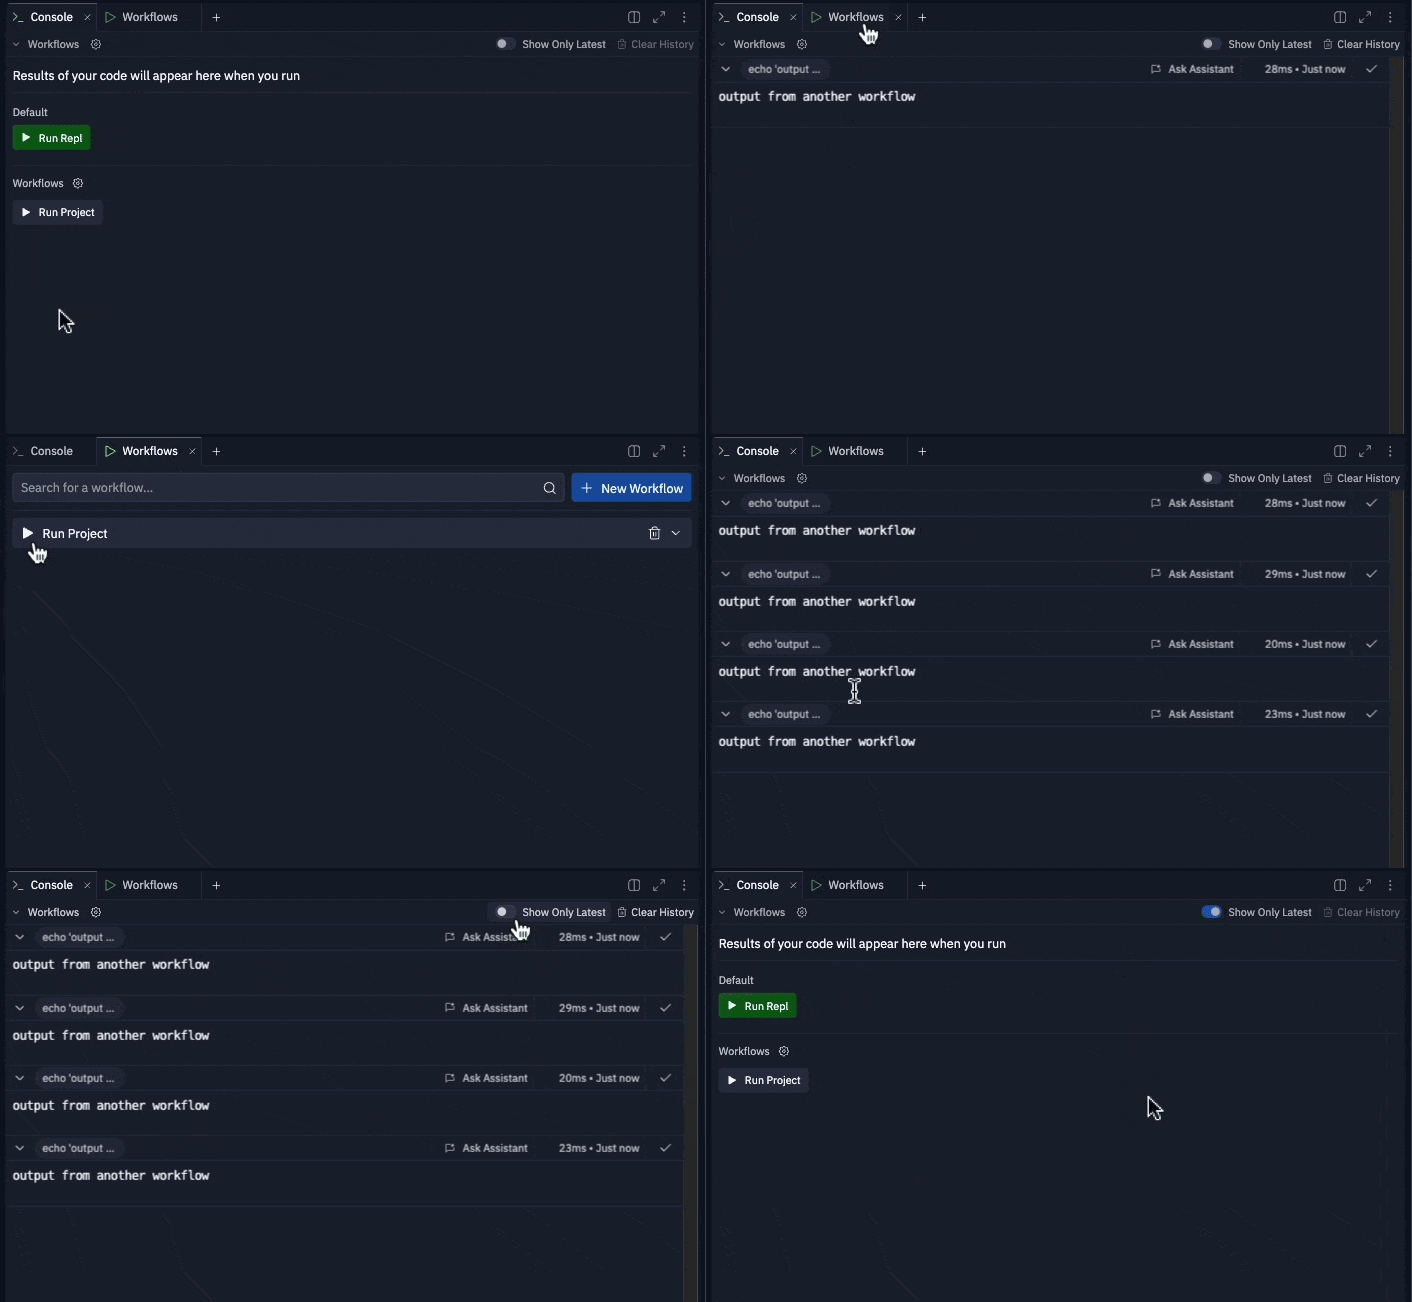
워크플로 출력은 `Console` 창에 표시됩니다. 최신 출력만 표시하도록 전환하거나 콘솔을 완전히 지울 수 있습니다.
## 워크플로 출력 보기
워크플로 출력은 `Console` 창에 표시됩니다. 최신 출력만 표시하도록 전환하거나 콘솔을 완전히 지울 수 있습니다.