;
};
export const PACE_PROTOTYPE_PROMPT = `Build me a personal running mobile app called "Pace".
I want a clean, modern iPhone/Android app where I can track my runs and see my progress at a glance — a friendlier, more visual version of a running journal like Strava or Nike Run Club, but simpler and prettier. It only needs to support one user (me) for now, and my profile name should be Alex Morgan. Pre-fill it with about a month of pretend running history so it looks alive from the moment I open it — runs through San Francisco, a mix of easy runs, tempo runs, long runs, and recovery runs, with at least 4–5 runs in the past week so the dashboard looks active.
The app should run on real phones (both iPhone and Android), feel fast and native, and use the phone's safe areas (notch, home indicator) properly.
Look and feel
The vibe is sporty, premium, "athletic brand" — black, white, and a punchy lime green as the accent color. Use the Inter font everywhere. Rounded corners on everything (cards, buttons, pills). It should feel calm and uncluttered, not busy. Light mode by default. Smooth, subtle animations when screens push in, when cards appear, and when I tap buttons — it should feel responsive and alive, not stiff.
Overall navigation
A bottom tab bar with 5 icons: Home, Runs, Plan, Stats, Profile. The active tab icon is filled lime green; inactive ones are gray line icons. The tab bar sits on a clean white background with a subtle top border and respects the home indicator area.
A floating lime "+" button in the bottom-right corner (above the tab bar) is the primary action — tapping it opens the "Log a Run" screen.
The Home screen (the main screen) — a scrollable feed, top to bottom:
Top bar. A friendly greeting that changes with the time of day ("Good morning, Alex" / "Good afternoon, Alex" / "Good evening, Alex"), with a subtitle "Ready for your next run?". On the right, a round profile photo (tappable, opens Profile) and a bell icon with a tiny lime dot for notifications.
Hero banner card. A wide photo of someone running on pavement, with a dark gradient on the left so the text is readable. Big white headline: "You don't find willpower, you create it." Underneath: "Keep showing up." Bottom-left: a lime pill button "Start a Run" with a little black play-circle. Tapping it opens the run-logging screen.
"This Week" stats. A 2×2 grid of four cards: Distance (km), Time (h/min), Elevation (m), Runs (count). Each card: small icon, big number, "+12% vs last week" caption, thin squiggly line graph at the bottom (lime, blue, purple, lime). Numbers reflect my actual runs from the last 7 days.
Weekly Progress card. Title + small "View goals" link. Then "X of Y runs completed" and a big bold percentage on the right. Gradient lime progress bar. Below: seven day pills (M T W T F S S) with date numbers. Today is a black filled circle; days I've run show a lime circle with a white checkmark; others are empty circles.
Your Last Run card. A real interactive map (native or maps SDK) showing the route of my most recent run as a lime line, date in the corner, lime "View Run" button, and four stats (Distance, Time, Pace, Calories). Tap → full run detail.
Recent Runs section. Title "Recent Runs" + "See all" link. Three rows, one per recent run: tiny green map-line thumbnail on the left, run name + date, distance + pace lined up on the right. Tap a row → run detail. Swipe left to reveal delete.
Upcoming Workout card. Title + small lime circle icon with footprints. Workout name "Tempo Run", "Tomorrow · 6:30 AM". Three stats: 8 km, 5:40/km target pace, "Moderate" intensity. A muted gray "View workout" button. (Placeholder — no real training plan yet.)
Recent Achievements card. Two badges, each with a colorful icon, the badge name, and a one-line description. First is a real PR from my history (e.g. "10K Crusher — Completed a 10K in under 60 minutes"). Second is a placeholder: "Early Bird — Completed 5 runs before 7 AM" with a lime crescent moon icon.
The whole feed supports pull-to-refresh.
The Runs tab
Full list of all my runs, grouped by month (sticky month headers as I scroll). Each row like the recent-runs rows. A search icon in the top-right opens search by name or filter by run type (Easy, Tempo, Long, Recovery, Interval). Tap a row → run detail.
The Stats tab — a scrollable view with:
- Time-range pill tabs at the top (7D / 30D / 3M / 6M / 1Y / All).
- Three KPI numbers (Total Distance, Avg Pace, Total Time), each with a green or red badge for change vs the previous period.
- A smooth lime area chart of distance over time. Tap a point to see that day's value.
- Below: a small bar chart of "runs per day of week" and a list of personal records (fastest 5K, fastest 10K, longest run, etc.).
The Plan tab
A weekly calendar of upcoming workouts (placeholder — mostly the visual shell). Each day is a row showing what's planned (or "Rest day"). Today's row highlighted lime.
The Profile tab
Avatar, name, weekly goal setting, total all-time stats (total distance, total runs, total hours), an "Upgrade to Pro" card with a lime sparkle and "Upgrade Now" button, and a settings list (units km/mi, notifications, sign out).
The "Log a Run" screen (sheet sliding up from the bottom):
- Type of run (segmented control: Easy / Tempo / Long / Recovery / Interval)
- Distance in km (number pad)
- Duration (mm:ss or hh:mm:ss picker)
- Date and time (native date picker)
- Optional name
- Big lime "Save Run" button at the bottom
After saving: smooth dismiss, dashboard updates instantly, small toast confirmation.
The Run Detail screen (pushes in from the right when I tap a run):
- Big interactive map of the full route at the top
- Date, run type chip, back arrow
- Stats row (Distance, Duration, Avg Pace, Calories)
- Per-kilometer splits with pace per km
- 3-dot menu with Edit and Delete
How it should behave
- The greeting changes based on time of day.
- Floating "+" and hero "Start a Run" both open the same Log a Run sheet.
- Loading skeletons instead of blank space.
- Pull-to-refresh on Home, Runs, and Stats tabs.
- Smooth screen transitions, soft haptic feedback on main action buttons.
- Respect the phone's safe areas (no content under notch or home indicator).
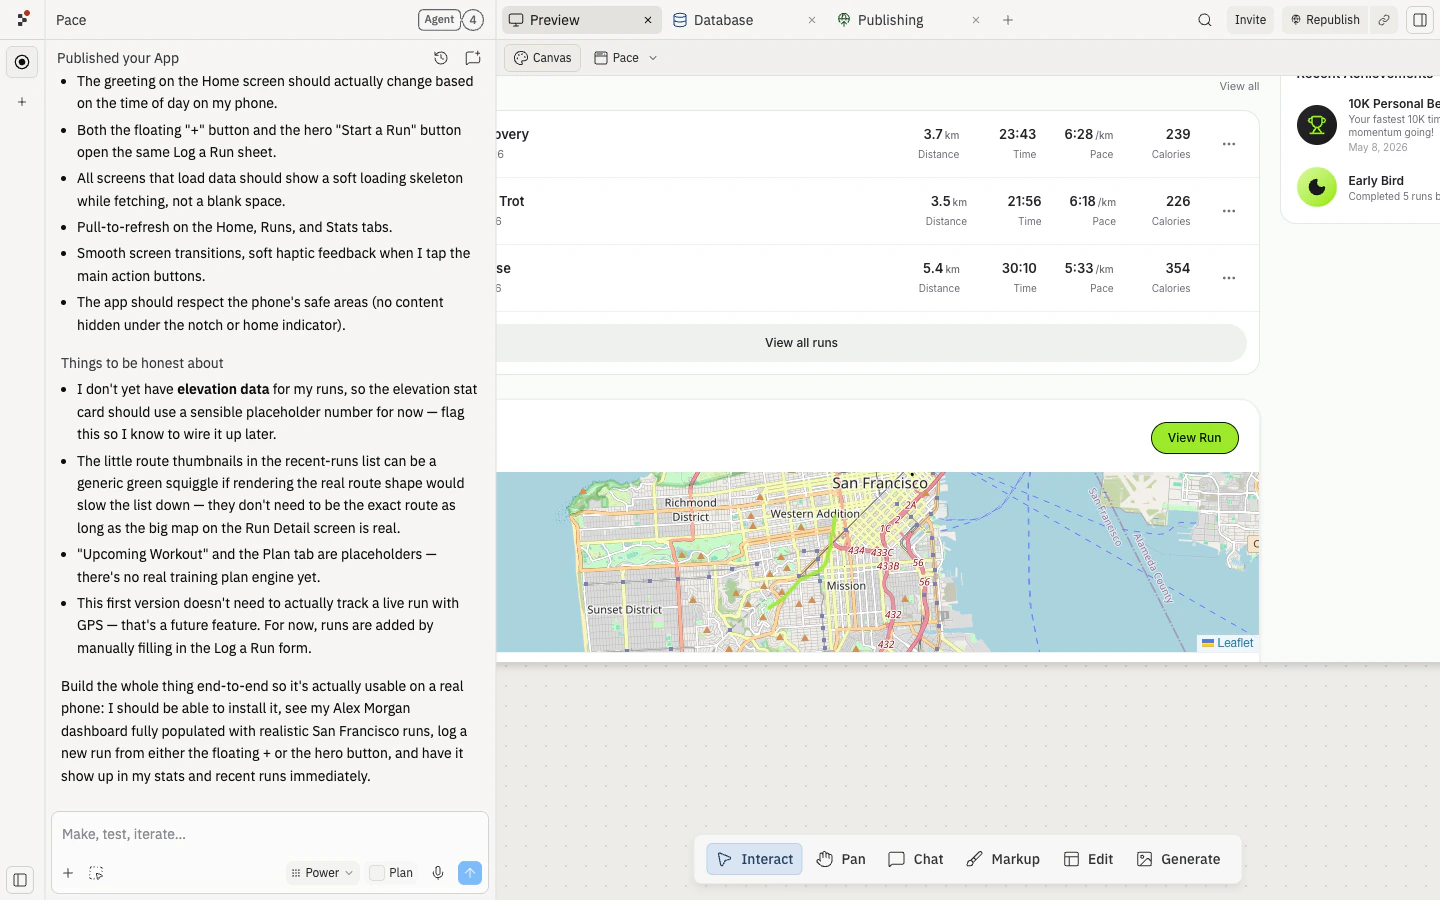
Things to be honest about
- No real elevation data yet — use a sensible placeholder for the elevation stat card and flag it.
- The little route thumbnails in the recent-runs list can be a generic green squiggle if the real route shape would slow the list down — the big Run Detail map should be real.
- "Upcoming Workout" and the Plan tab are placeholders — no training plan engine yet.
- No live GPS tracking in this first version — runs are added by manually filling the Log a Run form.
Build the whole thing end-to-end so it's actually usable on a real phone: I should be able to install it, see my Alex Morgan dashboard fully populated with realistic San Francisco runs, log a new run from either the floating + or the hero button, and have it show up in my stats and recent runs immediately.`;
⏰ *예상 시간: 15분*
프로토타입은 누군가가 사용해보고 반응할 수 있는 제품 아이디어의 가장 작은 버전입니다.
**Pace**를 예제로 사용할 것입니다: 러너에게 훈련, 회복, 진행 상황의 세련된 개요를 제공하는 프리미엄 러닝 트래커.
## 배울 내용
다음을 배우게 됩니다:
* 광범위한 제품 아이디어를 하나의 테스트 가능한 플로우로 전환하는 방법.
* Plan 모드를 사용하여 빌드 전에 프로토타입 범위를 정하는 방법.
* Agent의 계획이 테스트하기에 충분히 작은지 검토하는 방법.
* Canvas 주석과 협업을 사용하여 맥락 내에서 피드백을 수집하는 방법.
* 제품 방향이 불분명할 때 두 가지 프로토타입 방향을 병렬로 탐색하는 방법.
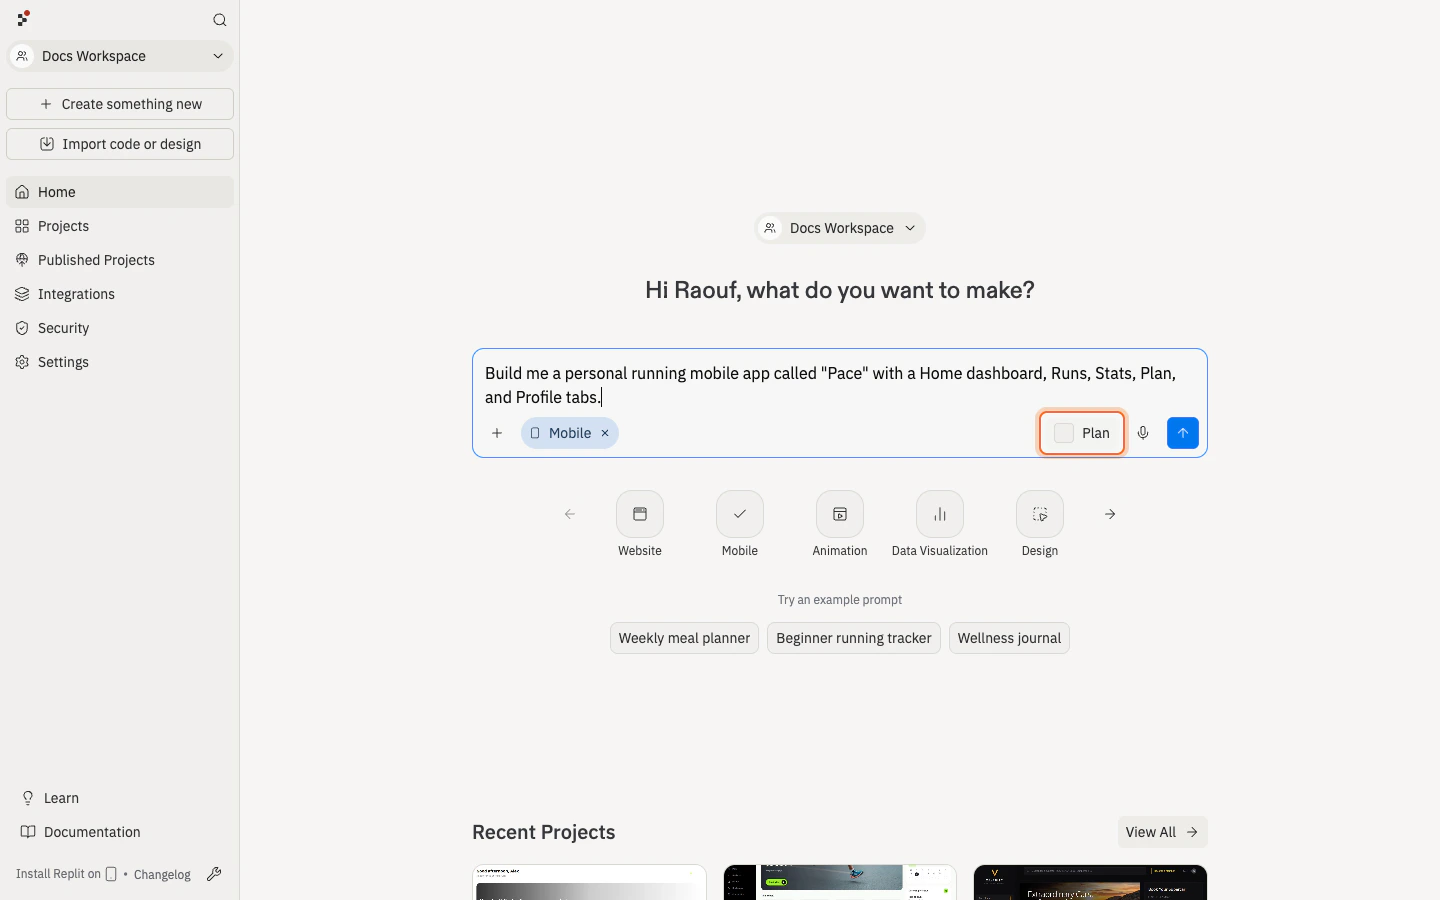
위의 프롬프트는 **Pace**를 설명합니다 — 세련된 홈 대시보드, Add Run 플로우, 통계, 플레이스홀더 계획 보기, 실제적인 샌프란시스코 샘플 데이터가 있는 개인 러닝 트래커. Replit에 직접 붙여넣으려면 **Copy the prompt**를 사용하거나, 프롬프트가 이미 첨부된 상태로 Replit을 열려면 **Build on Replit**을 사용하세요.
프롬프트는 시각적 방향, 화면, 모의 데이터, 플레이스홀더가 무엇인지에 대해 의도적으로 구체적입니다 — 그것이 Agent에게 평가할 명확한 목표를 제공하는 것입니다.
Agent가 코드를 작성하기 전에 제품 방향을 먼저 생각하도록 하려면, 프롬프트 입력란 옆의 **Plan**을 토글하세요. Plan 모드는 빌드를 승인하기 전에 검토할 수 있는 구조화된 계획을 만듭니다 — 방향이 아직 완전히 결정되지 않았을 때 유용합니다.
계획을 검토하세요: 목표 사용자, 주요 플로우, 실제로 구현할 것, 모의로 처리할 것, 그리고 테스트 체크리스트. 계획에 기능이 너무 많다면 Agent에게 줄이도록 요청하세요.
This prototype is too broad.
Reduce it to one target user, one main flow, and one question I can answer with feedback.
Move the other ideas into a future improvements list.
Agent가 완료되면 Preview를 열고 Pace를 처음 방문하는 사람처럼 사용해 보세요.
다음을 확인하세요:
* 현실적인 샘플 달리기로 채워진 Alex Morgan 대시보드를 볼 수 있는지.
* 떠 있는 **+** 또는 히어로 **Start a Run** 버튼에서 새 달리기를 기록할 수 있는지.
* **Recent Runs**에 달리기가 나타나고 **This Week** 통계가 업데이트되는지.
* Runs, Stats, Plan, Profile 탭을 탐색할 수 있는지.
* 모바일 레이아웃을 확인하기 위해 Preview를 폰 크기 너비로 조정할 수 있는지.
무언가 이상하다면 Agent에게 증상을 설명하고 가장 작은 수정을 요청하세요.
주요 플로우가 작동하면 게시하세요.
게시한 후 새 브라우저 탭에서 공개 URL을 열어 공유하기 전에 처음 방문하는 사람에게 경험이 제대로 작동하는지 확인하세요.
하나의 집중된 작업과 함께 URL을 공유하세요:
> 한 주의 훈련을 추적하려는 러너로서 Pace를 사용해 보세요. 달리기를 하나 기록하고, 대시보드를 살펴보고, 혼란스럽거나 동기 부여가 되는 것을 알려주세요.
좋은 피드백은 다음에 무엇을 빌드할지 결정하는 데 도움이 되어야 합니다. 막연한 답변을 원하지 않는다면 "어떻게 생각하세요?"라고 묻지 마세요.
제품 프로토타입은 팀원들이 동일한 아티팩트를 검토하고 맥락 내에서 피드백을 줄 수 있을 때 더 나아집니다.
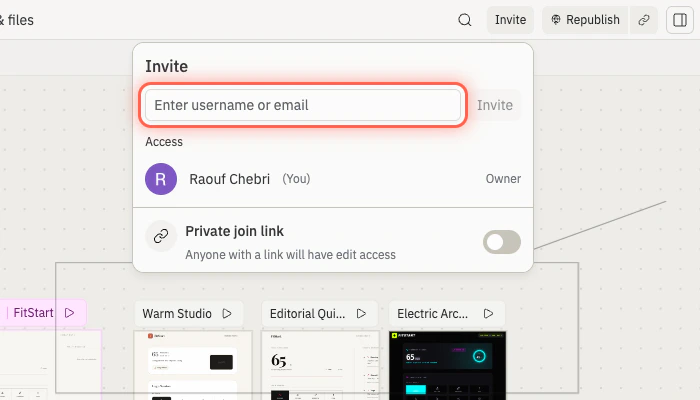
얼마나 가까이 함께 작업해야 하는지에 따라 협력자를 초대하세요:
* 이 프로토타입만 검토하거나 도움을 줄 사람은 프로젝트에 초대하세요. [팀원 초대하기](/build/invite-teammates)를 참조하세요.
* 진행 중인 팀의 일원이고 여러 프로젝트에 접근이 필요한 사람은 워크스페이스에 초대하세요. [팀 워크스페이스](/references/collaboration/team-workspaces)를 참조하세요.
그런 다음 피드백이 시각적일 때 [Canvas](/learn/design/canvas)를 사용하세요. 프로토타입에 직접 메모를 추가하고, 변경하고 싶은 영역에 주석을 달고, 앱을 업데이트할 때 그 메모를 사용하도록 Agent에게 요청하세요.
Use the Canvas annotations on Pace to improve the prototype.
Keep the run-logging flow unchanged.
Apply the notes to the hero section, weekly progress card, and recent runs list only.
After the update, test that logging a run still updates today's progress.
PM들에게 이것은 프로토타입이 공유 아티팩트로서 작동한다는 것을 의미합니다: 디자이너는 플로우에 주석을 달 수 있고, 엔지니어는 실현 가능성을 확인할 수 있고, 이해관계자는 게시된 버전을 사용해볼 수 있습니다.
## 🎉 축하합니다
제품 아이디어를 집중적이고 공유 가능한 프로토타입으로 변환했습니다 — 팀원과 고객이 사용해보고 반응할 수 있는 동작하는 Pace 대시보드. 어려운 부분은 이 프로토타입이 아니었습니다. 광범위한 아이디어를 하나의 테스트 가능한 플로우로 줄이고, 맥락 내에서 피드백을 수집하고, 다음에 무엇이 빌드할 가치가 있는지 결정하는 방법을 배우는 것이었습니다.
## 다음 단계
피드백을 사용하여 다음 단계 중 하나를 선택하세요:
새로 고침 후에도 달리기 기록을 저장하세요.
각 러너에게 자신의 진행 상황이 있는 계정을 제공하세요.
iOS 또는 Android에서 폰 우선 추적으로 Pace를 가져가세요.
달리기 기록을 진행 인사이트로 전환하세요.
### 병렬로 빌드하기
제품 방향에 대한 질문이 단순히 구현에 관한 것이 아닐 때, 여러 아이디어를 동시에 탐색하면 너무 일찍 전념하는 대신 옵션을 비교할 수 있습니다. Replit Agent는 병렬 작업을 지원합니다 — 동시에 둘 이상의 프로토타입, 기능, 또는 실험에 대해 Agent에게 작업을 요청하고 나란히 검토할 수 있습니다.
작업이 대기열에 들어가고, 실행되고, 완료되는 방식은 [작업 시스템](/core-concepts/agent/task-system)을 참조하세요.
어느 방향이 더 좋을지 확신하지 못할 때, Agent에게 두 가지 병렬 작업을 만들도록 요청하세요. Pace의 경우 다음을 비교할 수 있습니다:
* **동기 부여 우선 프로토타입**: 연속 기록, 성취, 격려하는 추천.
* **분석 우선 프로토타입**: 더 깊은 통계, 주별 트렌드, 개인 기록.
Create two parallel tasks for improving Pace as a product prototype.
Task 1 should explore a motivation-first version with streaks, achievements, and encouraging recommendations.
Task 2 should explore an analytics-first version with deeper stats, week-over-week trends, and personal records.
Keep both versions small enough to test today.
For each task, define the user flow, what to build, and how I should evaluate the result.
두 작업이 완료되면 동일한 피드백 질문으로 비교하세요:
> 어느 버전이 내일 다시 돌아오게 만들 가능성이 더 높고, 그 이유는 무엇인가요?
## 추가 도움이 필요하신가요?
* **프로토타입에 기능이 너무 많을 때:** Agent에게 하나의 목표 사용자와 하나의 플로우로 줄여달라고 요청하세요.
* **대상이 불명확할 때:** Agent에게 한 명의 목표 사용자를 위해 환영 섹션을 다시 작성해달라고 요청하세요.
* **모의 데이터가 위험을 숨길 때:** Agent에게 실제인 것과 모의인 것의 목록을 만들어달라고 요청하세요.
* **피드백이 막연할 때:** 검토자에게 하나의 작업과 하나의 질문을 주세요.
* **게시가 실패할 때:** [게시 문제 해결](/build/troubleshooting)을 사용하세요.
## 관련 항목
* [첫 번째 앱 빌드하고 게시하기](/build/your-first-app)
* [바이브 코딩 101](/learn/foundations/vibe-coding-101)
* [팀원 초대하기](/build/invite-teammates)
 계획을 검토하세요: 목표 사용자, 주요 플로우, 실제로 구현할 것, 모의로 처리할 것, 그리고 테스트 체크리스트. 계획에 기능이 너무 많다면 Agent에게 줄이도록 요청하세요.
 게시한 후 새 브라우저 탭에서 공개 URL을 열어 공유하기 전에 처음 방문하는 사람에게 경험이 제대로 작동하는지 확인하세요.
 그런 다음 피드백이 시각적일 때 [Canvas](/learn/design/canvas)를 사용하세요. 프로토타입에 직접 메모를 추가하고, 변경하고 싶은 영역에 주석을 달고, 앱을 업데이트할 때 그 메모를 사용하도록 Agent에게 요청하세요.
 PM들에게 이것은 프로토타입이 공유 아티팩트로서 작동한다는 것을 의미합니다: 디자이너는 플로우에 주석을 달 수 있고, 엔지니어는 실현 가능성을 확인할 수 있고, 이해관계자는 게시된 버전을 사용해볼 수 있습니다.
 작업이 대기열에 들어가고, 실행되고, 완료되는 방식은 [작업 시스템](/core-concepts/agent/task-system)을 참조하세요.
어느 방향이 더 좋을지 확신하지 못할 때, Agent에게 두 가지 병렬 작업을 만들도록 요청하세요. Pace의 경우 다음을 비교할 수 있습니다:
* **동기 부여 우선 프로토타입**: 연속 기록, 성취, 격려하는 추천.
* **분석 우선 프로토타입**: 더 깊은 통계, 주별 트렌드, 개인 기록.
작업이 대기열에 들어가고, 실행되고, 완료되는 방식은 [작업 시스템](/core-concepts/agent/task-system)을 참조하세요.
어느 방향이 더 좋을지 확신하지 못할 때, Agent에게 두 가지 병렬 작업을 만들도록 요청하세요. Pace의 경우 다음을 비교할 수 있습니다:
* **동기 부여 우선 프로토타입**: 연속 기록, 성취, 격려하는 추천.
* **분석 우선 프로토타입**: 더 깊은 통계, 주별 트렌드, 개인 기록.