> ## Documentation Index
> Fetch the complete documentation index at: https://docs.replit.com/llms.txt
> Use this file to discover all available pages before exploring further.
# Shopify 스토어프론트 빌드하기
> Replit으로 커스텀 Shopify 스토어프론트를 디자인하고 출시하는 방법을 알아보세요.
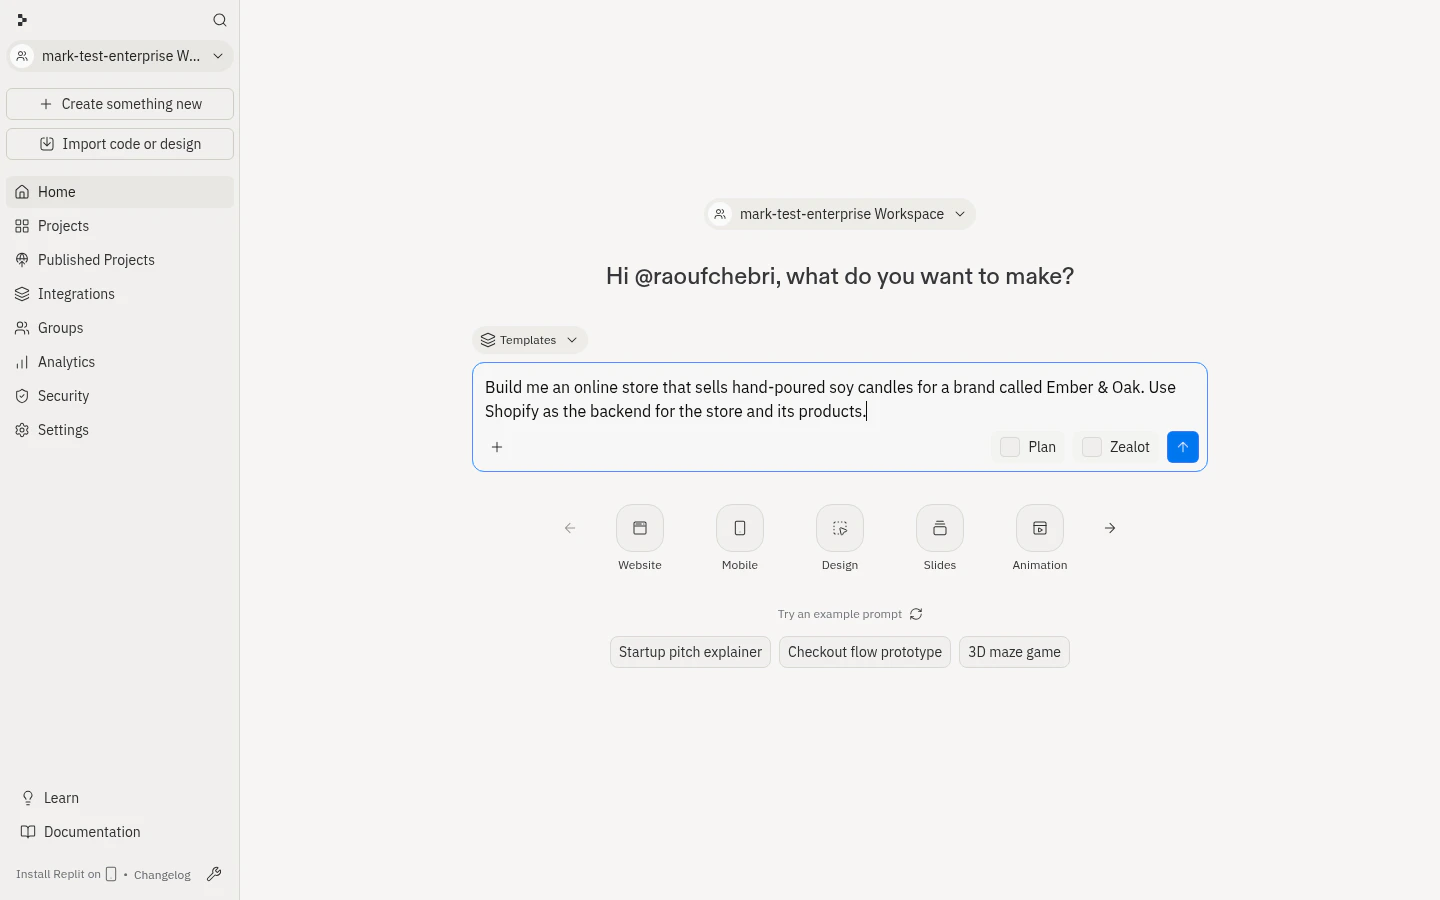
export const CANDLE_STORE_PROMPT = `Build me an online store that sells hand-poured soy candles for a brand called "Ember & Oak." Use Shopify as the backend for the store and its products.
It should feel warm, calm, and premium — like a boutique home-goods brand. Use a soft cream background, deep charcoal text, and a muted amber accent. Elegant serif headlines, generous spacing, and soft rounded product cards.
Top to bottom:
A simple header with a small "Ember & Oak" wordmark on the left, a few links in the middle (Shop, Scents, Our Story), and a cart icon on the right.
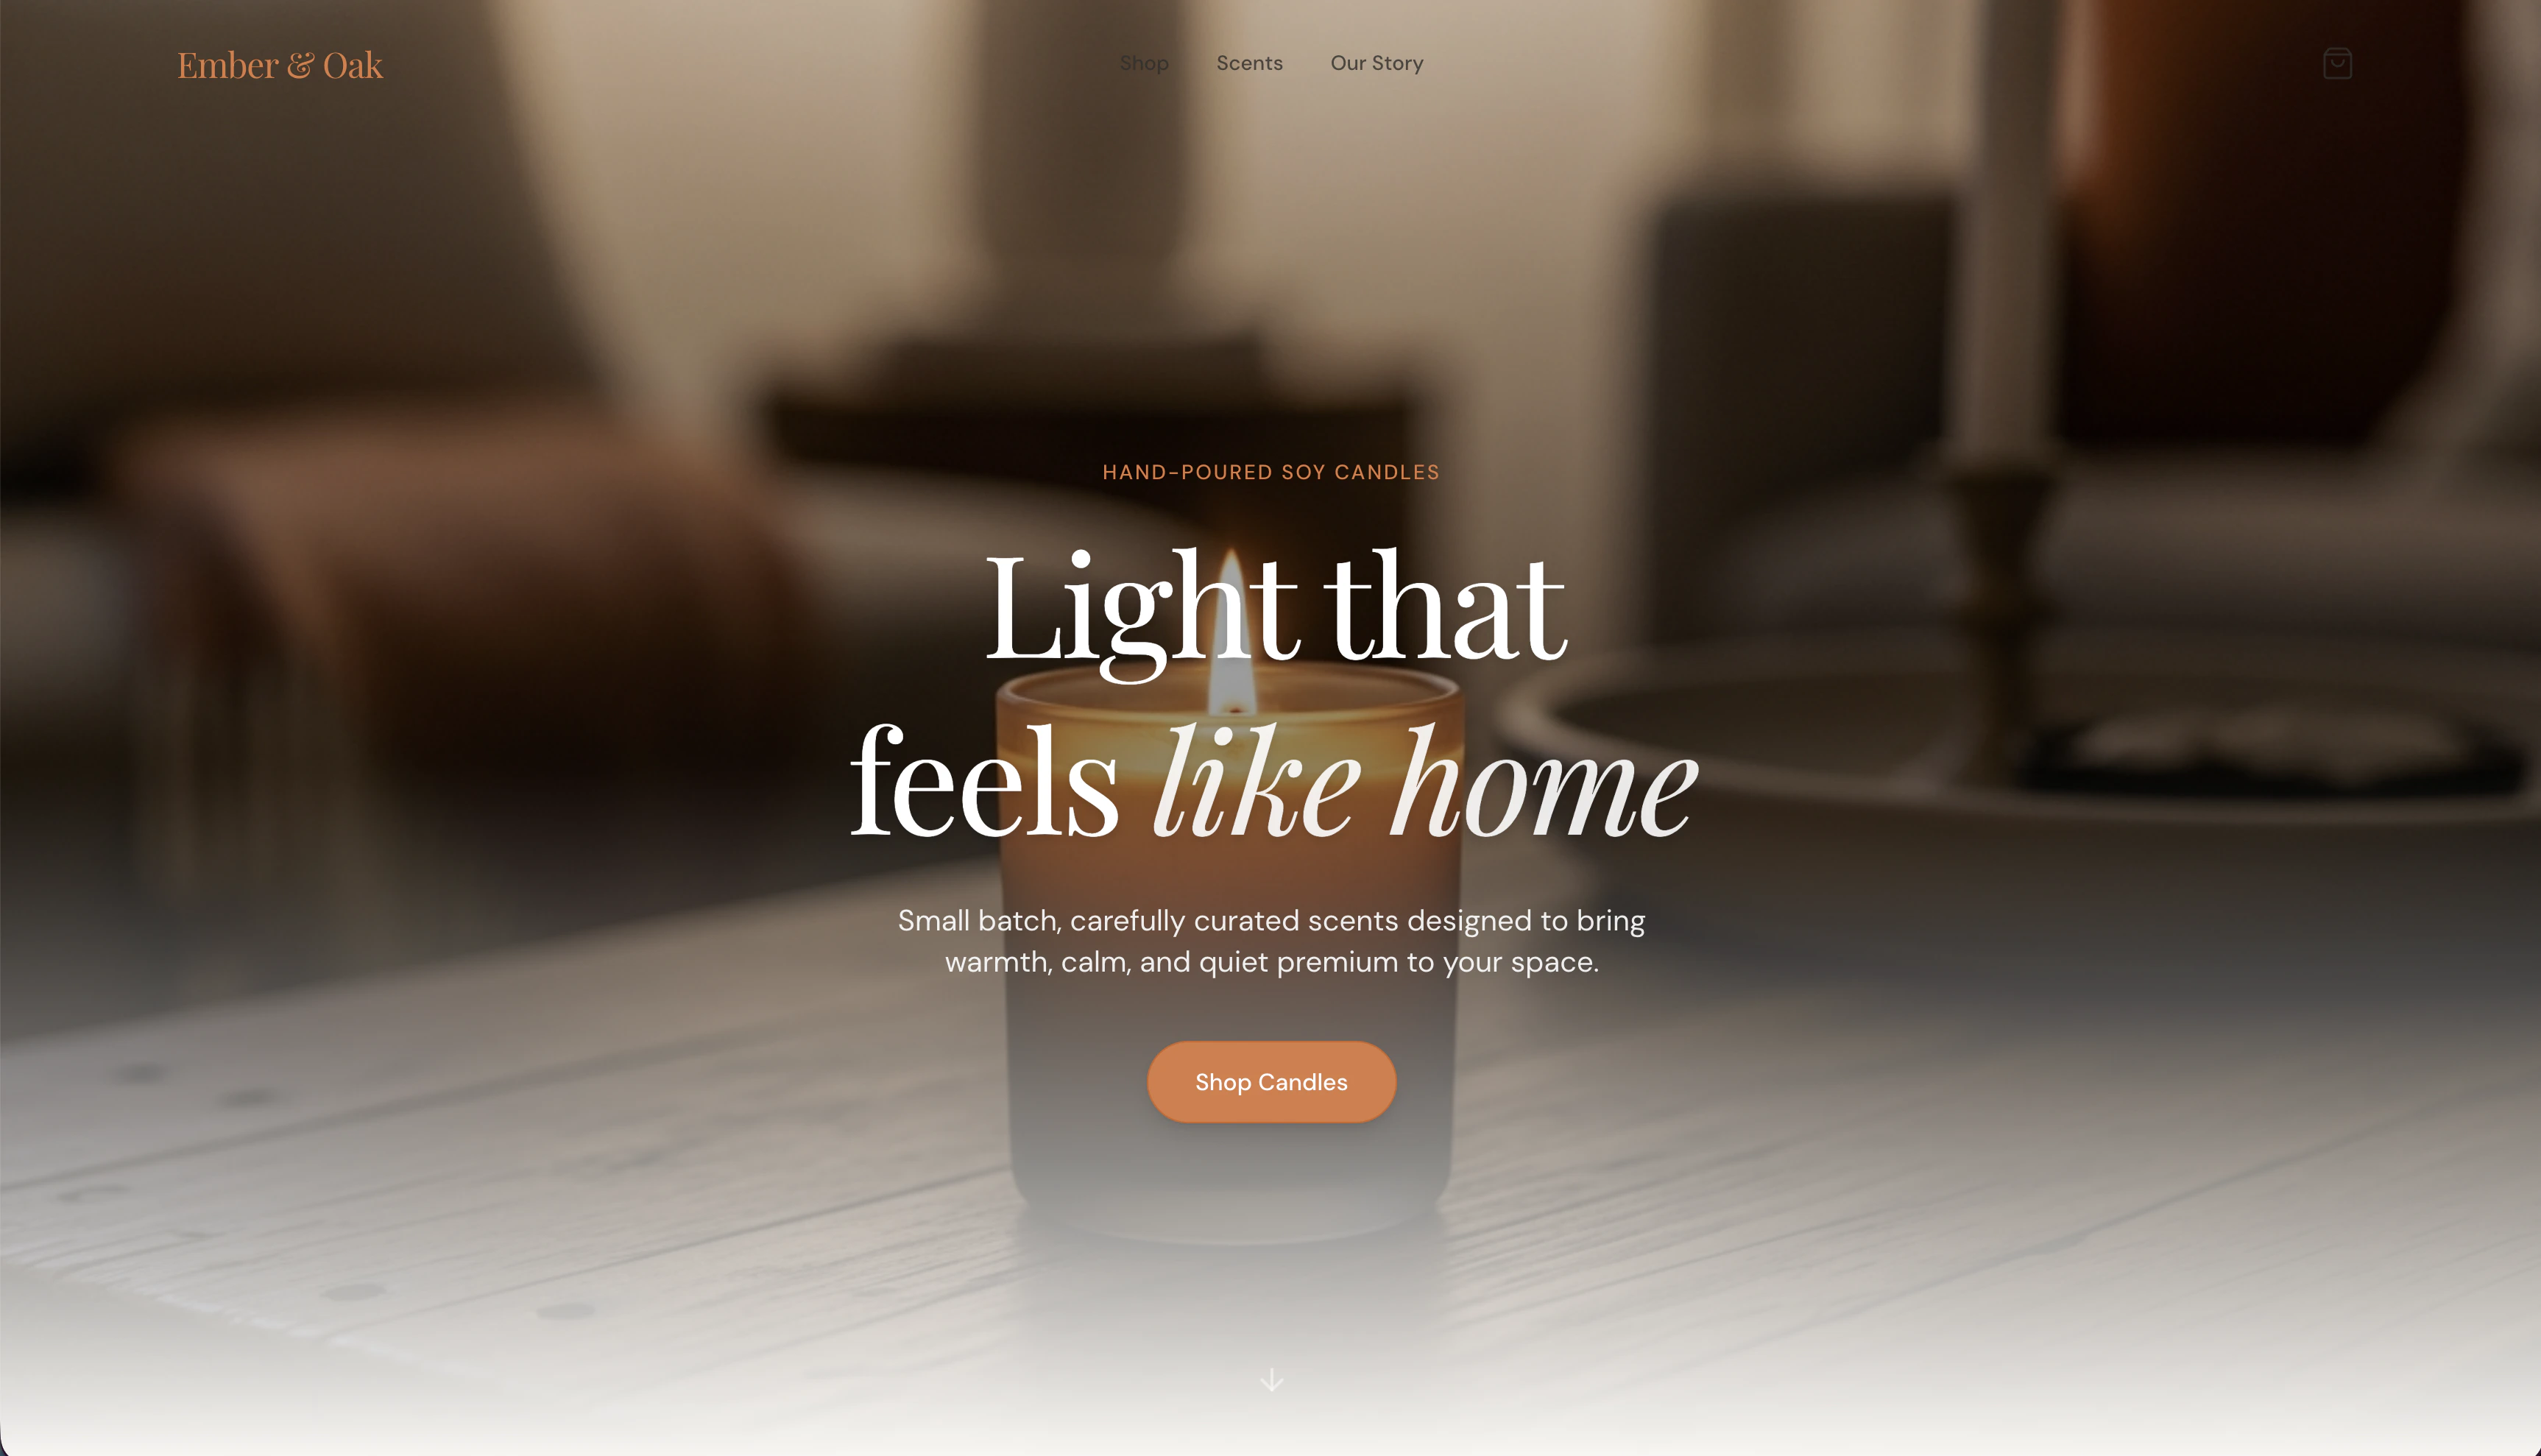
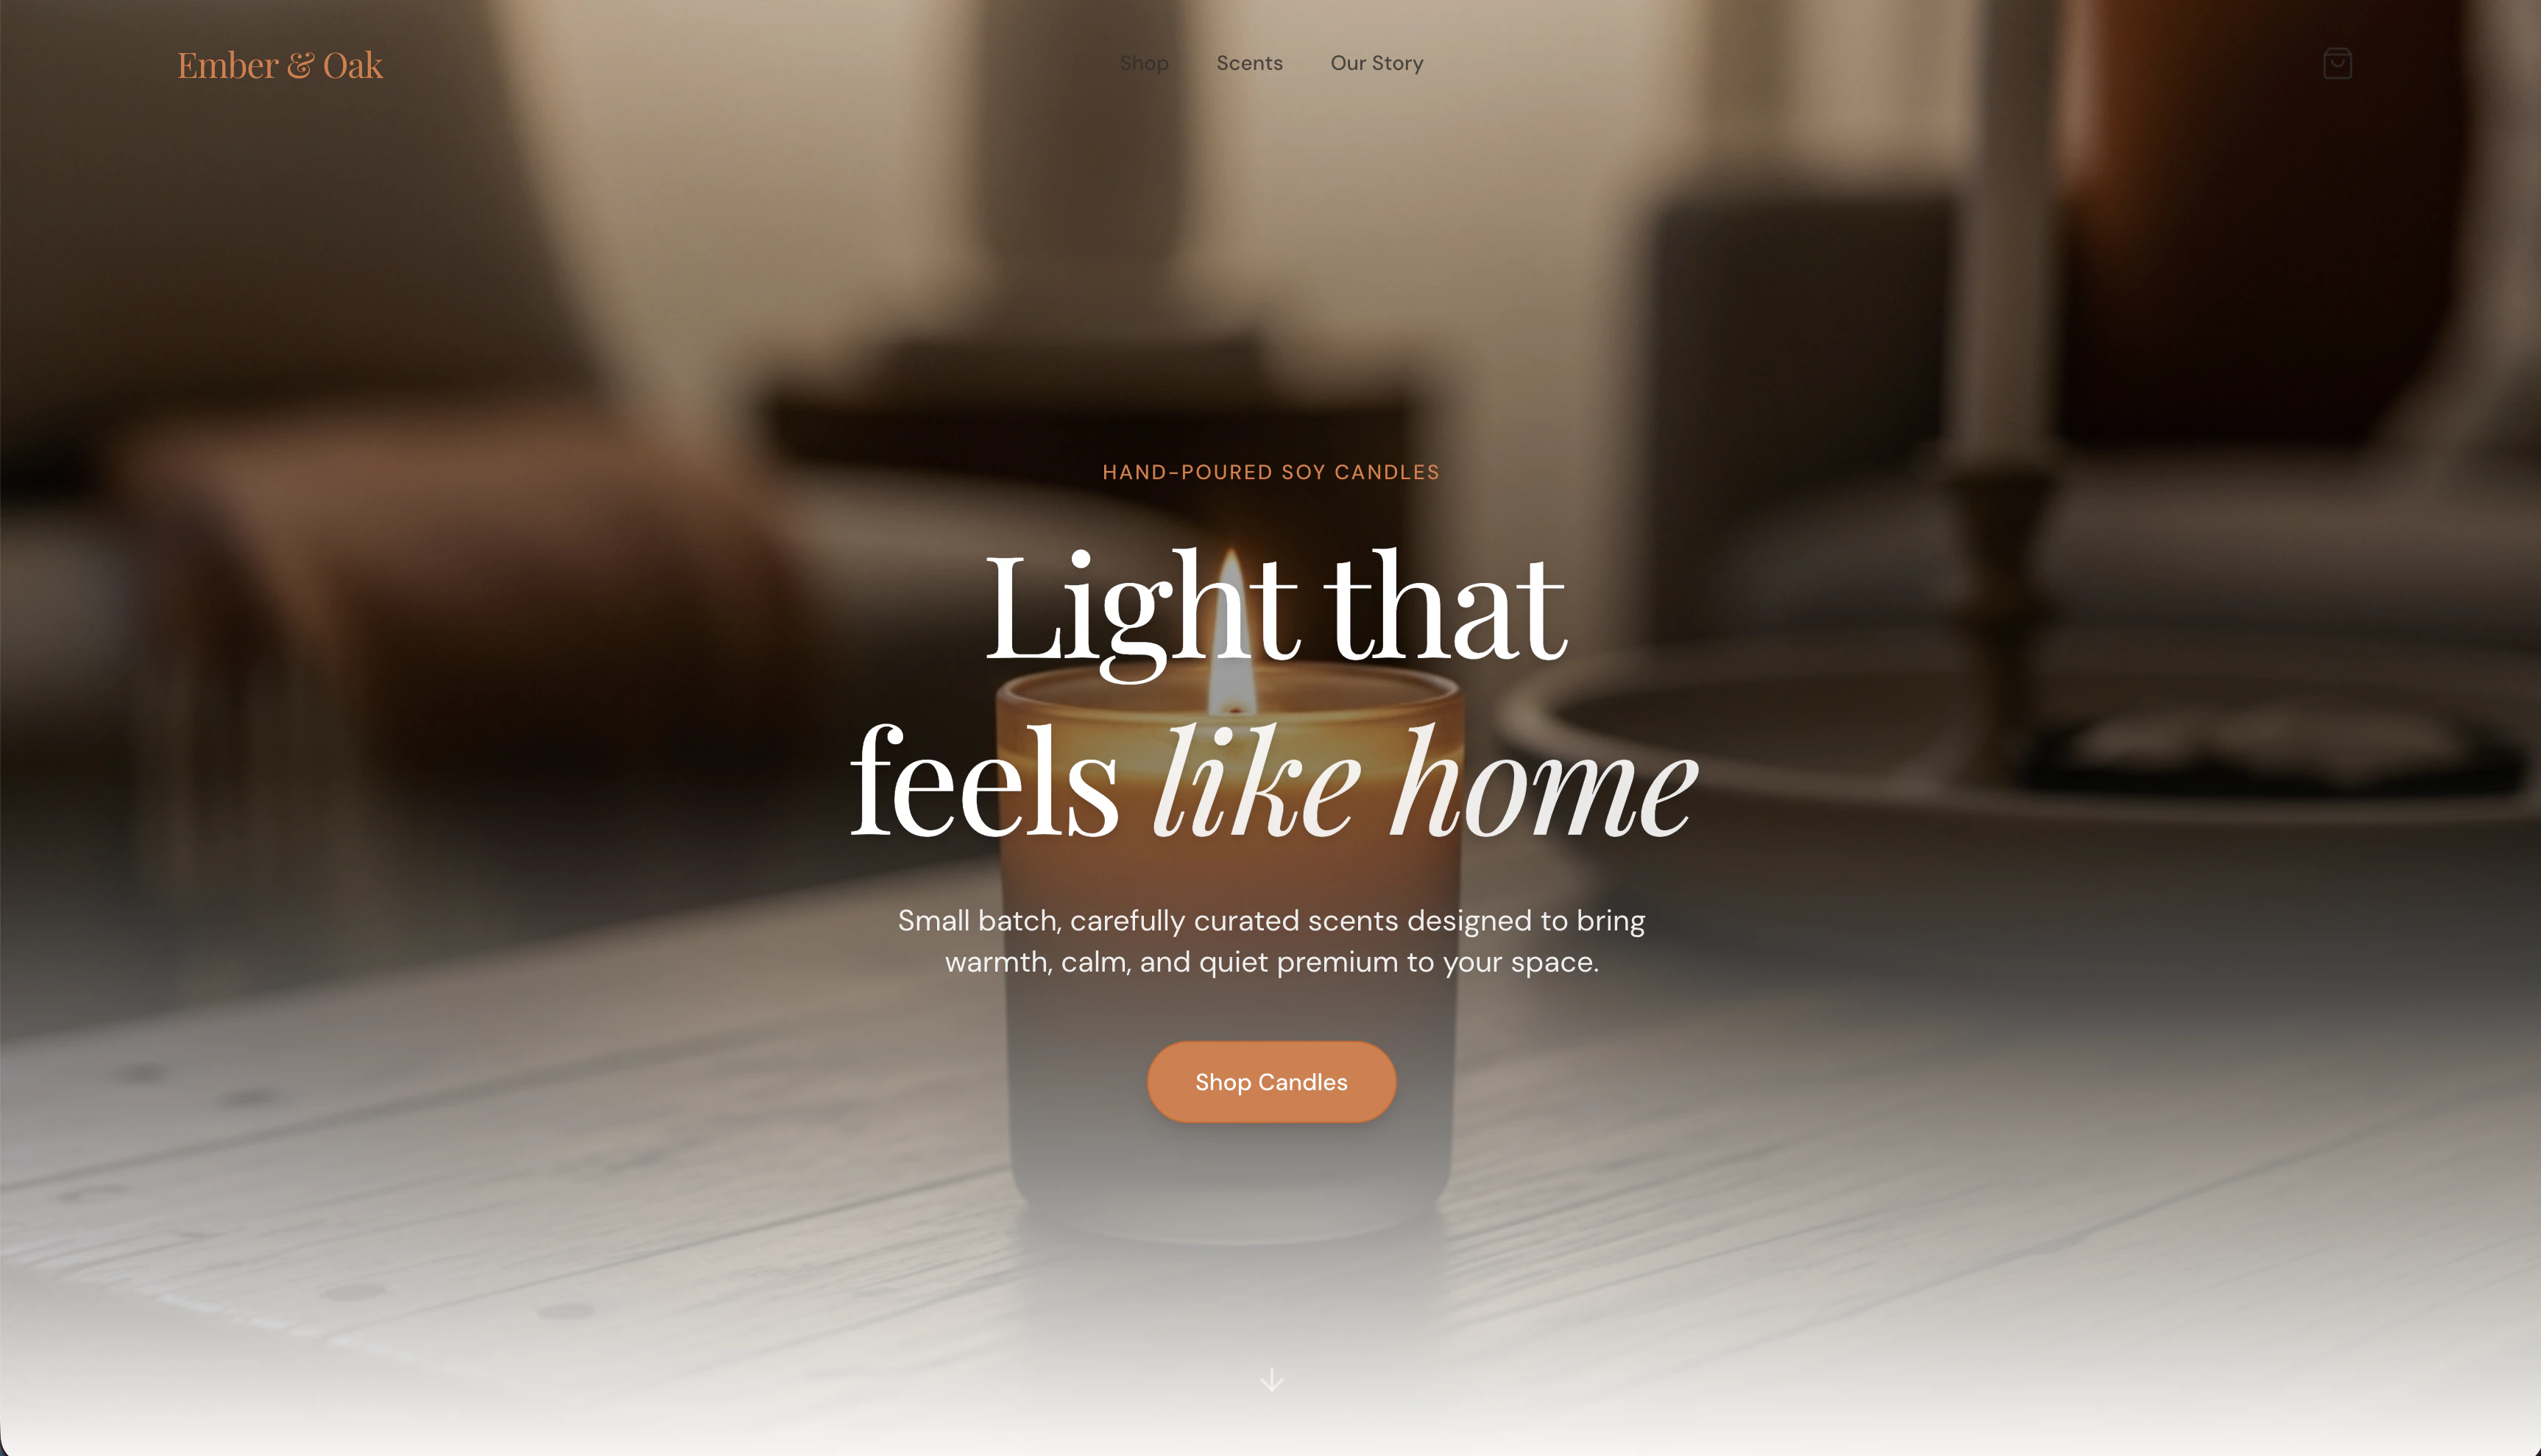
A hero section with a large lifestyle photo of a lit candle on a wooden table in warm light, a headline like "Light that feels like home," a one-line subhead, and a "Shop candles" button.
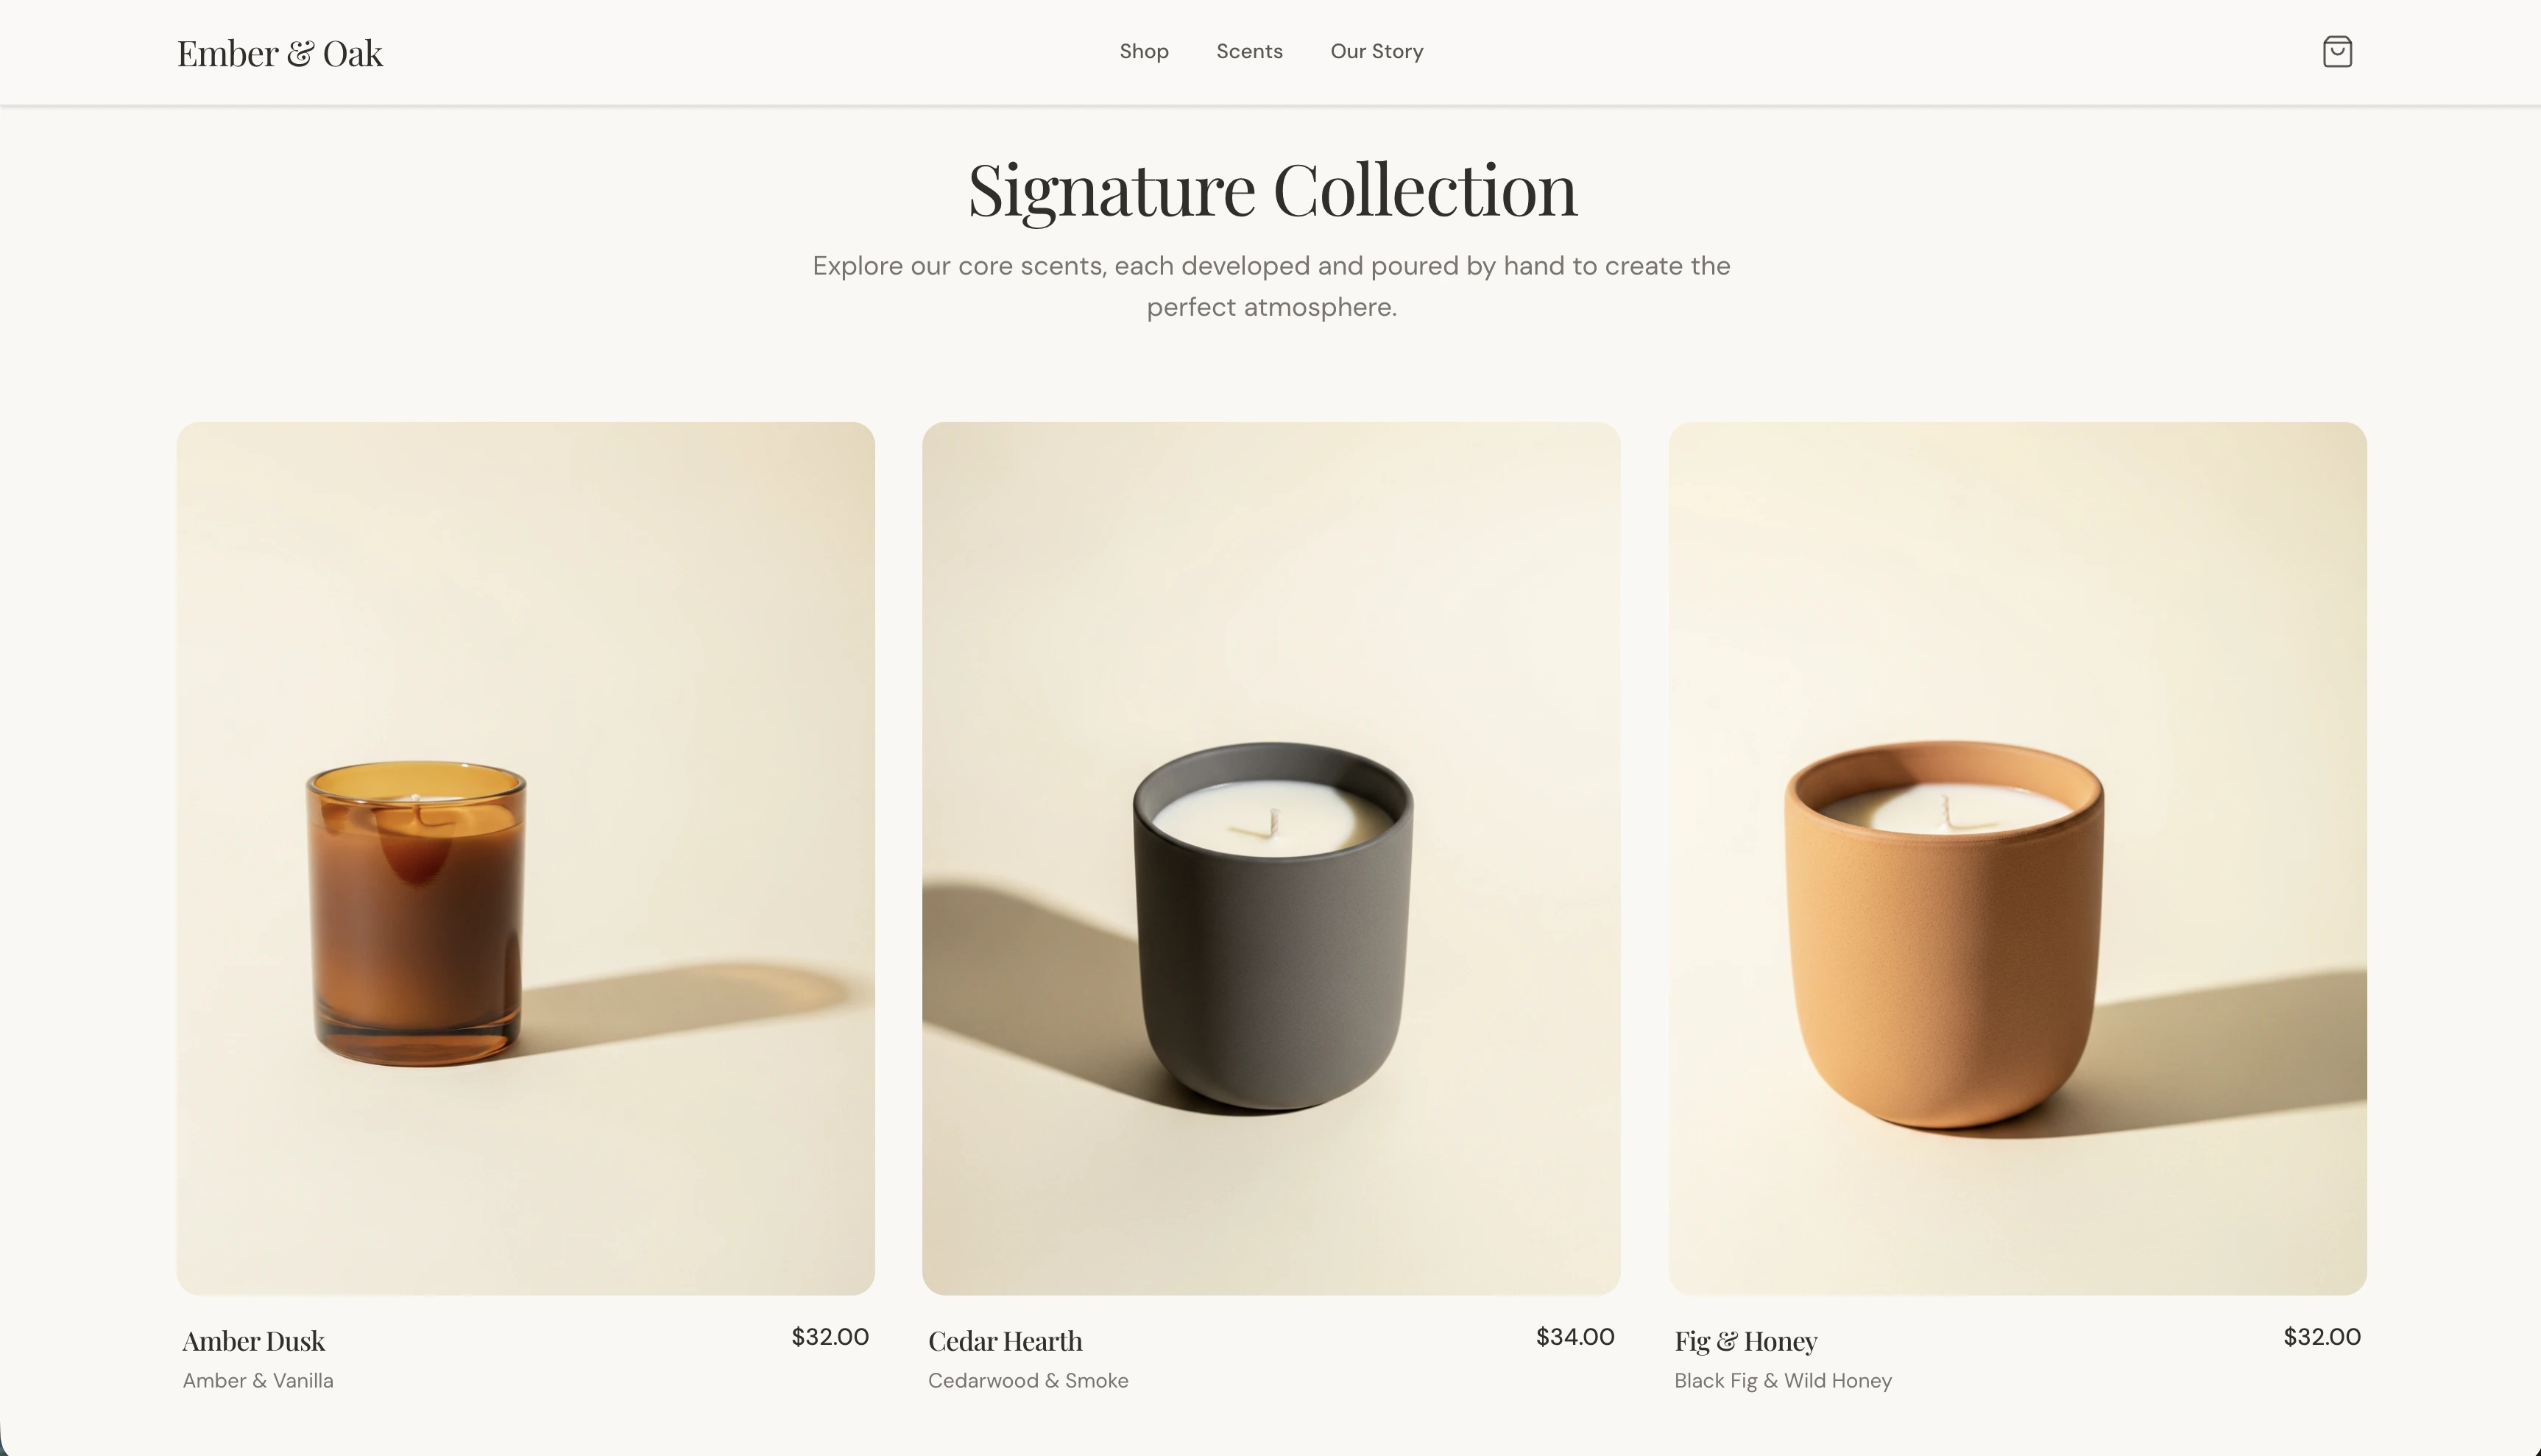
A product grid that shows each candle with its photo, name, scent, and price, with an "Add to cart" button on each card. Read the products from the connected Shopify store.
A short "Our Story" band with a sentence or two about small-batch, hand-poured candles.
A simple footer with the wordmark and the same links.
Generate warm, cozy candle and home photography. Make it look like a real boutique brand, not a template. Wire the product grid and cart to the Shopify store you set up — don't ask me for any Shopify API keys.`;
export const PromptActions = ({prompt = "", campaign = "docs-prompt-actions"}) => {
const LZ_SRC = "https://cdnjs.cloudflare.com/ajax/libs/lz-string/1.5.0/lz-string.min.js";
const ensureLZString = () => {
if (typeof document === "undefined") return;
if (window.LZString) return;
if (document.querySelector(`script[src="${LZ_SRC}"]`)) return;
const s = document.createElement("script");
s.src = LZ_SRC;
s.async = true;
document.head.appendChild(s);
};
const handleCopy = async e => {
const btn = e.currentTarget;
if (!prompt) return;
try {
await navigator.clipboard.writeText(prompt);
} catch {
const ta = document.createElement("textarea");
ta.value = prompt;
document.body.appendChild(ta);
ta.select();
try {
document.execCommand("copy");
} catch {}
document.body.removeChild(ta);
}
const original = btn.dataset.label || btn.innerText;
btn.dataset.label = original;
btn.innerText = "Copied!";
setTimeout(() => {
if (btn.isConnected) btn.innerText = original;
}, 1500);
};
const handleBuild = () => {
if (!prompt || typeof window === "undefined") return;
const utm = `utm_source=replit-docs&utm_medium=docs&utm_campaign=${encodeURIComponent(campaign)}&utm_content=prompt-actions`;
let url;
if (window.LZString) {
const encoded = window.LZString.compressToEncodedURIComponent(prompt);
url = `https://replit.com/?prompt=${encoded}&referrer=replit-docs&${utm}`;
} else {
url = `https://replit.com/?prompt=${encodeURIComponent(prompt)}&referrer=replit-docs&${utm}`;
}
window.open(url, "_blank", "noopener,noreferrer");
};
ensureLZString();
const baseButtonStyle = {
display: "inline-flex",
alignItems: "center",
gap: "6px",
padding: "8px 16px",
borderRadius: "8px",
fontSize: "14px",
fontWeight: 500,
cursor: "pointer",
lineHeight: 1.2,
fontFamily: "inherit",
textDecoration: "none"
};
return
;
};
원하는 스토어를 설명하기만 하면 커스텀 Shopify 스토어프론트를 디자인하고 출시할 수 있습니다. Agent가 하나의 대화에서 Shopify 스토어를 프로비저닝하고, 스토어를 기반으로 프론트엔드를 빌드하고, 상품을 추가합니다. 판매할 준비가 되면 Shopify로 이동하여 스토어를 소유권 이전하고 결제를 활성화하기만 하면 됩니다.
이 가이드에서는 프롬프트부터 게시된 스토어프론트까지 소규모 양초 스토어인 **Ember & Oak**를 빌드합니다.
## 달성할 것
이 가이드를 마치면 다음을 갖게 됩니다:
* 실제 Shopify 스토어가 뒷받침하는 커스텀 디자인의 양초 스토어프론트.
* Shopify에서 만들어져 스토어프론트에 렌더링된 상품과 가격.
* 구매자를 Shopify 결제로 보내는 동작하는 장바구니.
* 출시로 가는 명확한 경로: 스토어 소유권 이전, 결제 활성화, 출시.
## 배울 것
다음을 배우게 됩니다:
* Agent가 Shopify를 추천하고 프로비저닝하도록 스토어를 설명하는 방법.
* API 키를 다루지 않고 Shopify에 연결하는 방법.
* Agent와 채팅하여 상품을 추가하고 게시하는 방법.
* 디자인과 구매 흐름을 다듬는 방법.
* 스토어를 개발에서 라이브 판매 가능한 스토어프론트로 전환하는 방법.
## Shopify 연결하기
Shopify는 모든 앱의 모든 빌더가 사용할 수 있으며, 대화 내에서 바로 연결합니다. 만들고 싶은 스토어를 설명하는 것으로 시작하세요.
프롬프트를 복사하여 [replit.com](https://replit.com)의 프롬프트 박스에 붙여넣거나, **Build on Replit**을 클릭하여 프롬프트가 미리 입력된 Replit을 여세요.
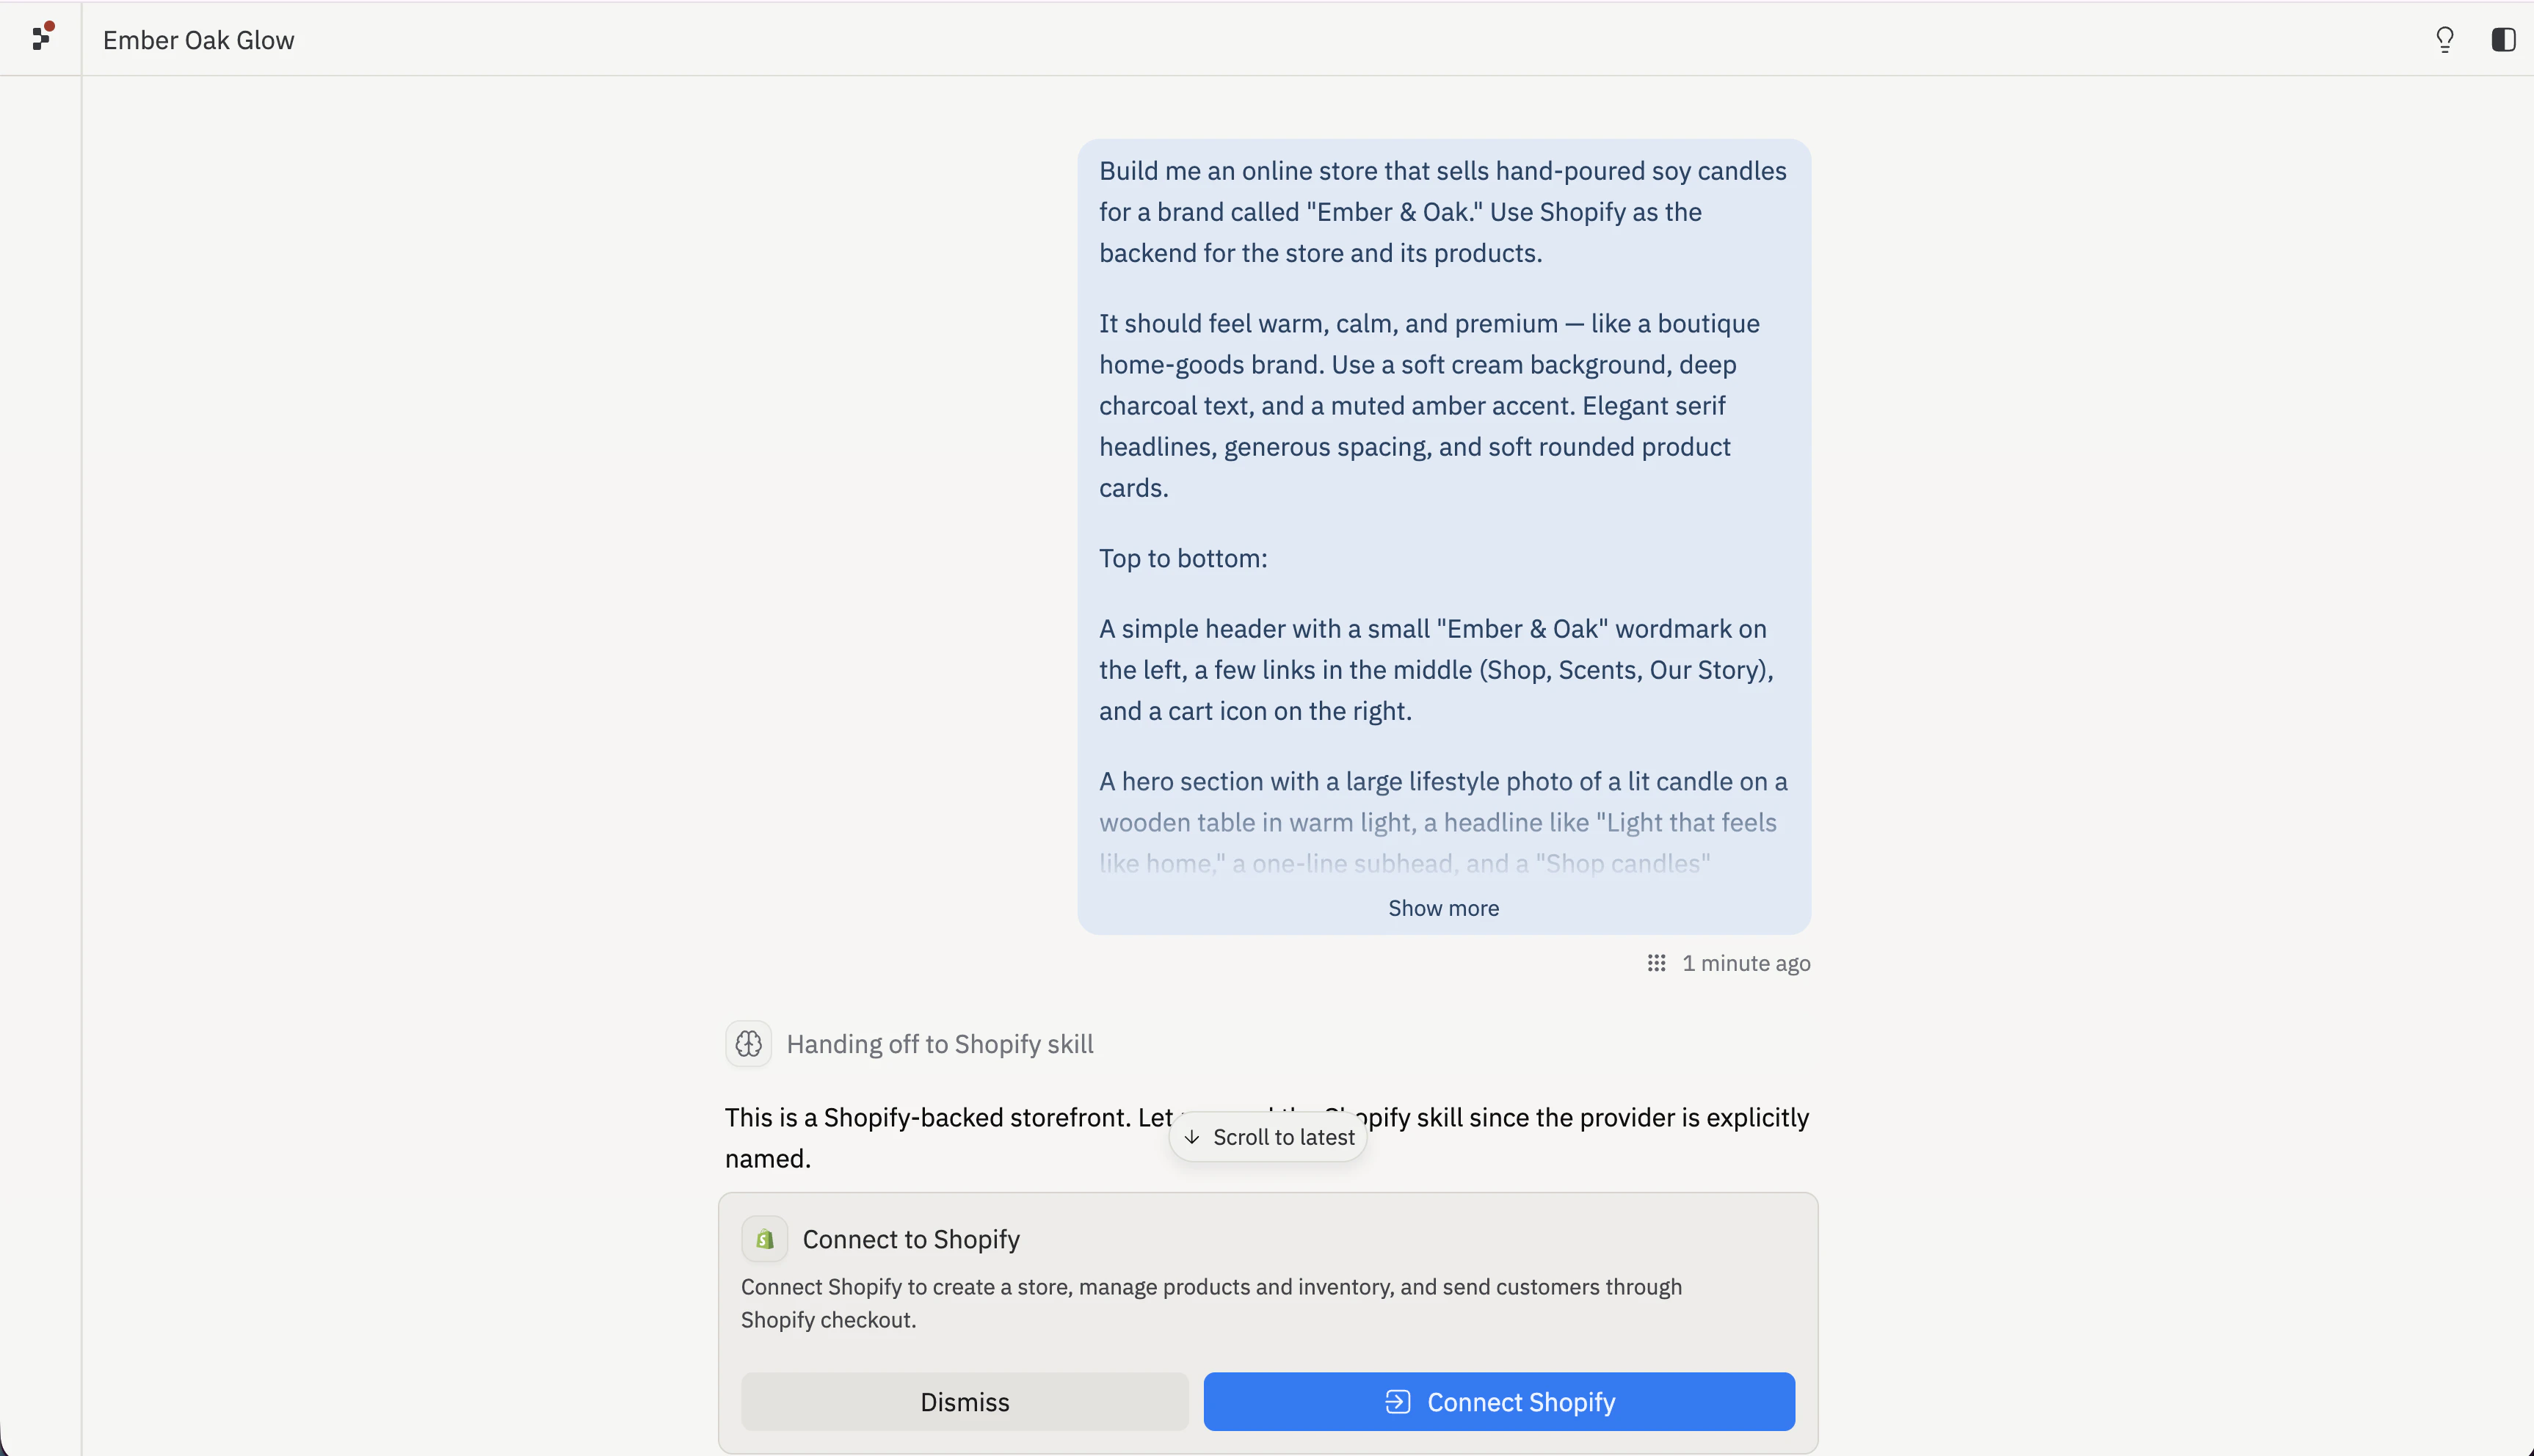
Agent는 실물 상품을 판매하는 것을 인식하고 스토어프론트의 백엔드로 Shopify를 추천합니다.
Agent가 앱을 위한 Shopify 스토어를 만들도록 요청합니다. 승인하면 Agent가 Replit 소유의 개발 스토어를 프로비저닝하고 연결합니다. 추가 구성이 필요하지 않습니다.
나중에 스토어를 소유권 이전할 수 있도록 이메일이 Shopify와 공유됩니다.
스토어는 비밀번호로 보호된 상태로 시작하며 출시 전까지 실제 결제를 받을 수 없으므로 위험 없이 자유롭게 빌드할 수 있습니다.
각 Shopify 스토어는 단일 앱에 연결됩니다. 나중에 두 번째 스토어를 빌드하면 Agent가 해당 앱을 위한 새로운 Shopify 스토어를 프로비저닝합니다. 전체 커넥터 세부 정보는 [Shopify 연결](/references/integrations/shopify)을 참조하세요.
## 스토어프론트 빌드하기
Shopify가 연결되면 Agent가 스토어를 기반으로 스토어프론트를 디자인하고 빌드합니다.
Agent가 프롬프트에서 스토어프론트를 생성합니다 — 히어로, 상품 그리드, 장바구니, 그리고 지원 섹션들. 완료되면 오른쪽 창이 **Preview**로 전환되어 페이지를 스크롤하고 디자인을 클릭해볼 수 있습니다.
새 스토어는 빈 카탈로그로 시작합니다. Agent에게 상품을 추가하도록 요청하면 Shopify에 상품을 만들고 스토어프론트에 게시합니다.
Add a lavender soy candle for \$18 with a short cozy description, then publish it to the storefront.
상품이 Shopify 스토어에 만들어지고 스토어프론트 상품 그리드에 나타납니다.
계속해서 상품을 설명하여 추가하세요. Agent가 각 상품을 가격, 설명, 이미지와 함께 Shopify에 만듭니다.
Add three more candles: Cedar & Sage at $20, Vanilla Bean at $16, and Sea Salt at \$22. Give each a short description and publish them.
**심화:** Agent에게 상품을 컬렉션으로 그룹화하도록 요청하거나("베스트셀러 세 개로 Holiday 컬렉션 만들기"), 크기나 향 같은 상품 변형을 추가하거나, 재고를 추적하여 스토어프론트에 재고 상황이 표시되도록 하세요. Shopify가 이 모든 것의 시스템 기록을 유지합니다.
## 디자인과 결제 반복 개선하기
스토어프론트의 모든 부분은 대화를 통해 편집할 수 있습니다. 외관을 다듬은 다음 처음부터 끝까지 구매 흐름을 확인하세요.
변경하고 싶은 것을 설명하면 Agent가 스토어프론트를 업데이트합니다.
Make the hero section feel more editorial — larger headline, more whitespace, and a softer amber accent on the buttons.
Preview에서 양초를 장바구니에 추가하고 결제를 시작하세요. 장바구니는 구매자를 Shopify의 호스팅된 결제로 보냅니다. 개발 중에는 스토어가 비밀번호로 보호되어 있으므로 결제 미리보기에서 비밀번호 페이지가 표시될 수 있습니다 — 이것은 정상이며 문제가 있다는 뜻이 아닙니다.
**심화:** Agent에게 상품 상세 페이지, 장바구니 드로어, 검색, 또는 추천 상품 섹션을 추가하도록 요청하세요. 스토어프론트가 실제 Replit 프로젝트이므로 설명할 수 있는 것은 무엇이든 확장할 수 있습니다 — 블로그, 위시리스트, 또는 커스텀 랜딩 페이지 — Shopify는 결제와 주문을 처리합니다.
## 출시하기
라이브 전환은 Shopify에서 이루어집니다. Agent에게 Go Live 플로우를 시작하도록 요청한 다음 판매자 소유 단계를 완료하세요.
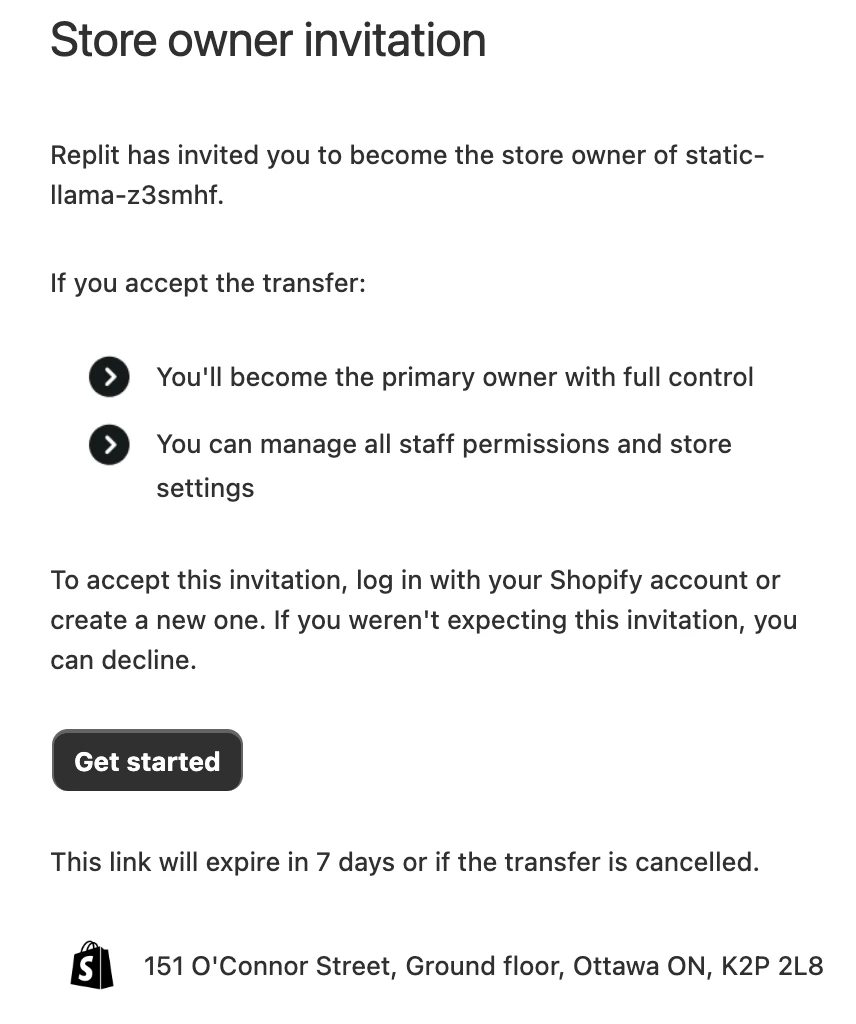
소유권 이전은 Shopify에서 이루어지며 Replit 외부에서 진행되는 유일한 단계입니다. 스토어가 생성될 때 이메일이 Shopify와 공유되었으므로 Replit이 제공하는 링크나 Shopify가 보내는 이메일에서 소유권을 이전할 수 있습니다.
Shopify가 단계를 안내하는 **Store owner invitation** 이메일을 보냅니다. 열고 **Get started**를 선택하세요.
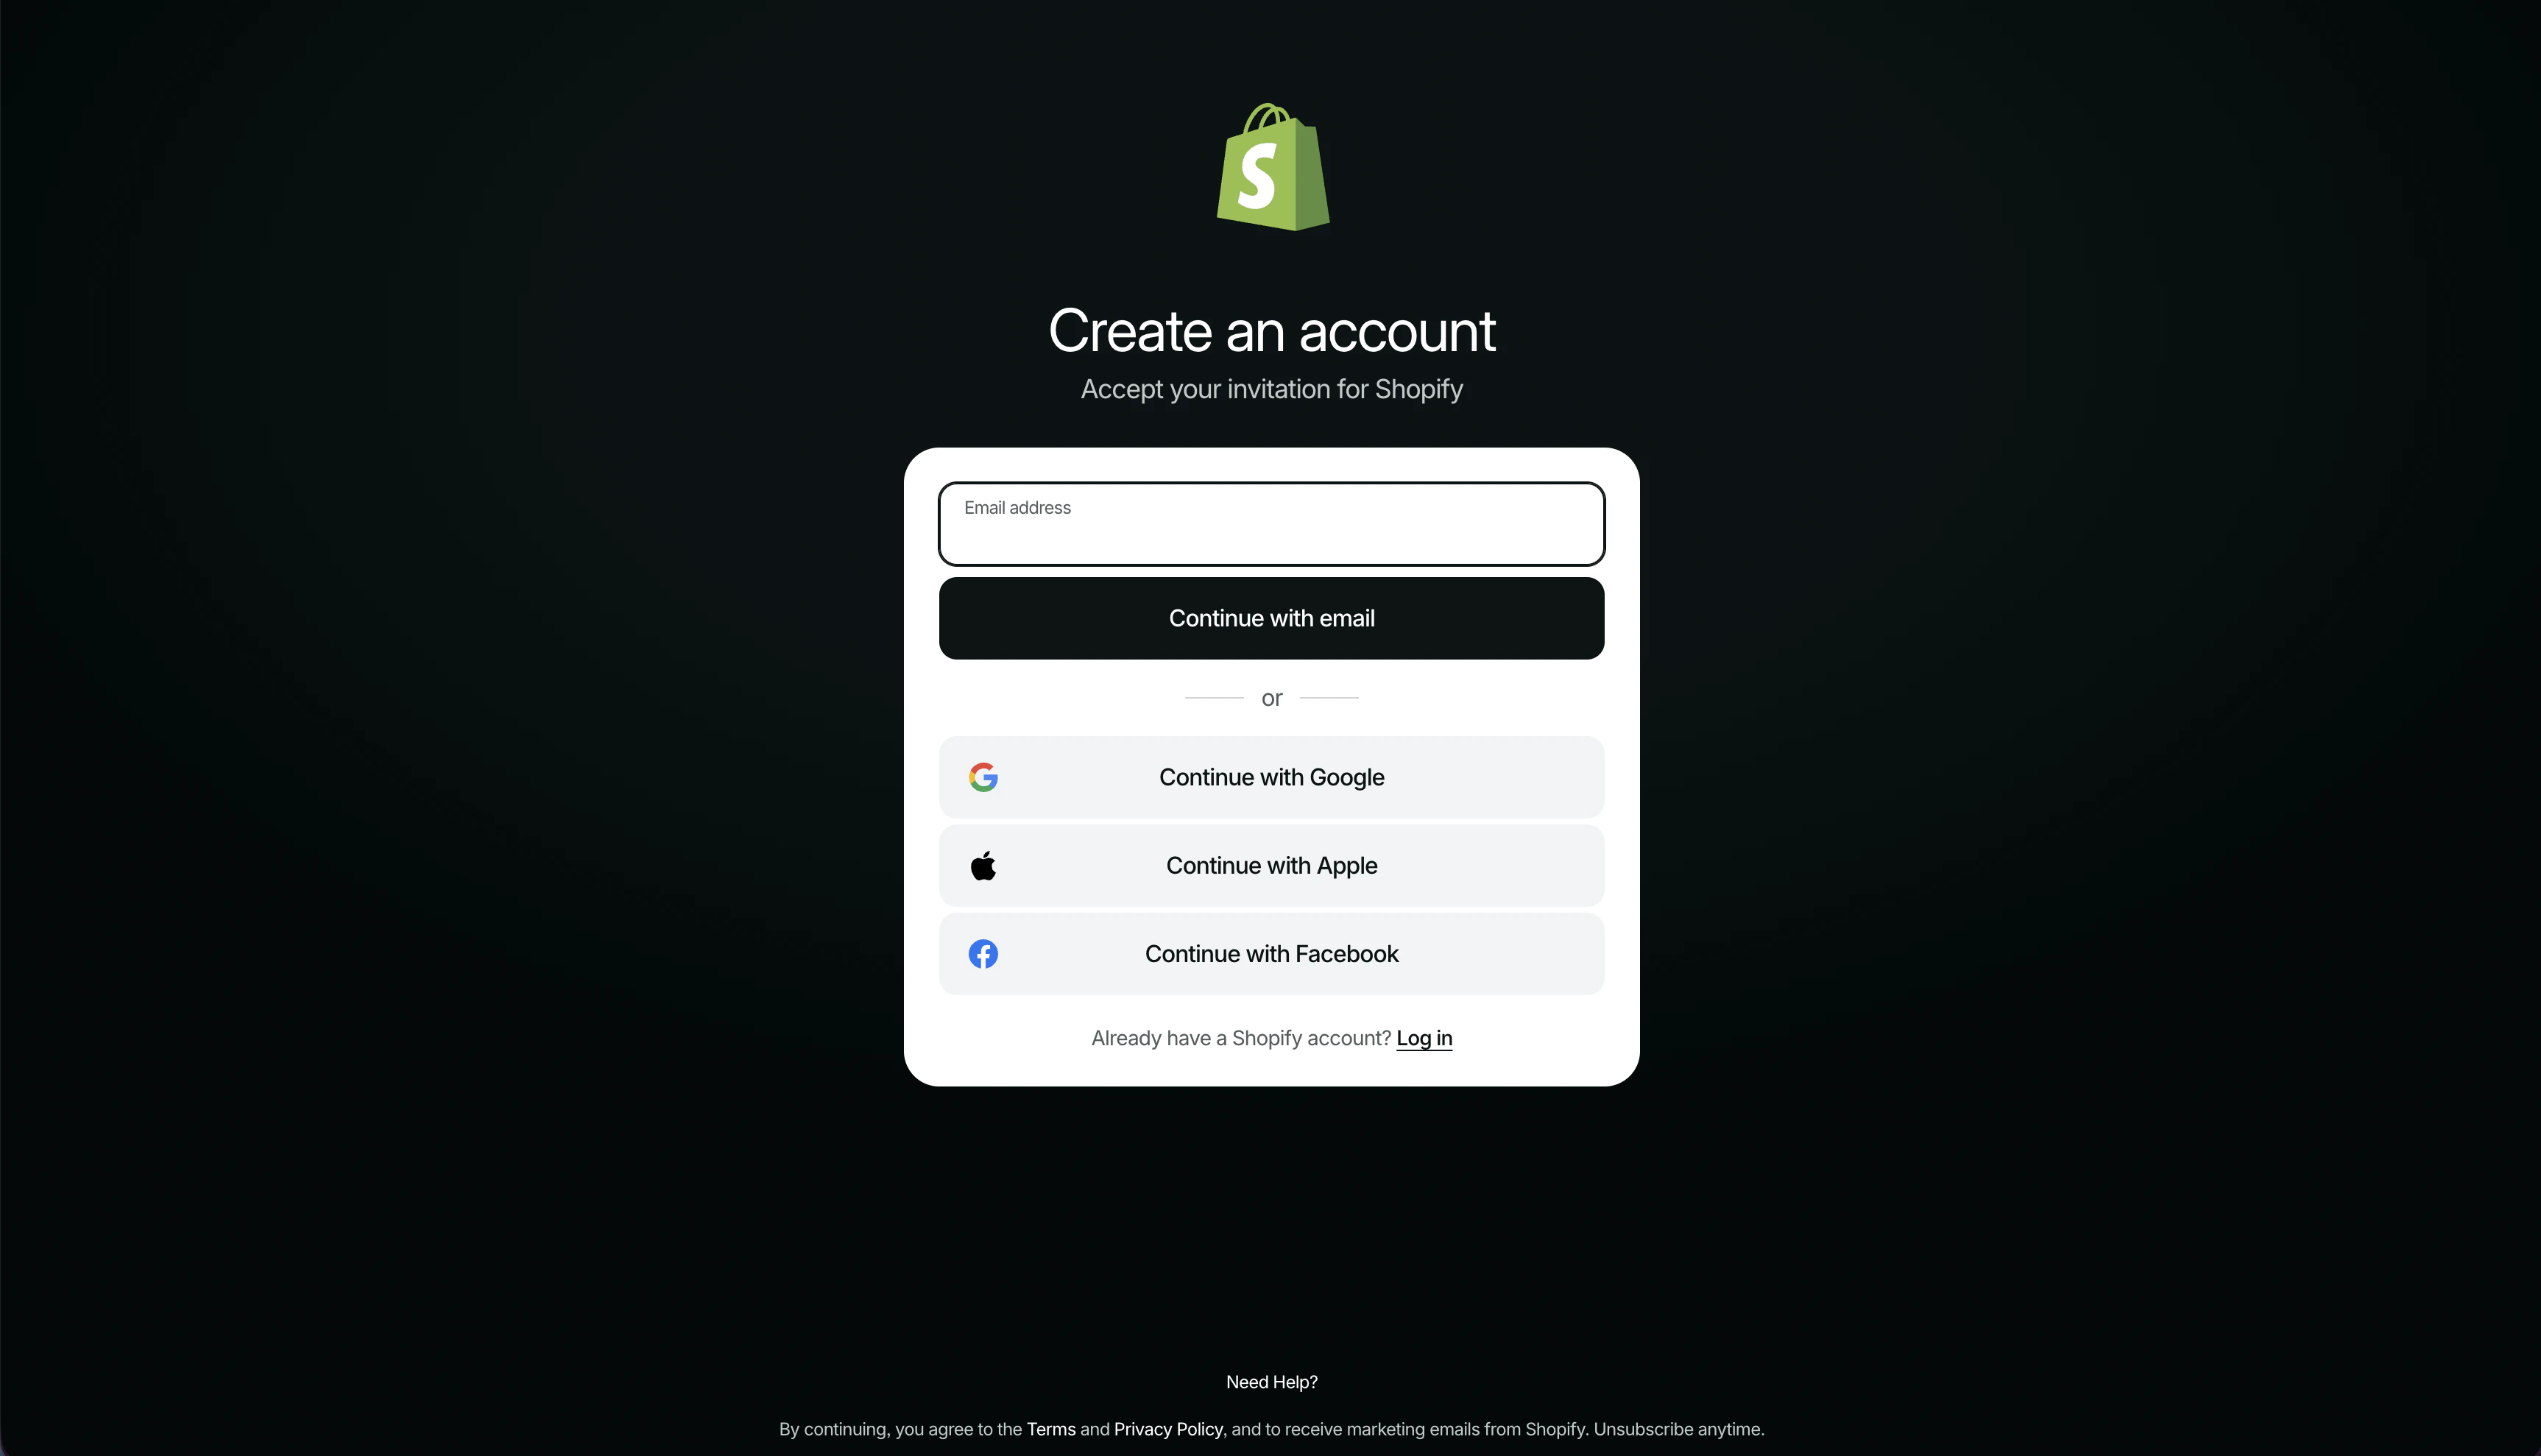
기존 Shopify 계정으로 로그인하거나, 초대를 수락하기 위해 계정을 만드세요.
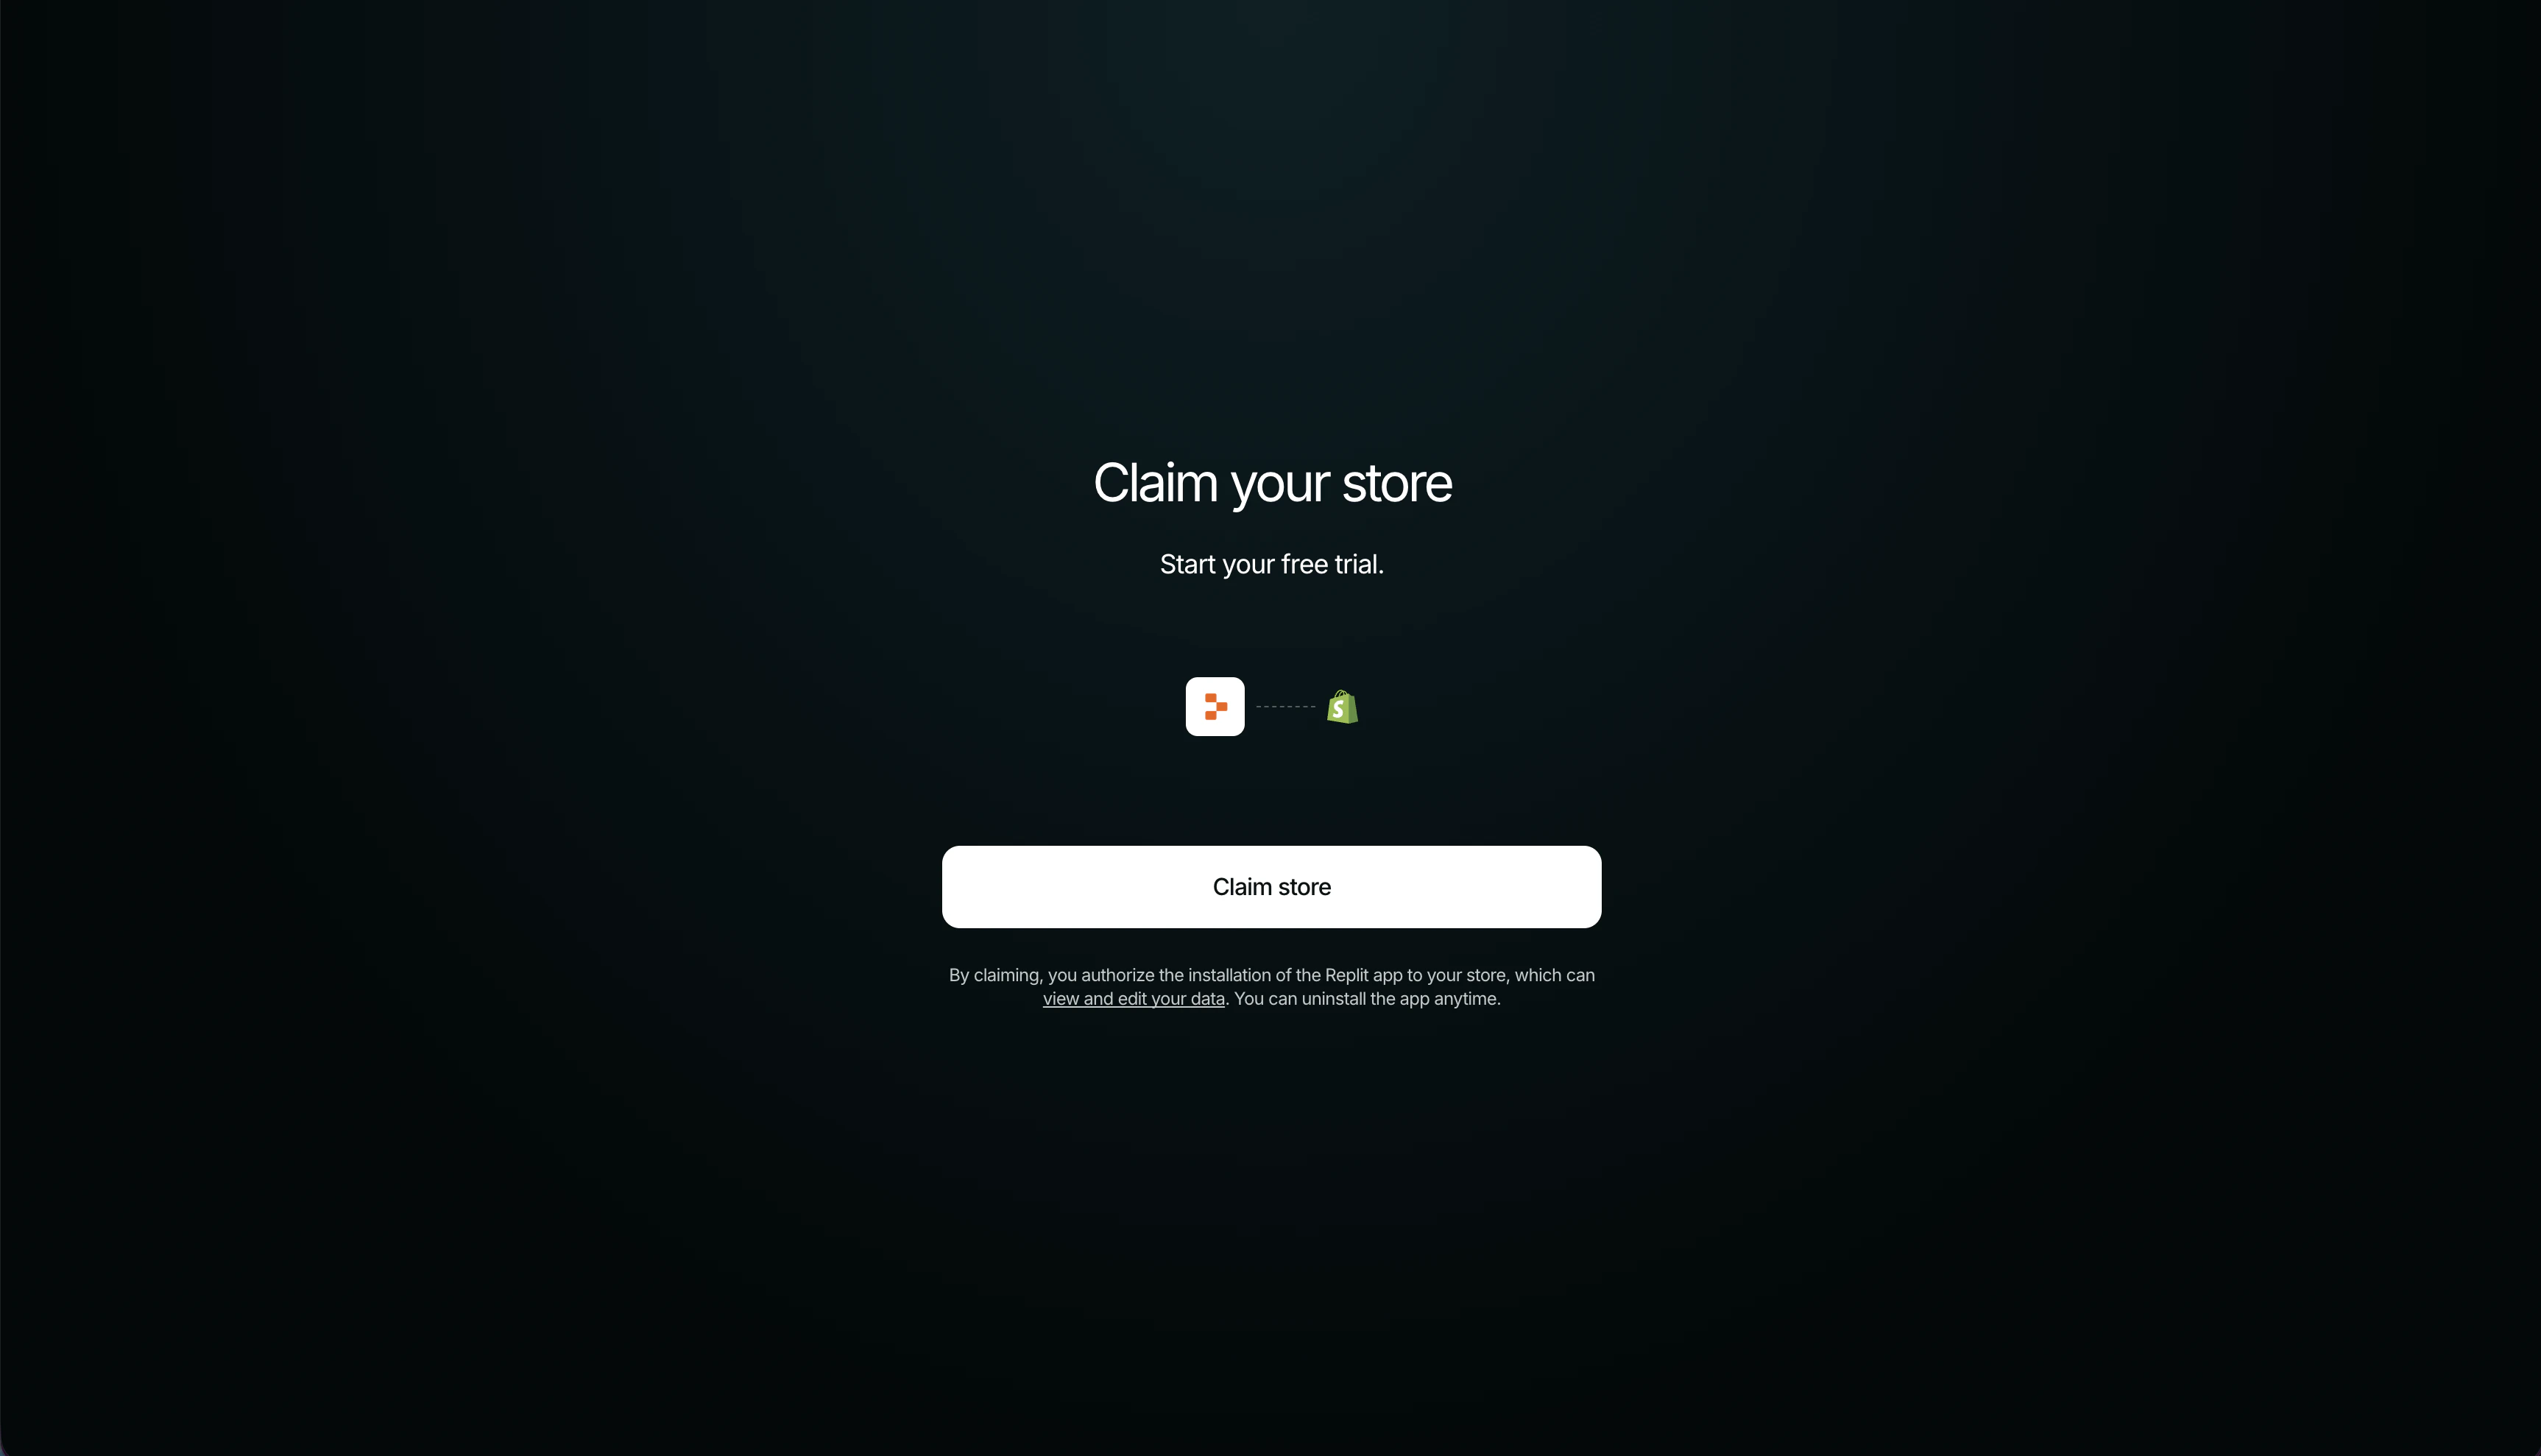
**Claim store**를 선택하여 스토어에서 Replit 앱을 승인하고 무료 체험을 시작하세요. 그런 다음 기본 소유자로 Shopify 관리자에 접속하게 됩니다.
Shopify 플랜을 선택하고 Shopify Payments 또는 다른 제공업체를 활성화하세요.
Shopify가 결제를 위해 필요한 신원 및 은행 정보를 수집합니다 — Replit에서는 아무것도 이루어지지 않습니다.
Shopify에서 배송 요금을 설정하고 세금을 검토하며, 선택적으로 커스텀 도메인을 연결하세요.
Shopify에서 스토어프론트 비밀번호를 제거하여 구매자에게 스토어를 오픈하세요. Replit으로 돌아와 **Publish**를 클릭하여 스토어프론트를 공개 URL에 배포하세요.
결제, 신원 확인, 세금, 배송, 사기 확인은 Shopify에서 처리합니다. 전체 출시 체크리스트와 커넥터 세부 정보는 [Shopify 연결](/references/integrations/shopify#go-live-on-shopify)을 참조하세요.
## 다음 단계
커넥터 참고 문서: Shopify 연결 작동 방식과 전체 출시 체크리스트.
출시 전에 스토어에 브랜드 URL을 부여하세요.
구매자가 검색에서 스토어를 찾을 수 있도록 도와주세요.
스토어로 트래픽을 유도하는 집중적인 캠페인 페이지를 빌드하세요.
## 관련 항목
* [Shopify 연결](/references/integrations/shopify)
* [커스텀 도메인 추가하기](/build/add-custom-domain)
* [Agent 통합](/references/integrations/overview)
 기존 Shopify 계정으로 로그인하거나, 초대를 수락하기 위해 계정을 만드세요.
 **Claim store**를 선택하여 스토어에서 Replit 앱을 승인하고 무료 체험을 시작하세요. 그런 다음 기본 소유자로 Shopify 관리자에 접속하게 됩니다.