> ## Documentation Index
> Fetch the complete documentation index at: https://docs.replit.com/llms.txt
> Use this file to discover all available pages before exploring further.
# Claude 디자인을 앱으로 변환하기
> Claude의 디자인을 Replit으로 전송하고, 정적 HTML에서 프로젝트를 만들고, Agent가 대화형 앱으로 변환하도록 하세요.
export const platform_0 = "Claude"
export const projectType_0 = "project"
export const setupDescription_0 = "Agent가 정적 디자인을 대화형 앱으로 변환하고 Replit에서 실행되도록 구성합니다"
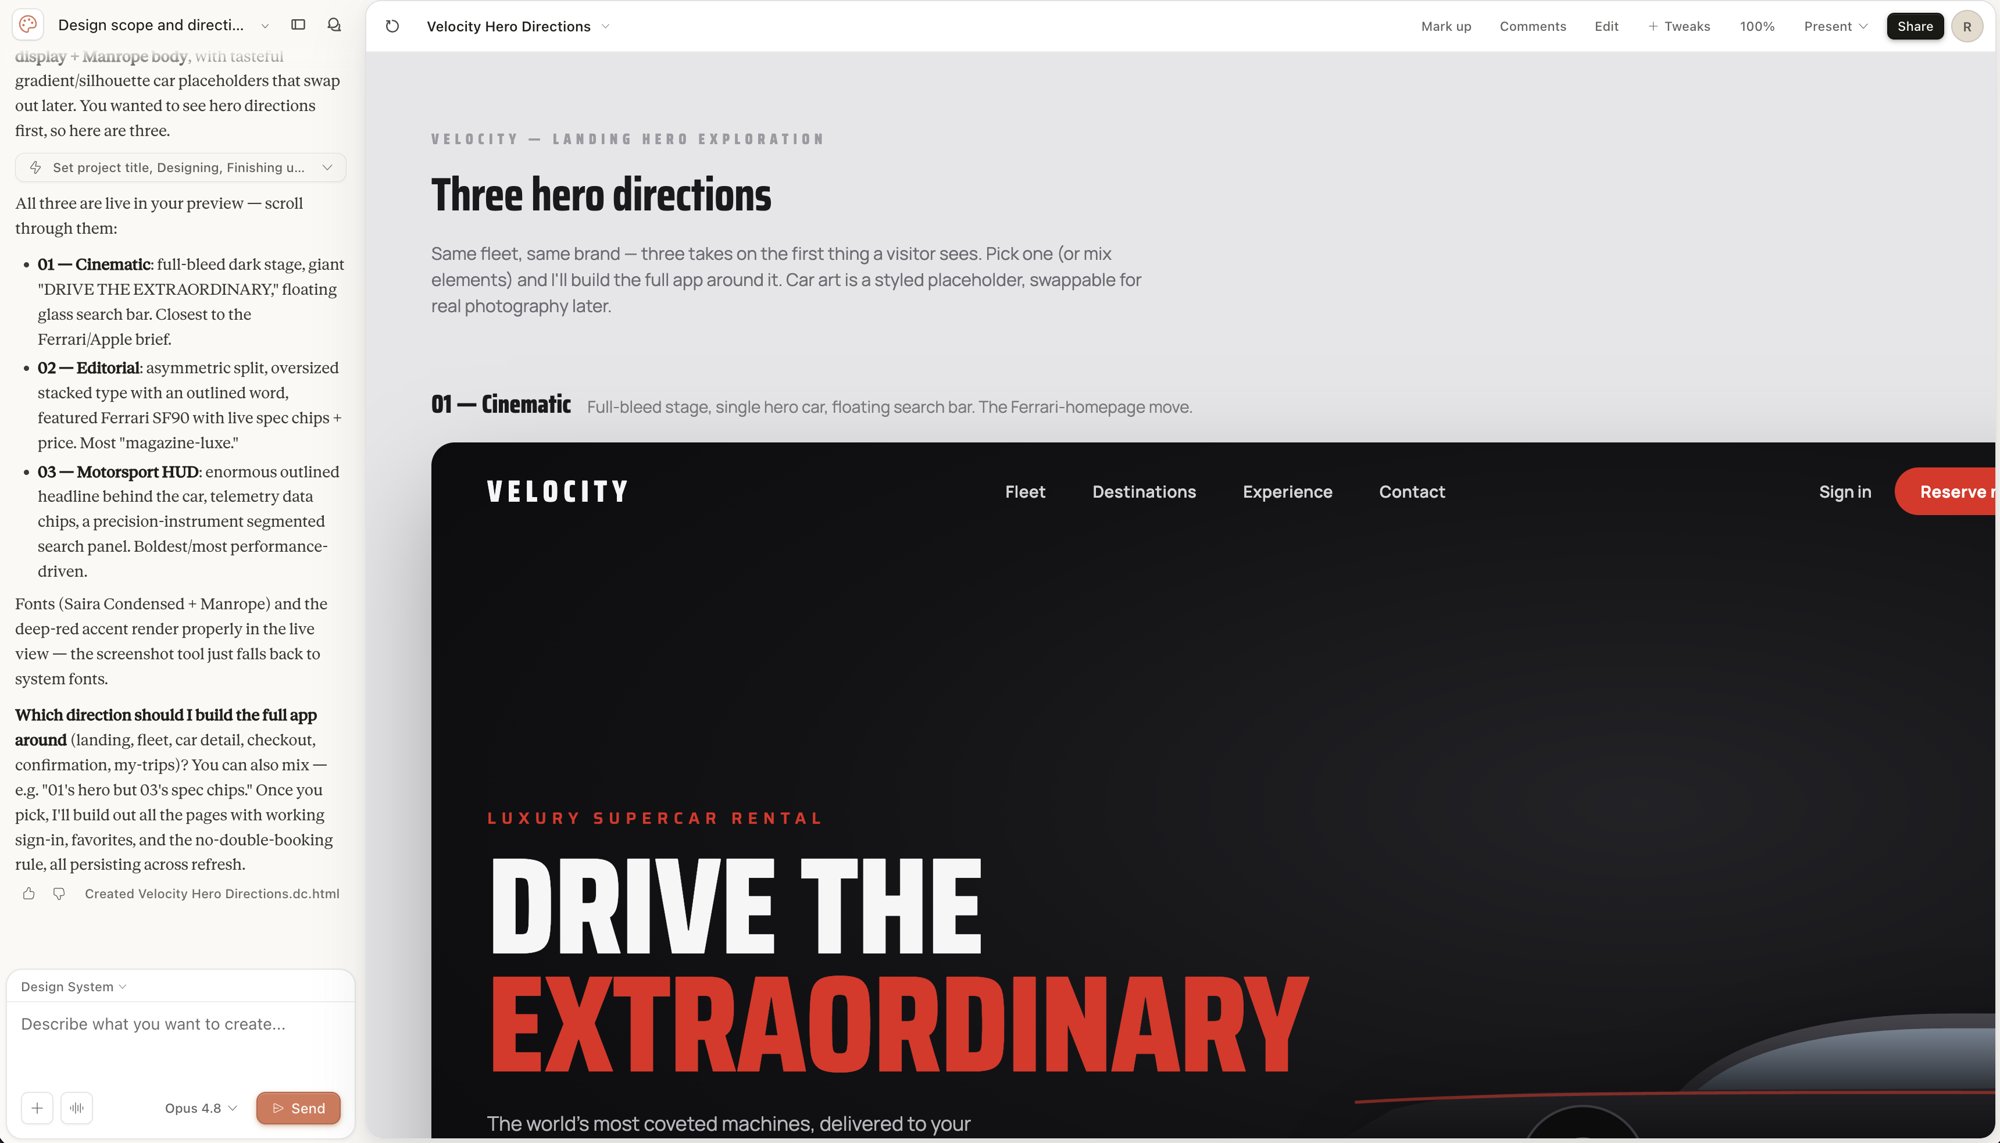
Claude에서 만든 디자인은 경험이 어떻게 보여야 하는지 보여줍니다. Claude의 **Send to Replit** 옵션을 사용하면 해당 디자인을 Replit에 전달할 수 있으며, Replit에서 프로젝트로 변환되고 Agent가 동작하는 대화형 앱으로 만들어줍니다.
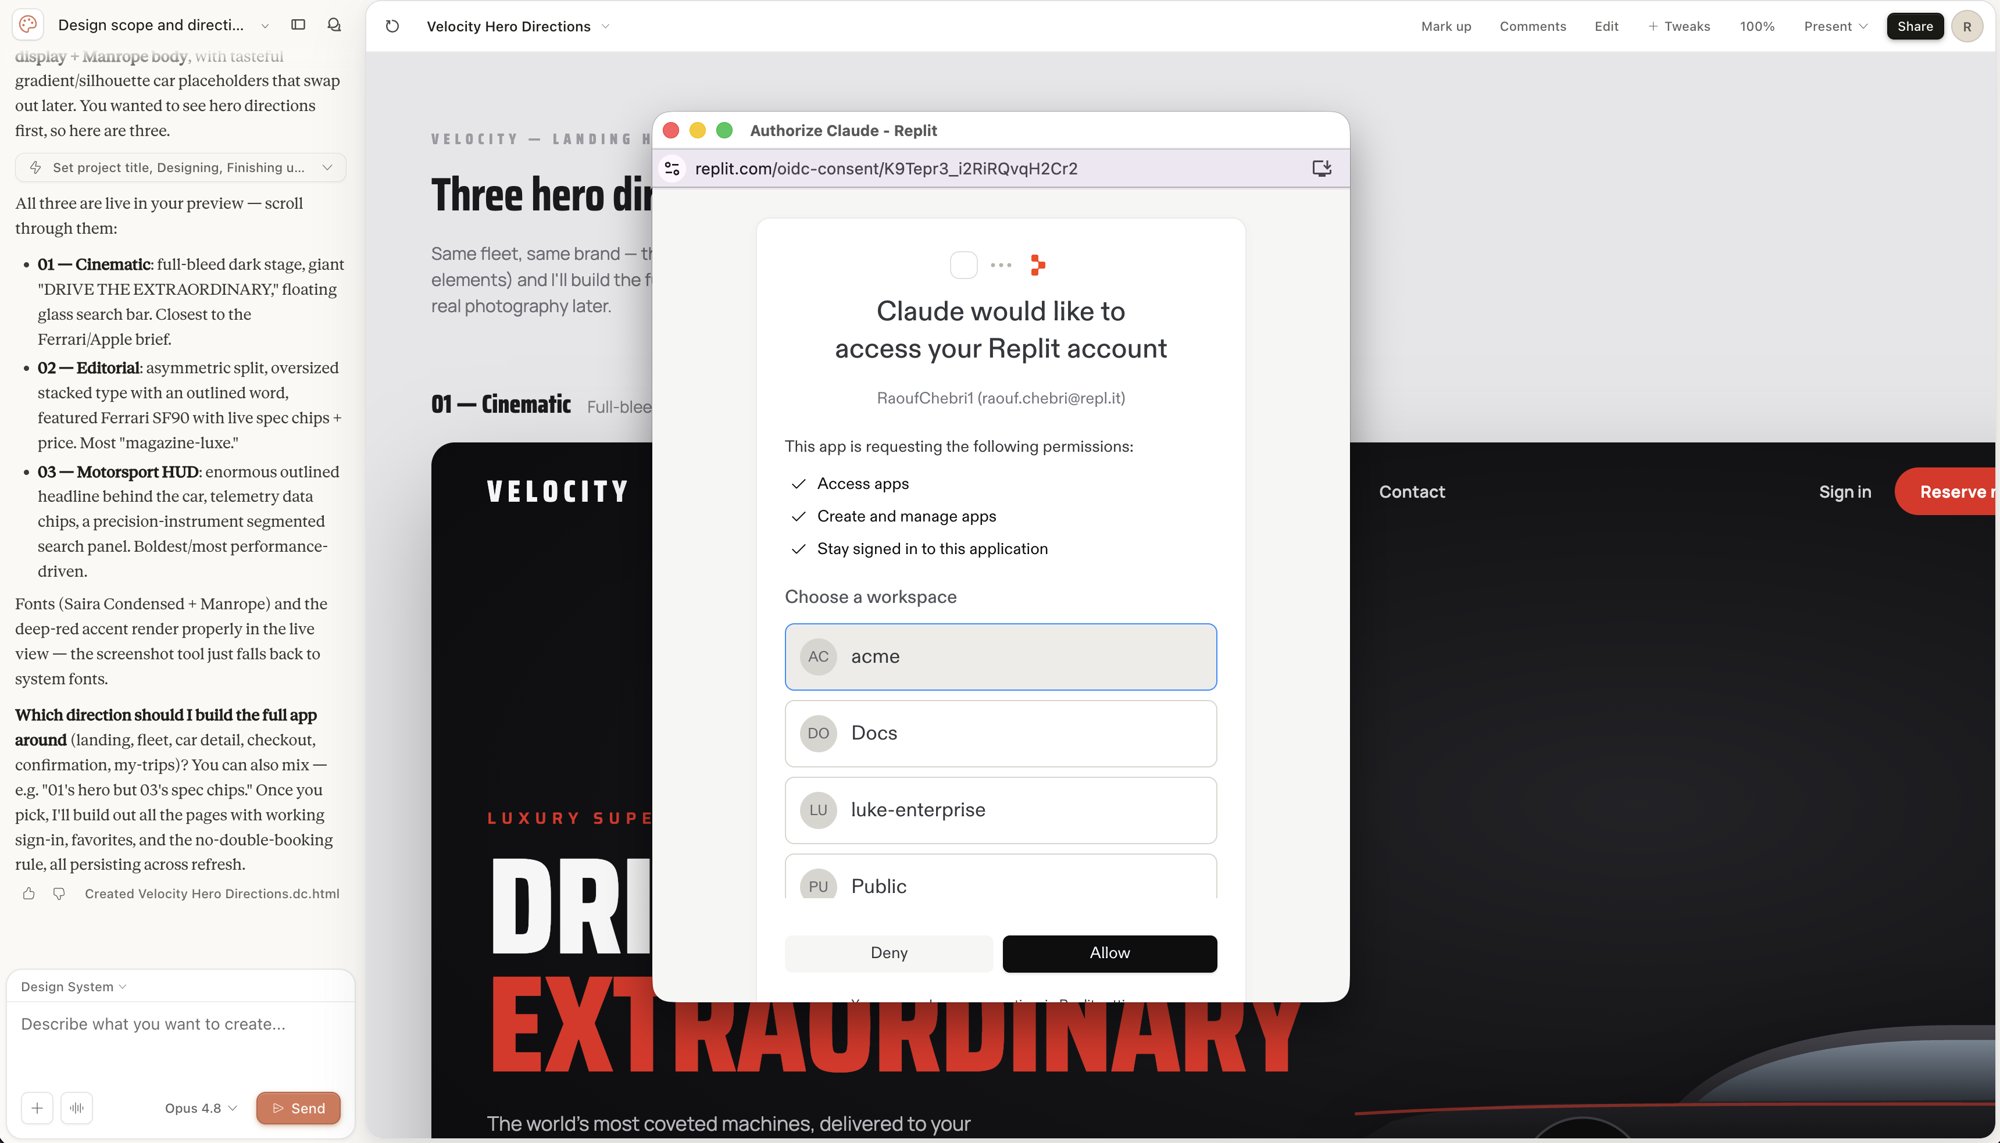
이것은 새로운 통합입니다. **Send to Replit**은 Claude가 디자인의 목적지로 Replit을 제공할 때만 Claude의 **Send to…** 메뉴에 나타납니다. 사용 가능 여부는 Claude에 의해 제어되므로 모든 계정에서 아직 표시되지 않을 수 있습니다. 전달을 수락하면 Claude가 Replit 동의 화면에서 **Access apps**, **Create and manage apps**, **Stay signed in to this application** 범위를 요청합니다.
 ## 작동 방식
전달 과정은 Claude에서 시작하여 Replit에서 완료됩니다:
1. Claude의 디자인 캔버스에서 자체 완결형 디자인을 만듭니다.
2. Claude의 **Share → Send to…** 메뉴에서 Replit으로 디자인을 전송합니다.
3. Claude가 Replit 계정에 접근하도록 승인하고 워크스페이스를 선택합니다.
4. Replit이 디자인을 정적 `index.html` 파일로 포함하는 프로젝트를 만듭니다.
5. Agent가 **Turn this Claude design into a real app** 작업을 시작하여 대화형으로 만들어줍니다.
이것은 Claude가 승인된 앱 연결을 통해 Replit으로 디자인을 *전송*하는 방식입니다. Replit에서 먼저 아무것도 구성할 필요 없습니다 — 플로우는 Claude에서 시작됩니다.
## 시작하기 전에
다음이 필요합니다:
* [Replit 계정](https://replit.com).
* Claude의 디자인 캔버스에 디자인이 있는 Claude 계정.
* 새 프로젝트를 위한 Replit 워크스페이스.
## Claude에서 Replit으로 디자인 전송하기
빌드하려는 디자인이 있는 Claude에서 시작하세요.
Claude에서 앱으로 변환하려는 디자인을 엽니다.
**Share**를 선택한 다음 **Send to…** 메뉴를 엽니다. Replit이 목적지로 나타납니다.
## 작동 방식
전달 과정은 Claude에서 시작하여 Replit에서 완료됩니다:
1. Claude의 디자인 캔버스에서 자체 완결형 디자인을 만듭니다.
2. Claude의 **Share → Send to…** 메뉴에서 Replit으로 디자인을 전송합니다.
3. Claude가 Replit 계정에 접근하도록 승인하고 워크스페이스를 선택합니다.
4. Replit이 디자인을 정적 `index.html` 파일로 포함하는 프로젝트를 만듭니다.
5. Agent가 **Turn this Claude design into a real app** 작업을 시작하여 대화형으로 만들어줍니다.
이것은 Claude가 승인된 앱 연결을 통해 Replit으로 디자인을 *전송*하는 방식입니다. Replit에서 먼저 아무것도 구성할 필요 없습니다 — 플로우는 Claude에서 시작됩니다.
## 시작하기 전에
다음이 필요합니다:
* [Replit 계정](https://replit.com).
* Claude의 디자인 캔버스에 디자인이 있는 Claude 계정.
* 새 프로젝트를 위한 Replit 워크스페이스.
## Claude에서 Replit으로 디자인 전송하기
빌드하려는 디자인이 있는 Claude에서 시작하세요.
Claude에서 앱으로 변환하려는 디자인을 엽니다.
**Share**를 선택한 다음 **Send to…** 메뉴를 엽니다. Replit이 목적지로 나타납니다.
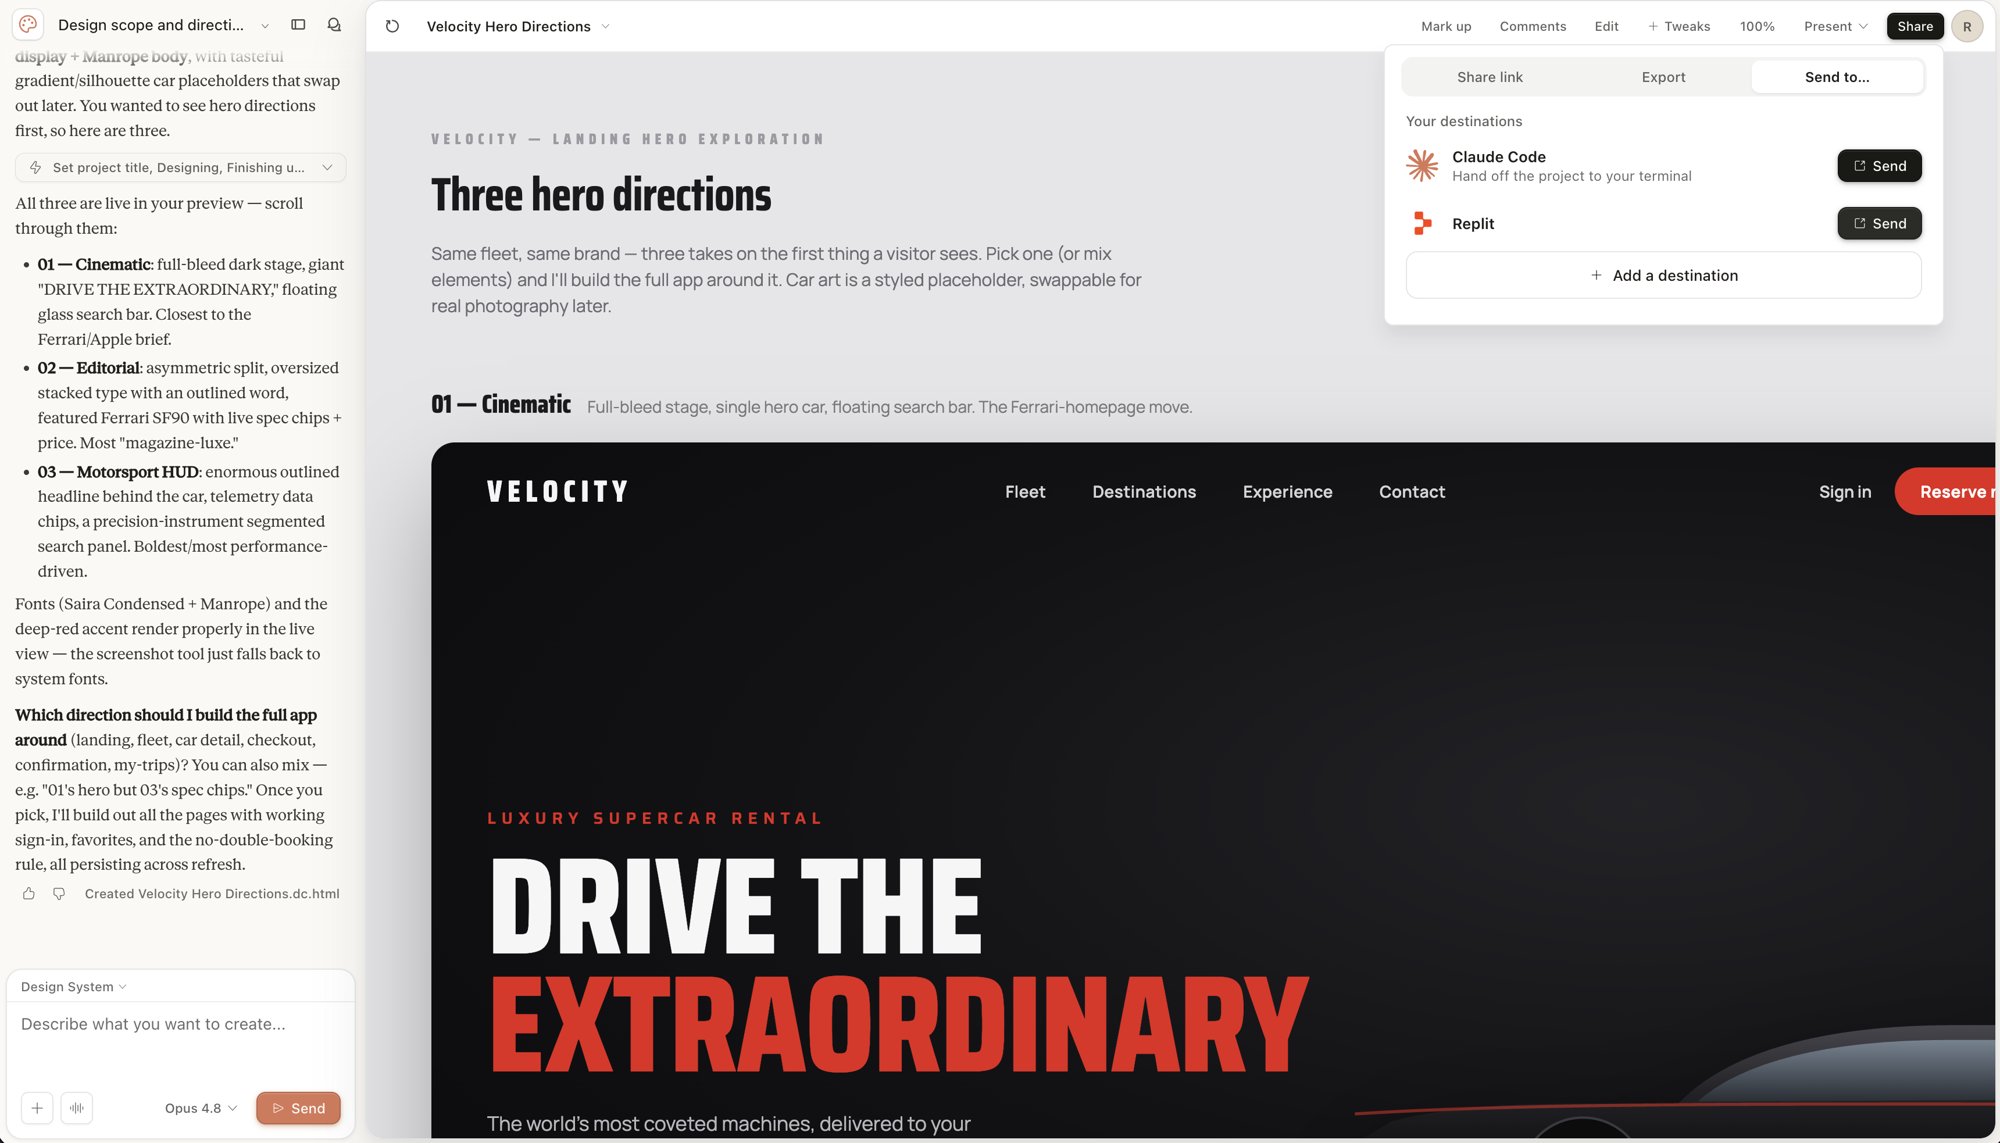 **Replit**을 선택하여 Replit 계정으로 전달을 시작합니다.
**Claude would like to access your Replit account**라는 제목의 Replit 동의 화면에서 Claude가 요청하는 접근 권한 — **Access apps**, **Create and manage apps**, **Stay signed in to this application** — 을 검토한 다음 연결을 승인합니다.
**Replit**을 선택하여 Replit 계정으로 전달을 시작합니다.
**Claude would like to access your Replit account**라는 제목의 Replit 동의 화면에서 Claude가 요청하는 접근 권한 — **Access apps**, **Create and manage apps**, **Stay signed in to this application** — 을 검토한 다음 연결을 승인합니다.
 새 프로젝트를 만들 Replit 워크스페이스를 선택한 다음 확인합니다.
확인 후 Replit이 디자인에서 프로젝트를 만들고 워크스페이스에서 엽니다.
## 가져오는 항목
Replit은 디자인을 단일 자체 완결형 `index.html` 파일로 가져옵니다. 가져오기는 Claude가 디자인에 포함한 시각적 레이아웃, 스타일링, 에셋을 보존합니다.
가져오기는 동작하는 시작점을 제공합니다. 디자인이 정적 HTML로 전달되므로 가져오기 후 동작, 데이터, 대화형 기능을 추가해야 합니다.
## 가져오지 않는 항목
전달은 디자인을 전달하며 완전한 애플리케이션이 아닙니다. 다음은 가져오기에 포함되지 않습니다:
* 백엔드 로직과 서버 측 기능.
* 데이터베이스 또는 저장된 데이터.
* 동작하는 양식, 상태, 내비게이션 등의 대화형 기능.
Agent가 디자인을 실제 앱으로 변환할 때 이 기능들을 추가합니다.
## Agent가 디자인을 대화형으로 만들기
가져오기 후 Agent가 워크스페이스에서 **Turn this Claude design into a real app** 작업을 시작합니다. Agent는 정적 디자인에서 디자인이 암시하는 대화형 동작을 빌드합니다.
새 프로젝트를 만들 Replit 워크스페이스를 선택한 다음 확인합니다.
확인 후 Replit이 디자인에서 프로젝트를 만들고 워크스페이스에서 엽니다.
## 가져오는 항목
Replit은 디자인을 단일 자체 완결형 `index.html` 파일로 가져옵니다. 가져오기는 Claude가 디자인에 포함한 시각적 레이아웃, 스타일링, 에셋을 보존합니다.
가져오기는 동작하는 시작점을 제공합니다. 디자인이 정적 HTML로 전달되므로 가져오기 후 동작, 데이터, 대화형 기능을 추가해야 합니다.
## 가져오지 않는 항목
전달은 디자인을 전달하며 완전한 애플리케이션이 아닙니다. 다음은 가져오기에 포함되지 않습니다:
* 백엔드 로직과 서버 측 기능.
* 데이터베이스 또는 저장된 데이터.
* 동작하는 양식, 상태, 내비게이션 등의 대화형 기능.
Agent가 디자인을 실제 앱으로 변환할 때 이 기능들을 추가합니다.
## Agent가 디자인을 대화형으로 만들기
가져오기 후 Agent가 워크스페이스에서 **Turn this Claude design into a real app** 작업을 시작합니다. Agent는 정적 디자인에서 디자인이 암시하는 대화형 동작을 빌드합니다.
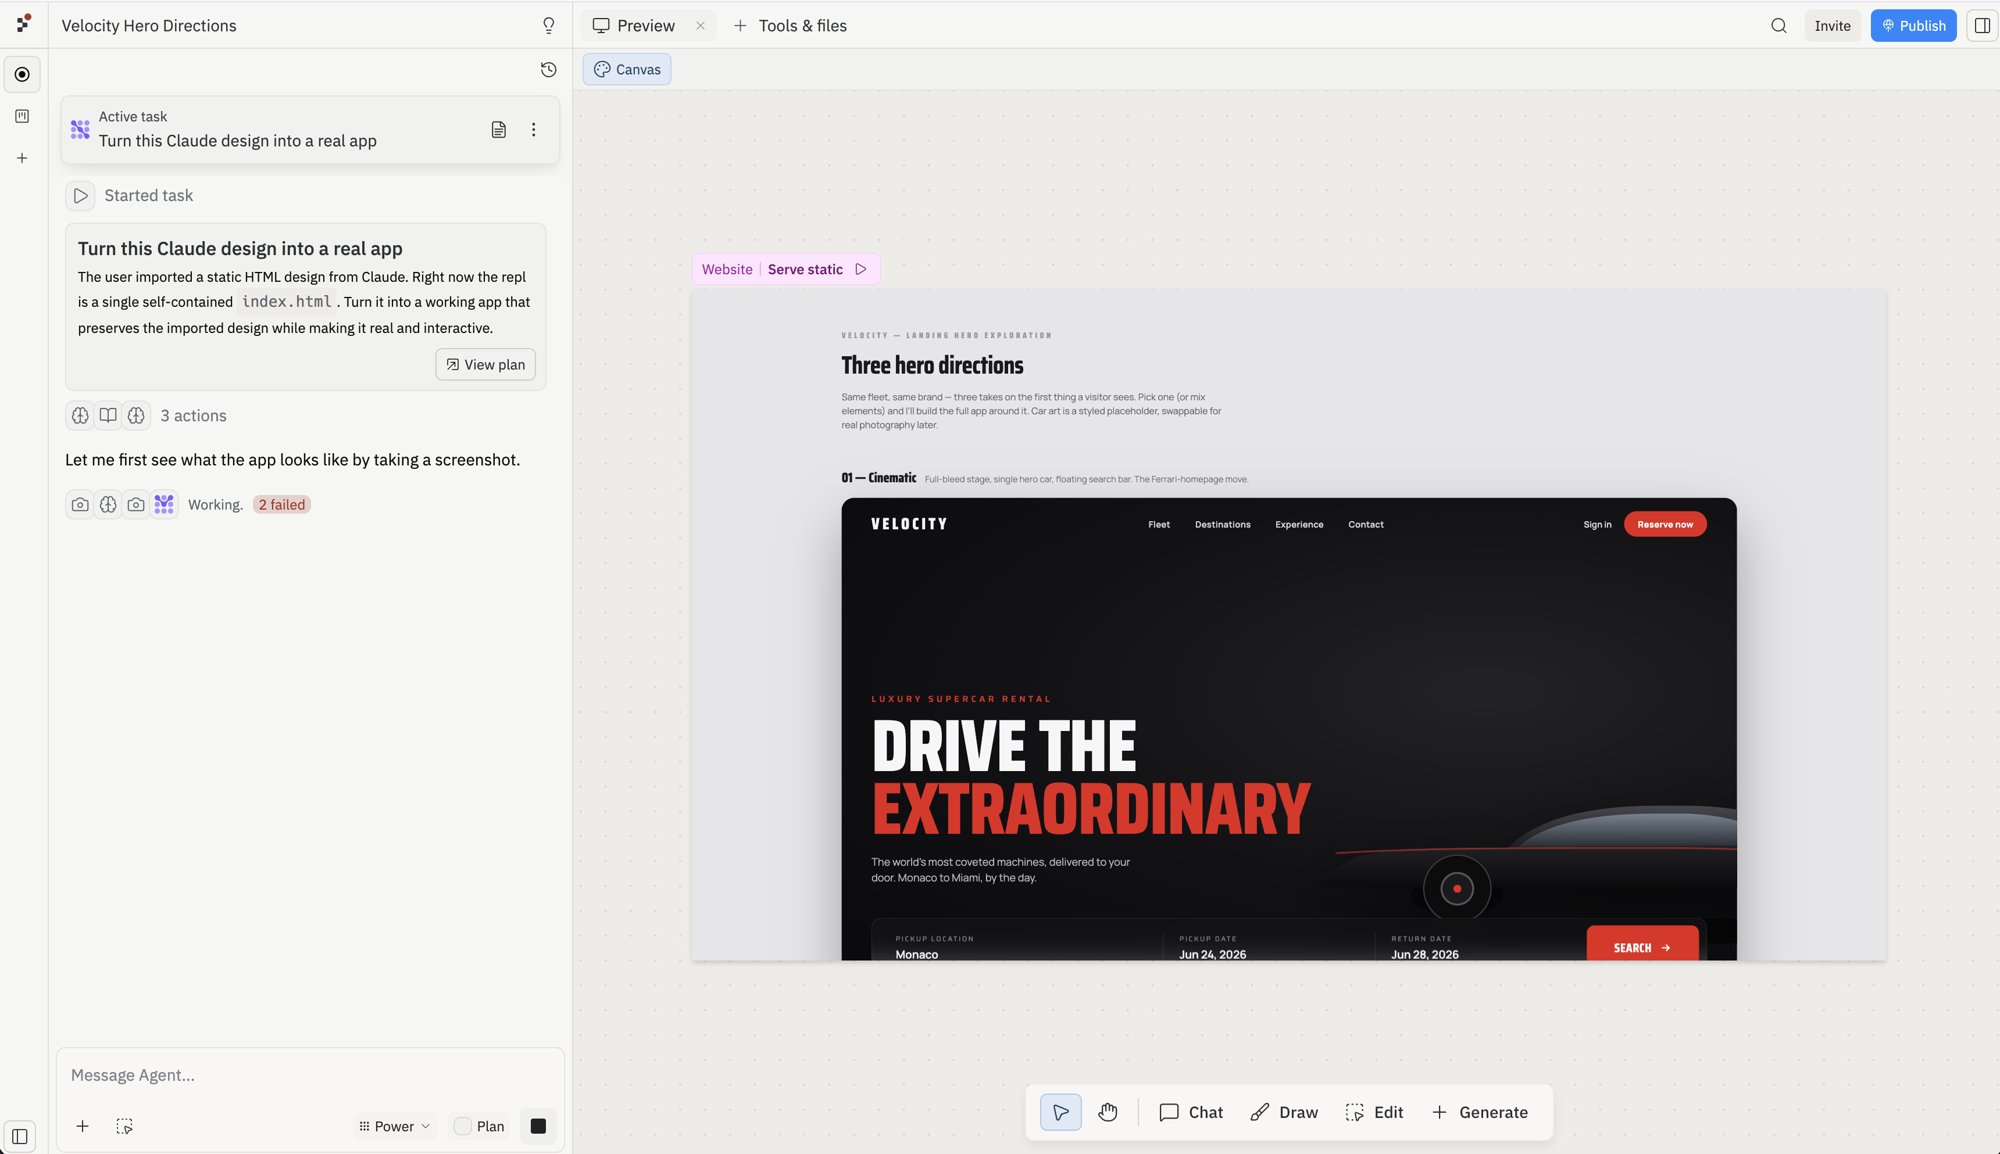 작업이 완료되면 Preview를 열어 결과를 테스트합니다. 실행 중인 앱을 원래 Claude 디자인과 비교하여 확인하세요:
* 레이아웃과 스타일링이 디자인과 충분히 일치하는지.
* 버튼, 양식, 내비게이션이 예상대로 작동하는지.
* 새로 고침 후에도 앱이 작동하는지.
무언가 빠져 있거나 잘못되었다면 Agent에게 변경 사항을 설명하고 앱을 다듬도록 하세요.
## Configure and run your app
During import, {setupDescription_0}. If your app needs changes, use these Project Editor tools:
* **[Agent](/references/agent/overview)**: Refine features, debug issues, and make code changes
* **[Secrets](/core-concepts/project-editor/app-setup/secrets)**: Add API keys and environment variables
* **[Workflows](/references/workspace-tools/workflows)**: Set the **Run** command for your app
## Continue your journey
Now that you've imported your {platform_0} {projectType_0}, explore these next steps:
* [Replit Agent](/references/agent/overview): Get help with feature work, debugging, and refactoring
* [Replit Deployments](/learn/projects-and-artifacts/replit-deployments): Publish your app
* [Collaborate](/build/invite-teammates): Build with teammates
## 요금
디자인을 동작하는 앱으로 변환하는 데 Agent가 사용되며 크레딧이 소모될 수 있습니다. 크레딧 사용량은 Agent가 가져온 디자인 위에 얼마나 많이 빌드하는지에 따라 달라집니다.
## 관련 항목
* [제공업체에서 가져오기](/build/import-from-providers)
* [Figma 디자인을 대화형 앱으로 변환하기](/build/figma-to-app)
작업이 완료되면 Preview를 열어 결과를 테스트합니다. 실행 중인 앱을 원래 Claude 디자인과 비교하여 확인하세요:
* 레이아웃과 스타일링이 디자인과 충분히 일치하는지.
* 버튼, 양식, 내비게이션이 예상대로 작동하는지.
* 새로 고침 후에도 앱이 작동하는지.
무언가 빠져 있거나 잘못되었다면 Agent에게 변경 사항을 설명하고 앱을 다듬도록 하세요.
## Configure and run your app
During import, {setupDescription_0}. If your app needs changes, use these Project Editor tools:
* **[Agent](/references/agent/overview)**: Refine features, debug issues, and make code changes
* **[Secrets](/core-concepts/project-editor/app-setup/secrets)**: Add API keys and environment variables
* **[Workflows](/references/workspace-tools/workflows)**: Set the **Run** command for your app
## Continue your journey
Now that you've imported your {platform_0} {projectType_0}, explore these next steps:
* [Replit Agent](/references/agent/overview): Get help with feature work, debugging, and refactoring
* [Replit Deployments](/learn/projects-and-artifacts/replit-deployments): Publish your app
* [Collaborate](/build/invite-teammates): Build with teammates
## 요금
디자인을 동작하는 앱으로 변환하는 데 Agent가 사용되며 크레딧이 소모될 수 있습니다. 크레딧 사용량은 Agent가 가져온 디자인 위에 얼마나 많이 빌드하는지에 따라 달라집니다.
## 관련 항목
* [제공업체에서 가져오기](/build/import-from-providers)
* [Figma 디자인을 대화형 앱으로 변환하기](/build/figma-to-app)