> ## Documentation Index
> Fetch the complete documentation index at: https://docs.replit.com/llms.txt
> Use this file to discover all available pages before exploring further.
# Reserved VMデプロイ
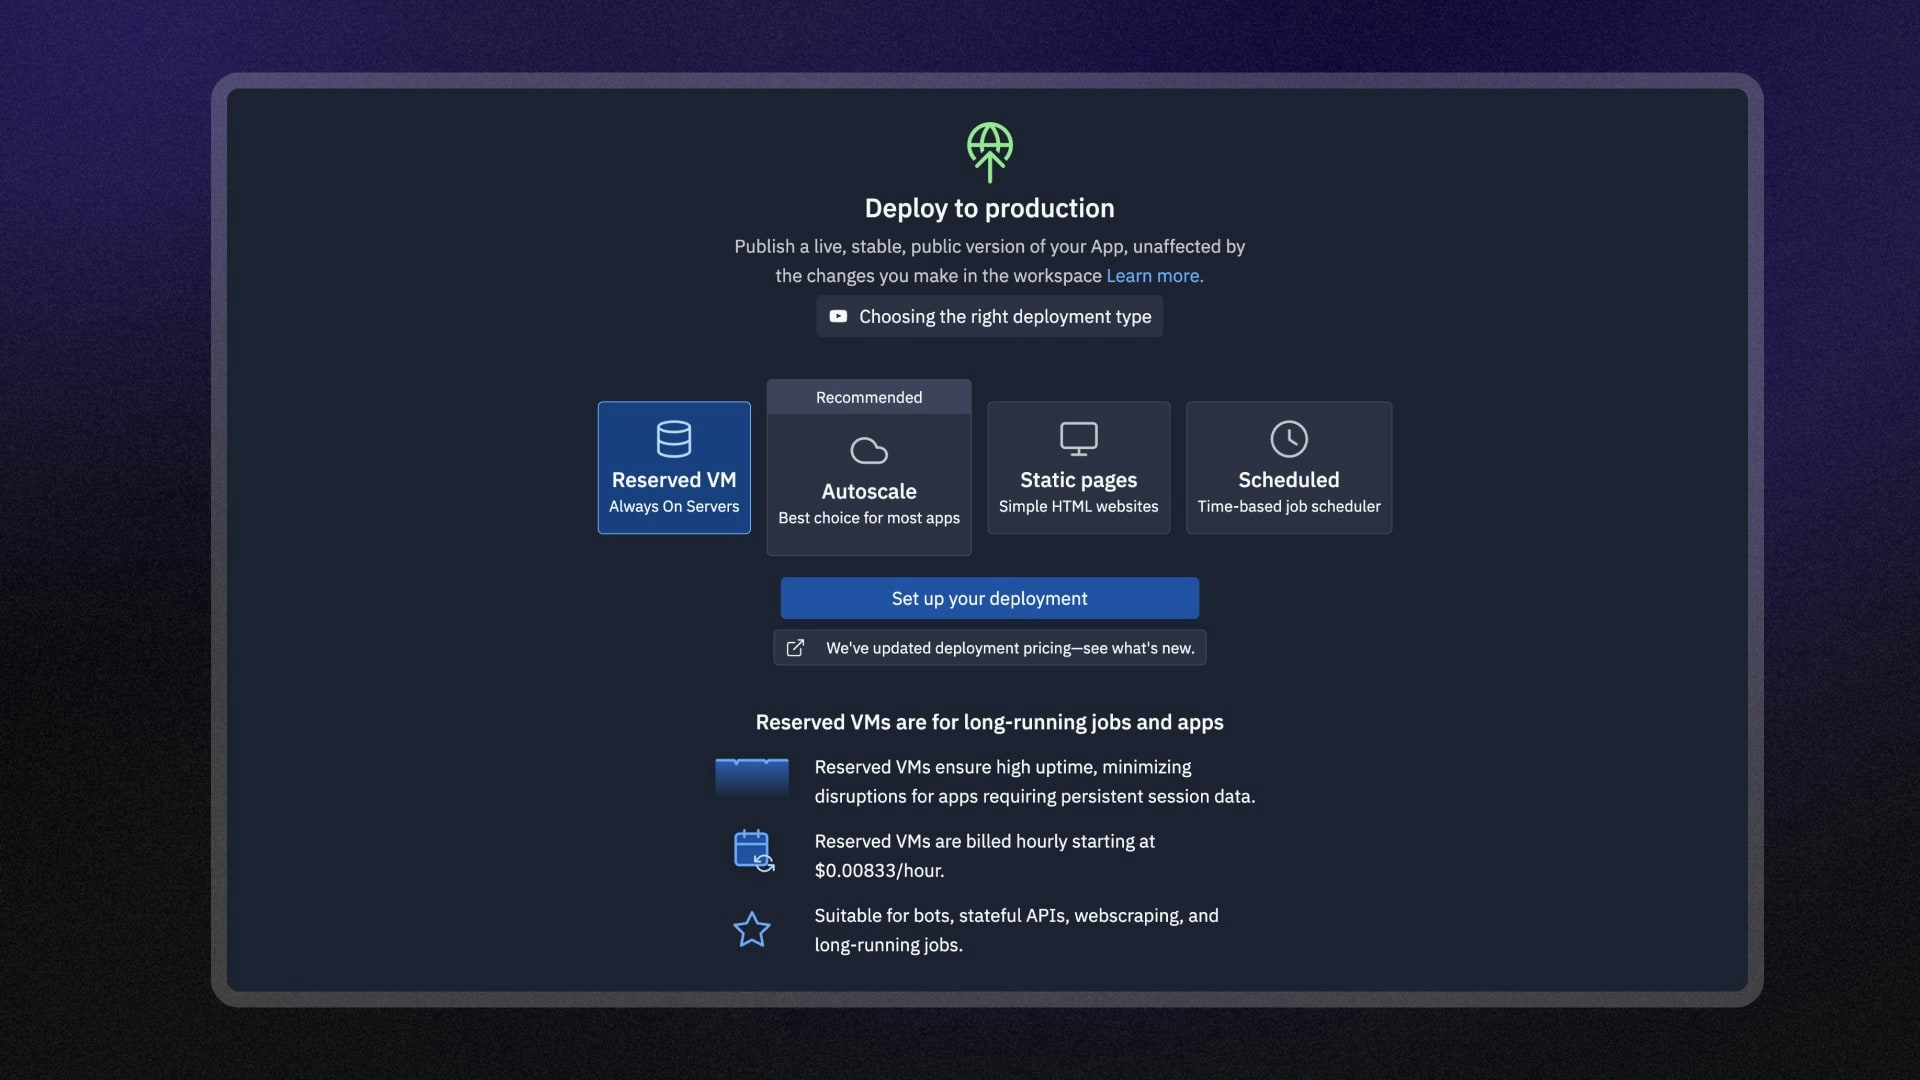
> Reserved VMデプロイで常時稼働のクラウドサーバーにアプリを発行する方法を説明します。
Reserved VMデプロイは、アプリ専用のコンピューティングリソースを提供する仮想マシン(VM)上で実行されます。このデプロイタイプは、中断なしに予測可能なコストとパフォーマンスを提供します。
以下のユースケースに最適です:
* メモリを多く使用するバックグラウンドタスク
* 常時接続が必要なチャットアプリのボット
* 常時稼働のAPIサーバー
 ## 機能
Reserved VMデプロイには以下の機能が含まれています:
* **専用リソース**: 予約されたコンピューティングリソースで一貫したアプリパフォーマンスを確保します。
* **カスタムドメイン**: カスタムドメインを設定するか、`.replit.app` URLを使用してアプリにアクセスします。
* **コンピューティングリソースオプション**: アプリのパフォーマンスニーズに合ったVMオプションを選択します。
* **設定可能なポートマッピング**: アプリがインターネットに公開するポートを定義します。
* **モニタリング**: ログを確認し、発行済みアプリのステータスを監視します。
## 使用方法
Reserved VMデプロイは、PublishingプロジェクトエディターツールからアクセスできCます。
左の**ツールドック**から:
1.
## 機能
Reserved VMデプロイには以下の機能が含まれています:
* **専用リソース**: 予約されたコンピューティングリソースで一貫したアプリパフォーマンスを確保します。
* **カスタムドメイン**: カスタムドメインを設定するか、`.replit.app` URLを使用してアプリにアクセスします。
* **コンピューティングリソースオプション**: アプリのパフォーマンスニーズに合ったVMオプションを選択します。
* **設定可能なポートマッピング**: アプリがインターネットに公開するポートを定義します。
* **モニタリング**: ログを確認し、発行済みアプリのステータスを監視します。
## 使用方法
Reserved VMデプロイは、PublishingプロジェクトエディターツールからアクセスできCます。
左の**ツールドック**から:
1.  **All tools**を選択して、プロジェクトエディターツールのリストを表示します。
2.
**All tools**を選択して、プロジェクトエディターツールのリストを表示します。
2.  **Publishing**を選択します。
3. **Reserved VM**オプションを選択し、**Set up your published app**を選択します。
**検索バー**から:
1. 上部の
**Publishing**を選択します。
3. **Reserved VM**オプションを選択し、**Set up your published app**を選択します。
**検索バー**から:
1. 上部の 虫眼鏡を選択して検索ツールを開きます
2. 「Publishing」と入力してツールを検索し、結果から選択します。
3. **Reserved VM**オプションを選択し、**Set up your published app**を選択します。
虫眼鏡を選択して検索ツールを開きます
2. 「Publishing」と入力してツールを検索し、結果から選択します。
3. **Reserved VM**オプションを選択し、**Set up your published app**を選択します。
 ### マシン設定
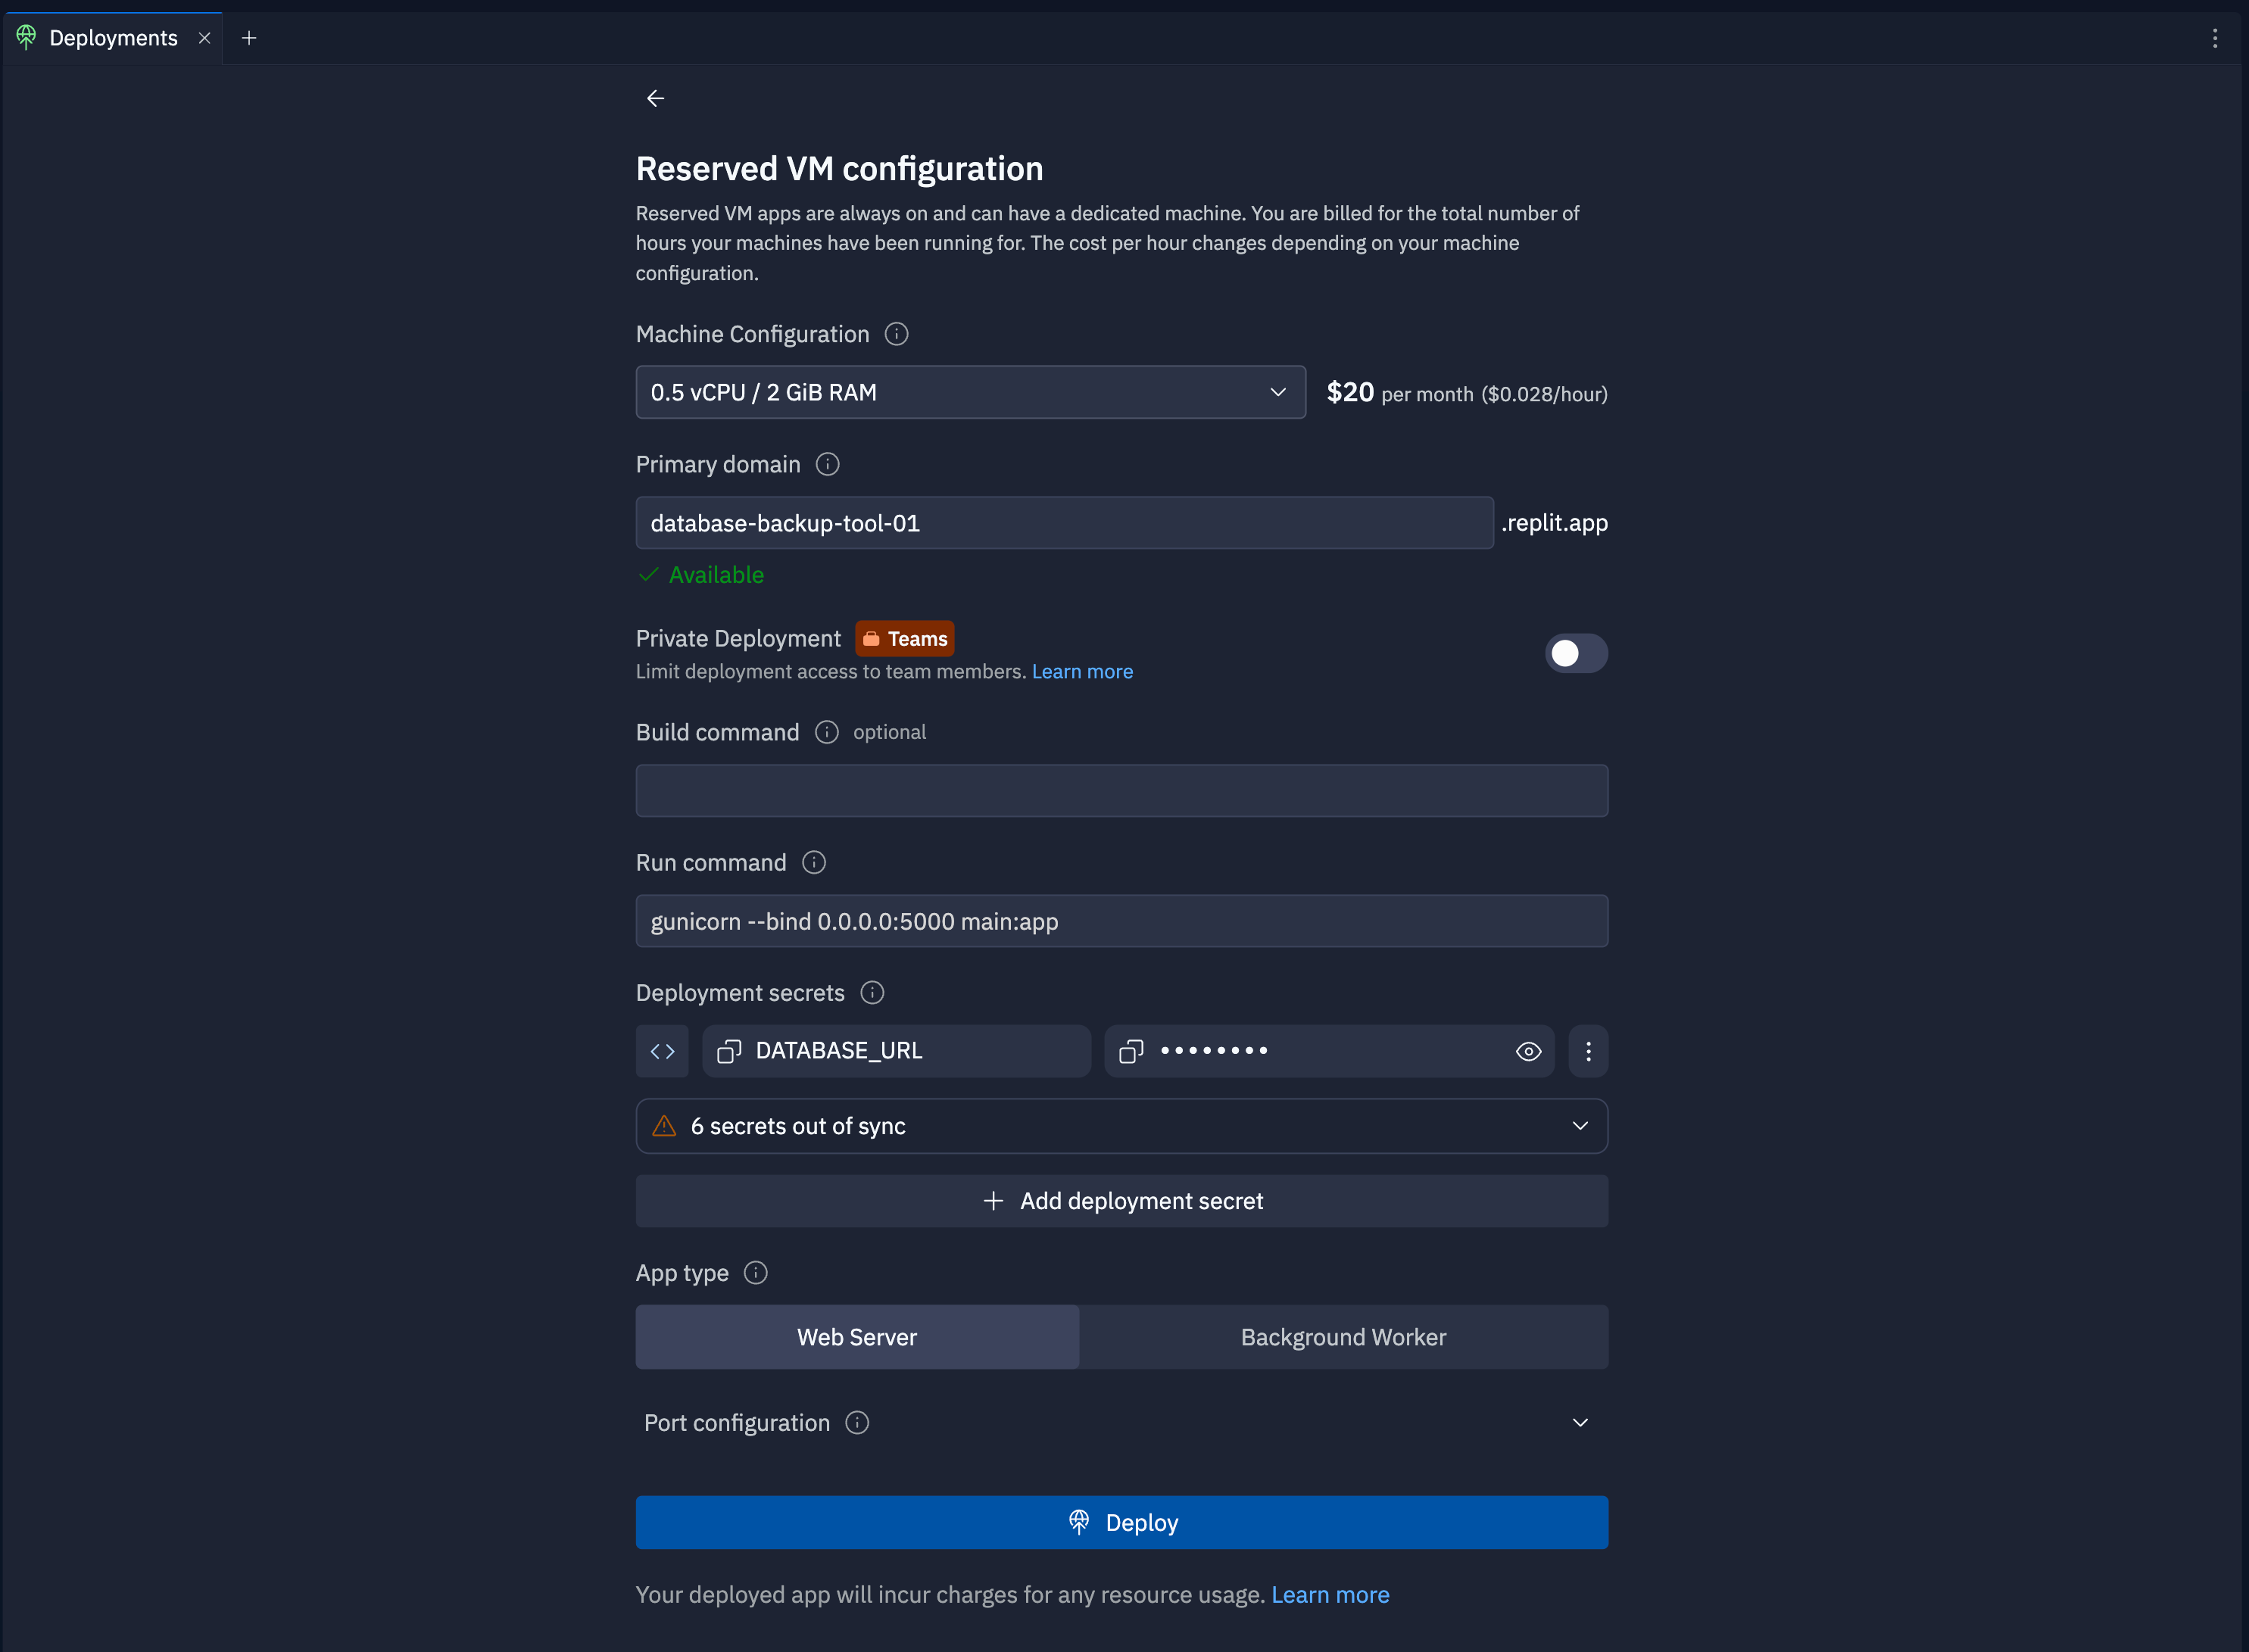
デプロイをホストするマシンのCPUとRAMの設定を選択します。選択したマシンサイズの横にオプションのコストが表示されます。
### プライマリドメイン
Specify the subdomain part of the hostname for your published app. After you publish, you can access your published app at `https://.replit.app`.
To learn how to use a custom domain, see [Custom Domains](/references/publishing/custom-domains).
### プライベートデプロイ
The private published app feature is available on the Pro and Enterprise plans.
Private published apps grant access to your app only to members of your workspace, or to specific users and groups that you invite.
When publishing, you can choose between **Public**, **Workspace only**, or **Only you** access.
To learn how to set up a private deployment, see [Private Deployments](/references/publishing/private-deployments/).
### ビルドコマンド
**Build command**フィールドに、Runコマンドを実行する前にアプリをコンパイルまたはセットアップするシェルコマンドを入力します。
例えば、Viteを使ってJavaScriptアプリを本番環境用に最適化するには、`vite build`コマンドを追加することがあります。
### 実行コマンド
**Run command**フィールドに、タスクを起動するシェルコマンドを入力します。このコマンドはワークフローで使用するものと同様にしてください。例えば、「myApp」というFlaskアプリを起動するには、`flask --app myApp run`コマンドを追加することがあります。
### 発行済みアプリのシークレット
**Add published app secret**を選択して、アプリを安全に実行するために必要な環境変数やシークレットを追加します。
Replit Appに環境変数やシークレットがある場合、PublishingツールはそれらをリストKに自動的に追加します。
### アプリタイプオプション
以下のオプションのいずれかを選択します:
* **Web server**: ウェブアプリやユーザーがインターネット上で接続できるアプリを発行する場合はこのオプションを選択します。
* **Background worker**: アプリがポートをリッスンしたりサーバーを起動しない場合はこのオプションを選択します。
**Web Server**を選択した場合、以下の操作を行ってどのポートを公開するかをカスタマイズできます:
1. **Port configuration**セクションを展開します。
2. **Networking pane to configure**を選択して**Networking**タブを開き、ポートマッピングを管理します。
ポートの設定の詳細については、[ポート](/references/project-setup/ports/)を参照してください。
## 次のステップ
発行の詳細については、以下のリソースを参照してください:
* [発行済みアプリの監視](/references/publishing/monitoring-a-deployment/):ログの確認とスケジュールされたデプロイの監視方法を学びます。
* [発行コスト](/billing/deployment-pricing):発行に関連するコストを確認します。
* [料金](https://replit.com/pricing/):各プランタイプの料金と許容量を確認します。
* [使用量許容量](/billing/about-usage-based-billing/):スケジュールされたデプロイの使用量制限と課金単位について学びます。
### マシン設定
デプロイをホストするマシンのCPUとRAMの設定を選択します。選択したマシンサイズの横にオプションのコストが表示されます。
### プライマリドメイン
Specify the subdomain part of the hostname for your published app. After you publish, you can access your published app at `https://.replit.app`.
To learn how to use a custom domain, see [Custom Domains](/references/publishing/custom-domains).
### プライベートデプロイ
The private published app feature is available on the Pro and Enterprise plans.
Private published apps grant access to your app only to members of your workspace, or to specific users and groups that you invite.
When publishing, you can choose between **Public**, **Workspace only**, or **Only you** access.
To learn how to set up a private deployment, see [Private Deployments](/references/publishing/private-deployments/).
### ビルドコマンド
**Build command**フィールドに、Runコマンドを実行する前にアプリをコンパイルまたはセットアップするシェルコマンドを入力します。
例えば、Viteを使ってJavaScriptアプリを本番環境用に最適化するには、`vite build`コマンドを追加することがあります。
### 実行コマンド
**Run command**フィールドに、タスクを起動するシェルコマンドを入力します。このコマンドはワークフローで使用するものと同様にしてください。例えば、「myApp」というFlaskアプリを起動するには、`flask --app myApp run`コマンドを追加することがあります。
### 発行済みアプリのシークレット
**Add published app secret**を選択して、アプリを安全に実行するために必要な環境変数やシークレットを追加します。
Replit Appに環境変数やシークレットがある場合、PublishingツールはそれらをリストKに自動的に追加します。
### アプリタイプオプション
以下のオプションのいずれかを選択します:
* **Web server**: ウェブアプリやユーザーがインターネット上で接続できるアプリを発行する場合はこのオプションを選択します。
* **Background worker**: アプリがポートをリッスンしたりサーバーを起動しない場合はこのオプションを選択します。
**Web Server**を選択した場合、以下の操作を行ってどのポートを公開するかをカスタマイズできます:
1. **Port configuration**セクションを展開します。
2. **Networking pane to configure**を選択して**Networking**タブを開き、ポートマッピングを管理します。
ポートの設定の詳細については、[ポート](/references/project-setup/ports/)を参照してください。
## 次のステップ
発行の詳細については、以下のリソースを参照してください:
* [発行済みアプリの監視](/references/publishing/monitoring-a-deployment/):ログの確認とスケジュールされたデプロイの監視方法を学びます。
* [発行コスト](/billing/deployment-pricing):発行に関連するコストを確認します。
* [料金](https://replit.com/pricing/):各プランタイプの料金と許容量を確認します。
* [使用量許容量](/billing/about-usage-based-billing/):スケジュールされたデプロイの使用量制限と課金単位について学びます。