> ## Documentation Index
> Fetch the complete documentation index at: https://docs.replit.com/llms.txt
> Use this file to discover all available pages before exploring further.

# アプリを公開する

> パブリック URL でアプリを公開して共有しましょう — たった4クリックで完了します。

export const YouTubeEmbed = ({videoId, title = "YouTube video", startAt}) => {
  if (!videoId) {
    return null;
  }
  let url = "https://www.youtube.com/embed/" + videoId;
  if (startAt) {
    url = url + "?start=" + startAt;
  }
  return <Frame>
      <iframe src={url} title={title} allow="accelerometer; autoplay; clipboard-write; encrypted-media; gyroscope; picture-in-picture; web-share" allowFullScreen></iframe>
    </Frame>;
};

<YouTubeEmbed videoId="ski8_MUYO4M" title="Publish your app on Replit" />

Replit App をパブリック URL で公開して共有しましょう。**Publish** ボタンで4クリックで完了します。

## アプリを公開する

<Steps>
  <Step title="プロジェクトエディタで Publish をクリックする">
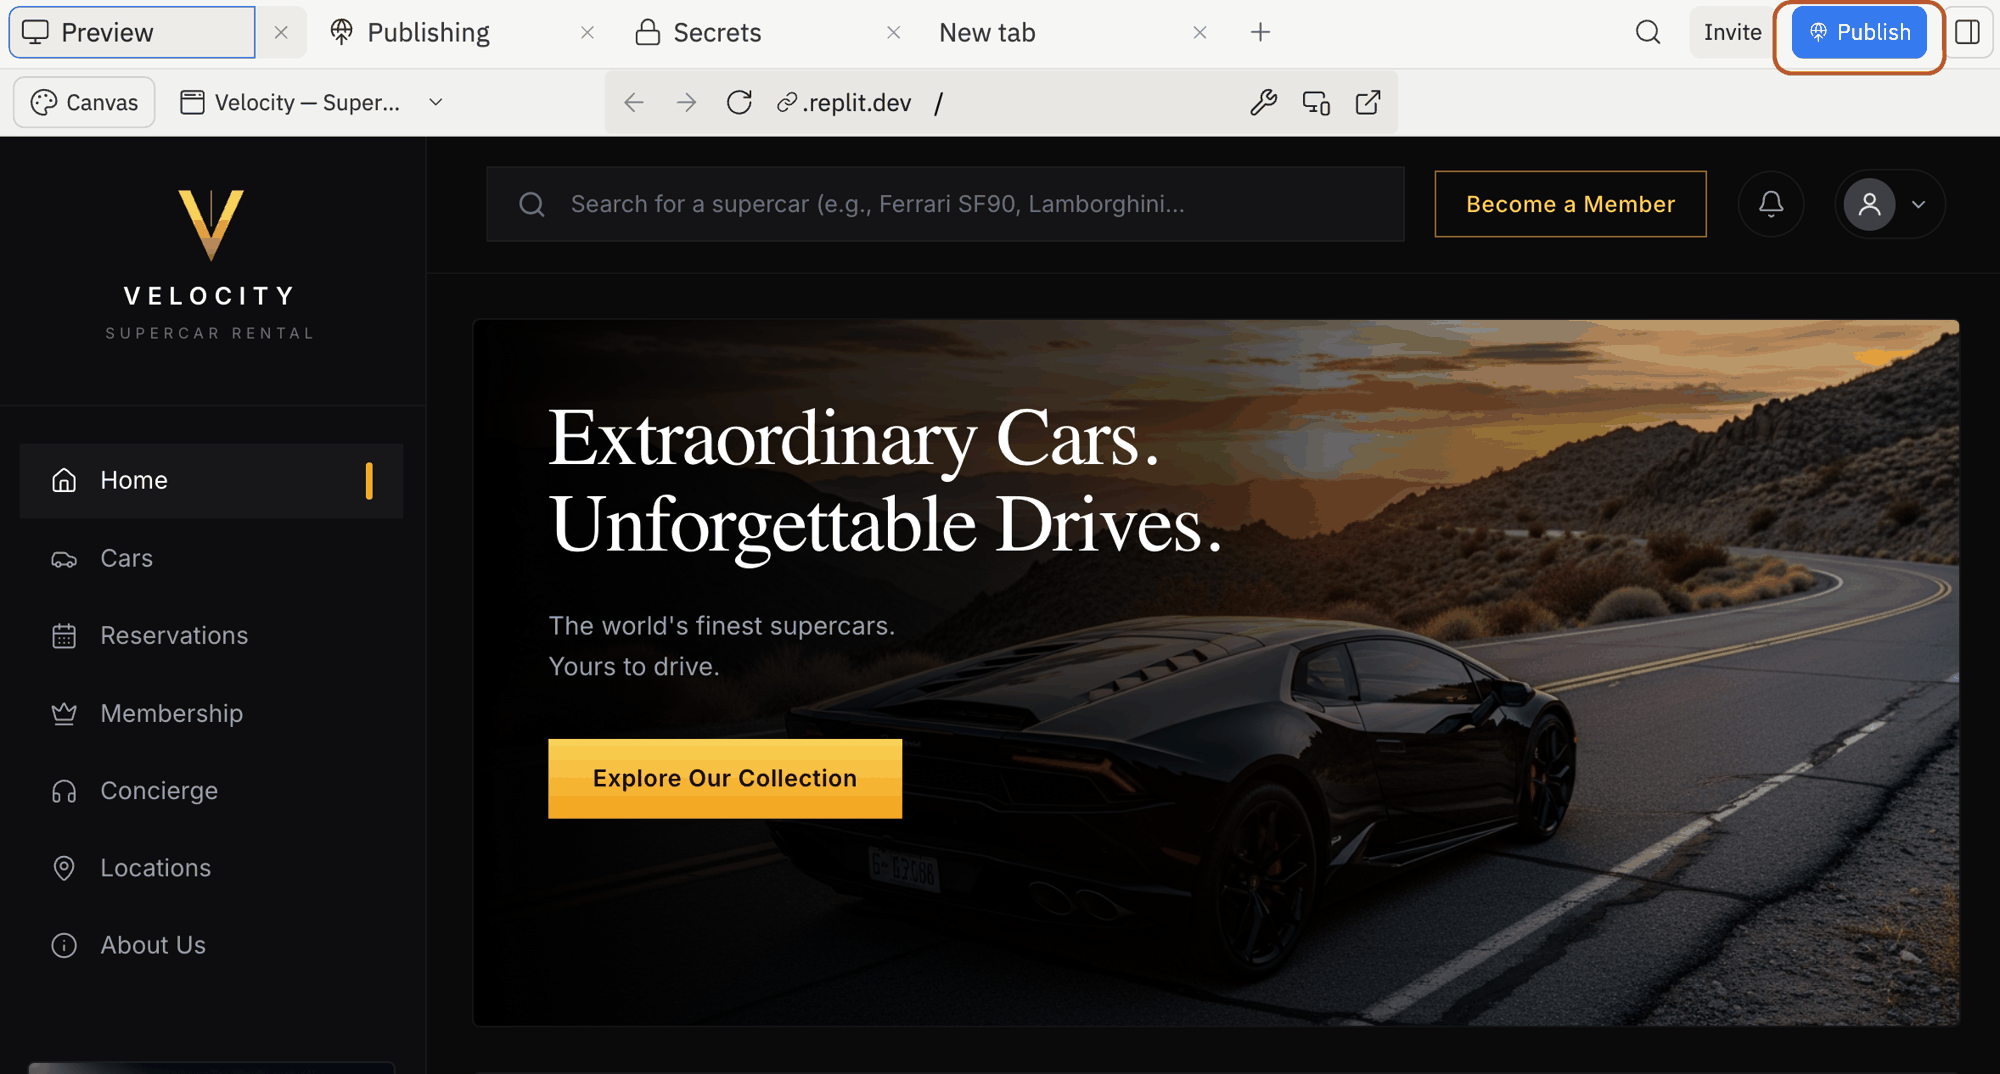
    プロジェクトを開きます。プロジェクトエディタの右上にある **Publish** を選択してください。

    <Note>
      公開はすべてのプランで利用できます。無料の Starter プランには公開済みアプリが1つ含まれます。Replit Core と Pro はその制限を解除し、さらに多くの公開オプションを追加します。
    </Note>

    <Frame>
      <img src="https://mintcdn.com/replit/DJAysPyGu4yUsaj3/images/publish-quickstart/01-publish-button.png?fit=max&auto=format&n=DJAysPyGu4yUsaj3&q=85&s=ef50e4f6387bf64bdc6603209c1f399b" alt="右上に Publish ボタンがハイライトされた Replit プロジェクトエディタのトップバー" width="2000" height="1074" data-path="images/publish-quickstart/01-publish-button.png" />
    </Frame>
  </Step>

  <Step title="Publish ダイアログでアプリを設定する">
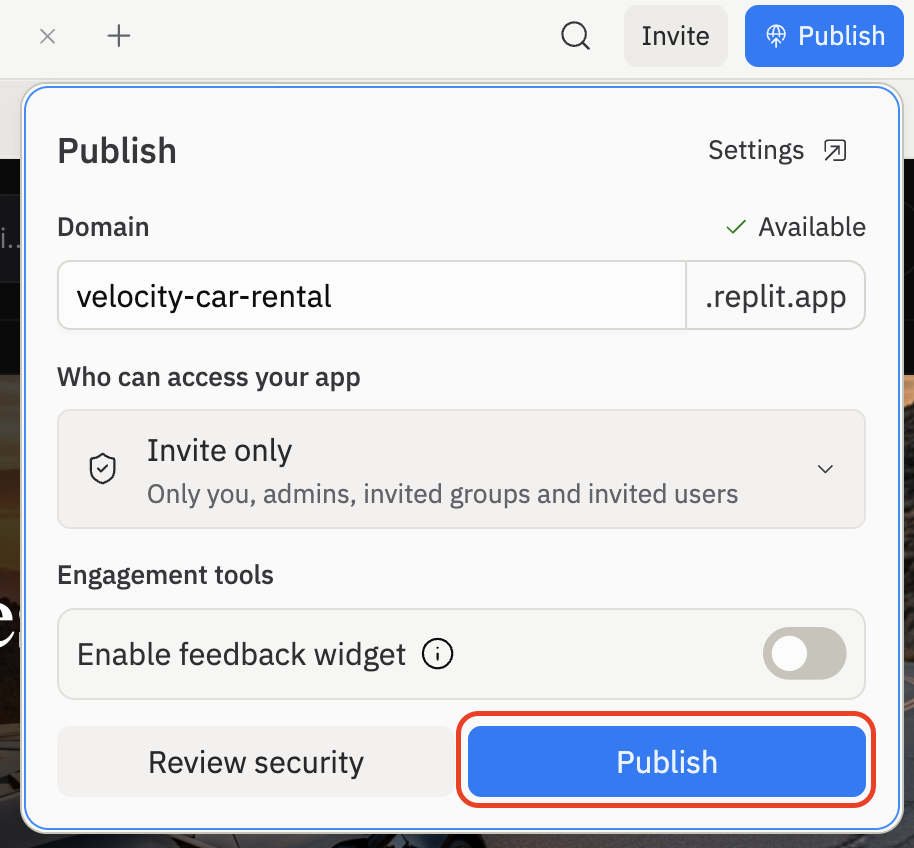
    Publish ダイアログが開きます。**Domain** を選択してください — 自動入力されますが変更できます。アプリにアクセスできる人を選択し（**Public**、**Invite only** など）、必要に応じてフィードバックウィジェットを有効にします。次に **Publish** を選択します。
    <Frame>
      <img src="https://mintcdn.com/replit/DJAysPyGu4yUsaj3/images/publish-quickstart/02-publish-dialog.png?fit=max&auto=format&n=DJAysPyGu4yUsaj3&q=85&s=2ae9589ccad9f1a49ade6efa86ff4e6f" alt="velocity-car-rental.replit.app サブドメインが表示された Domain フィールド、Invite only に設定された Who can access your app ドロップダウン、フィードバックウィジェットのトグルがある Engagement tools セクション、右下にハイライトされた Publish ボタンが表示された Publish ダイアログ" width="914" height="848" data-path="images/publish-quickstart/02-publish-dialog.png" />
    </Frame>
  </Step>

  <Step title="公開ステージを待つ">
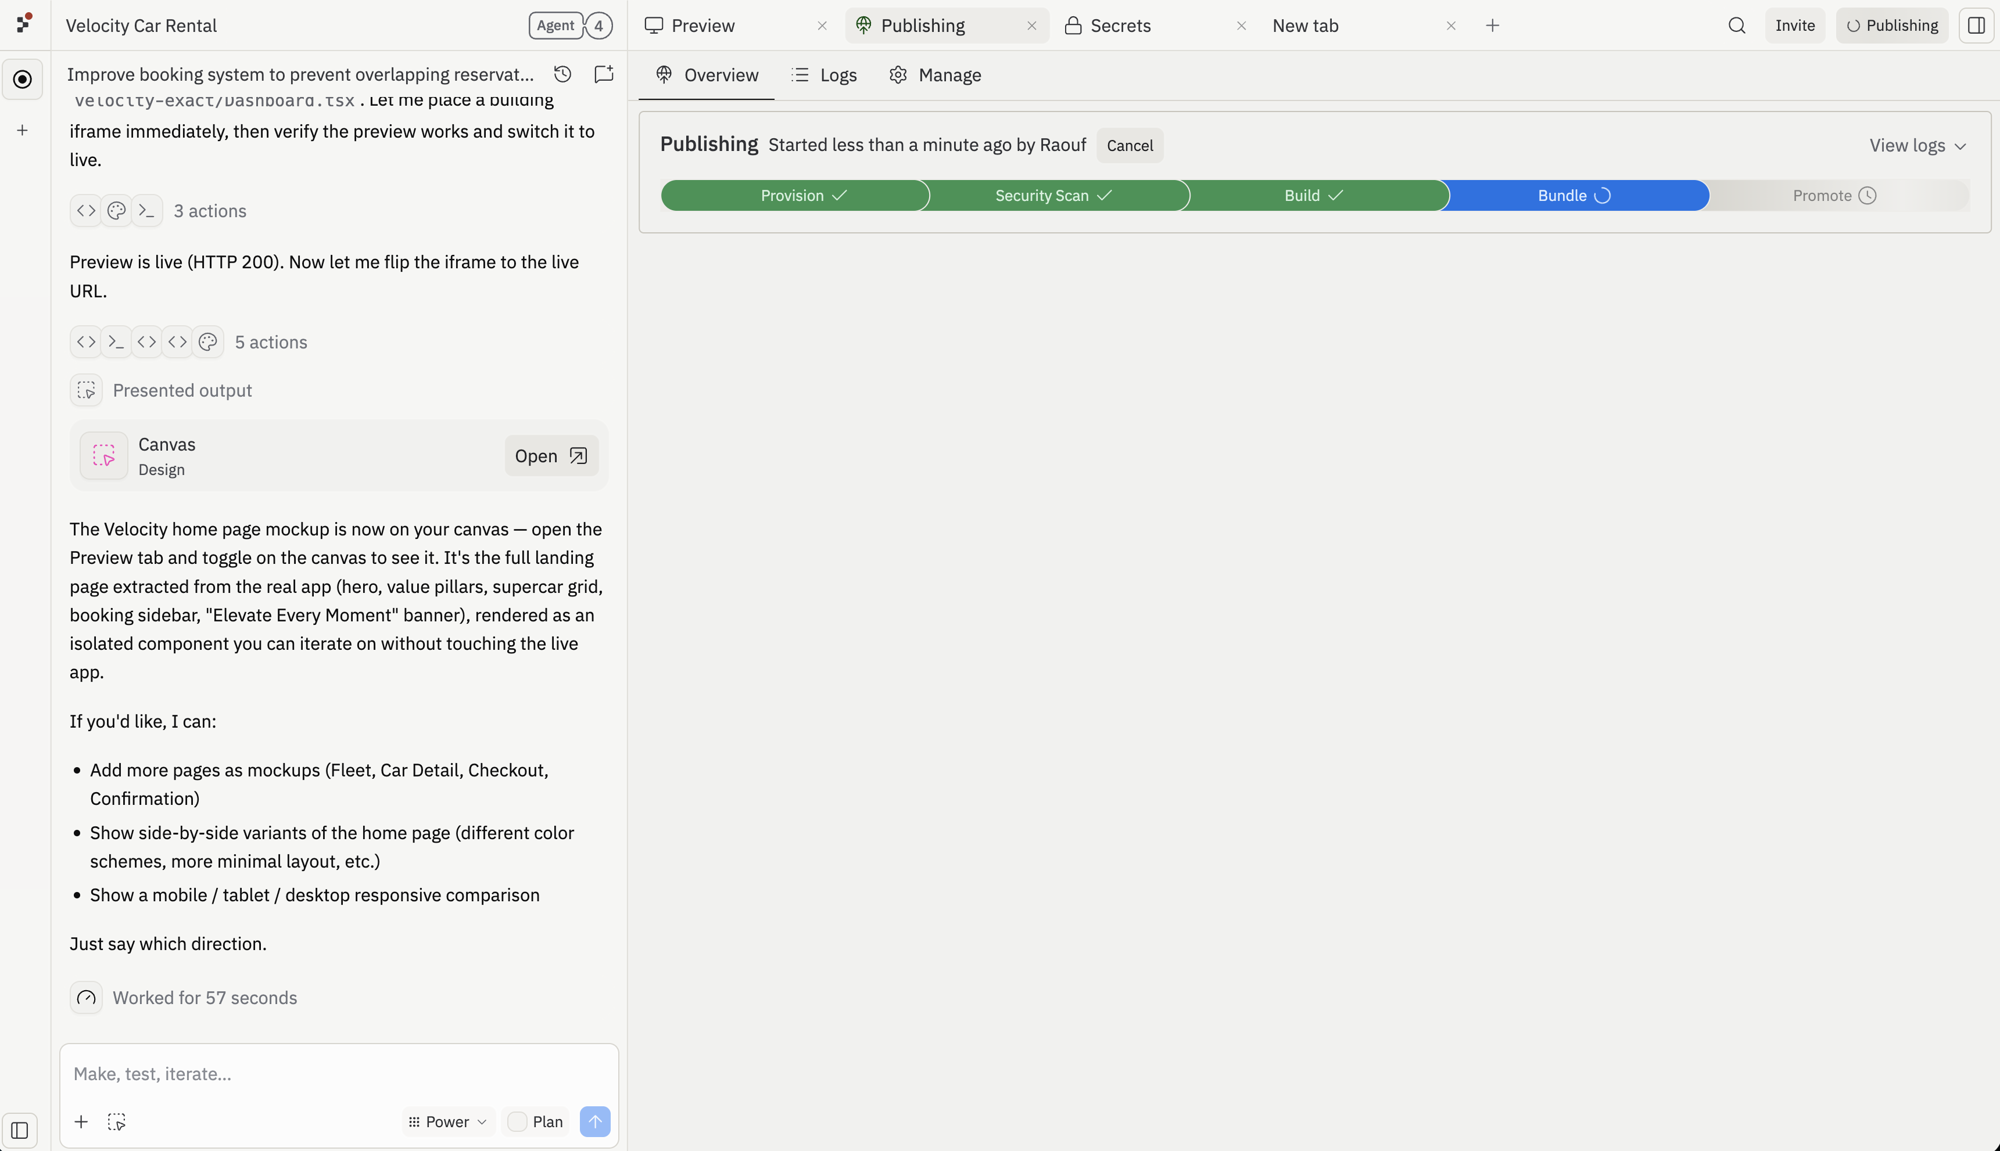
    Replit が **Provision → Security Scan → Build → Bundle → Promote** を実行します。通常は1〜2分かかります。
    <Frame>
      <img src="https://mintcdn.com/replit/DJAysPyGu4yUsaj3/images/publish-quickstart/03-publishing-stages.png?fit=max&auto=format&n=DJAysPyGu4yUsaj3&q=85&s=b7a256d4331a68ba822b7b6d513b762a" alt="Provision と Security Scan が完了（緑のチェックマーク）、Build も完了、Bundle が進行中（青いスピナー）、Promote が保留中の5段階プログレスバーが表示された Publishing タブ" width="2000" height="1151" data-path="images/publish-quickstart/03-publishing-stages.png" />
    </Frame>
  </Step>

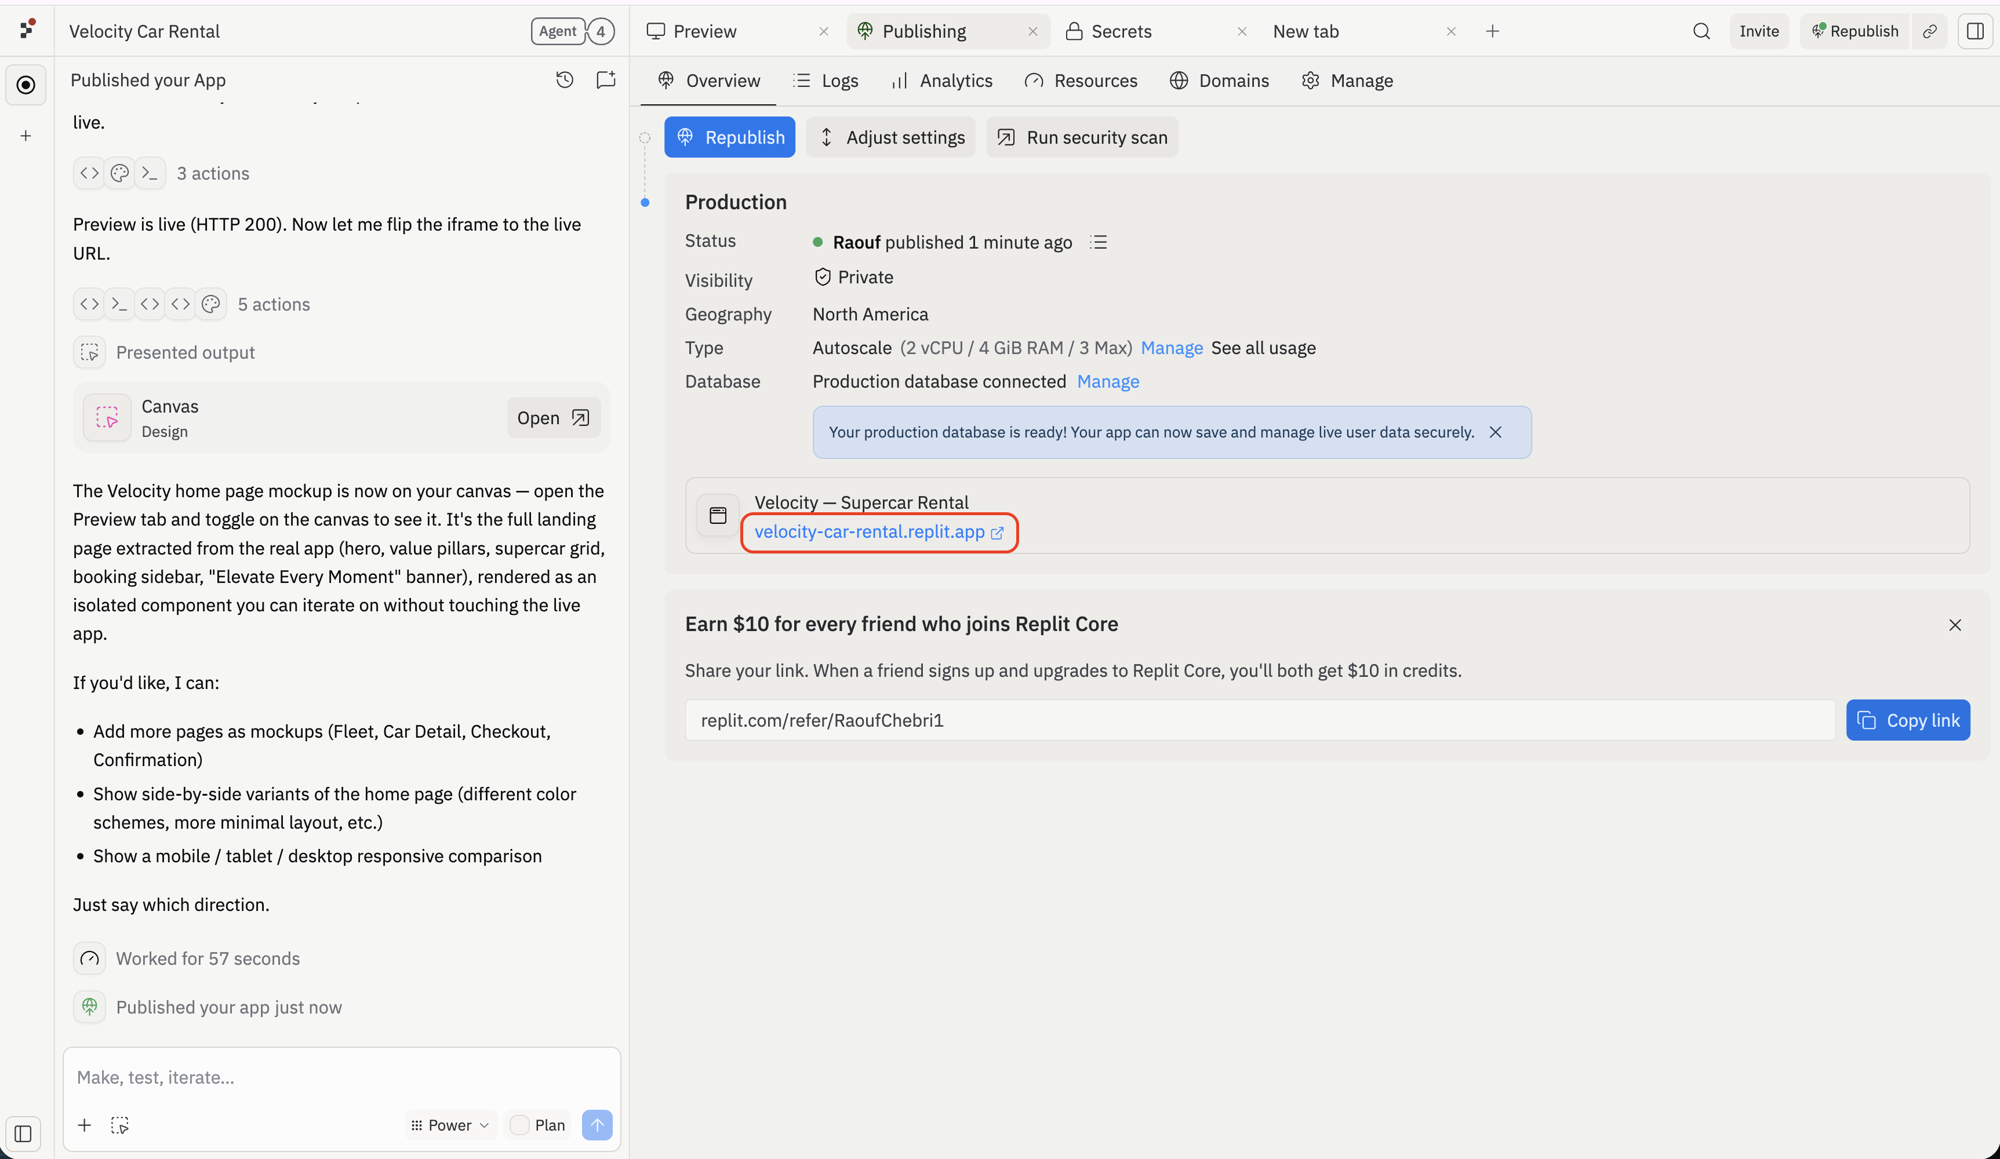
  <Step title="URL で公開されたアプリを開く">
    アプリが公開されました。Publishing タブの `.replit.app` URL を選択して開きましょう。その URL をどこでも共有できます — リンクを持つ人は誰でも（アクセス設定に従って）アプリを使用できます。

    <Frame>
      <img src="https://mintcdn.com/replit/DJAysPyGu4yUsaj3/images/publish-quickstart/04-app-published.png?fit=max&auto=format&n=DJAysPyGu4yUsaj3&q=85&s=0b611d7fc9249b433bc28d221350c458" width="2000" height="1159" data-path="images/publish-quickstart/04-app-published.png" />
    </Frame>
  </Step>
</Steps>

## アプリを更新する

変更を加えて再度 **Publish** を選択するたびに、アプリは同じ URL で更新されます。訪問者は次の読み込み時に最新バージョンを取得します — 新しいリンクを共有する必要はありません。

## 次のステップ

<CardGroup cols={2}>
  <Card title="カスタムドメインを追加する" icon="globe" href="/build/add-custom-domain">
    `.replit.app` の代わりに独自ドメインを使用しましょう。
  </Card>

  <Card title="デプロイメントの種類" icon="server" href="/learn/projects-and-artifacts/replit-deployments">
    Autoscale、Reserved VM、Static、Scheduled デプロイメントを比較しましょう。
  </Card>

  <Card title="公開のトラブルシューティング" icon="triangle-exclamation" href="/build/troubleshooting">
    よくある公開の問題とその解決方法。
  </Card>
</CardGroup>