> ## Documentation Index
> Fetch the complete documentation index at: https://docs.replit.com/llms.txt
> Use this file to discover all available pages before exploring further.
# PythonとFlaskにおけるGoogle認証
> FlaskアプリにGoogle OAuth認証を実装する方法をReplitで学ぶ。ユーザーログインとGoogle Sheets API連携を含む。
ユーザーがGoogleアカウントを使ってあなたのウェブサイトにログインできるようにすると、以下のメリットがあります:
1. 独自の認証スキームを実装する必要がない。
2. ユーザーの名前や連絡先情報を簡単に取得できる。
3. 同じ認証情報を使って、SheetsやDriveなどのユーザーのGoogleリソースにアクセスできる。
このガイドでは、ReplitでPythonとFlaskを使ってそれを行う方法を説明します。
まず、基本的なOAuth認証のセットアップ方法を説明し、次に取得した認証情報を使ってユーザーのGoogleリソースにアクセスする方法を説明します。
## OAuthの概要
Google認証はOAuth標準に基づいています。OAuthの仕組みは以下の通りです:
1. ウェブサイトのどこかで、ユーザーをログインページに誘導します。
2. ユーザーがログインページにアクセスすると、ウェブサイト上でログインフォームを実装するのではなく、Googleのログインサービスにリダイレクトしてユーザーをログインさせます。
3. Googleのログインサービスがユーザーのログインに成功すると、ユーザーとログインセッションに関する情報を送信しながら、あなたが定義したURL(例:`https://YOUR_DOMAIN/oauth2callback`)にウェブサイトへリダイレクトします。
4. ユーザーのログイン情報を使って、アクセストークンを取得します。これはユーザーのプロフィール情報、スプレッドシート、ドキュメントなどのリソースにアクセスするための通行証です。
## OAuth:コードを見せてください
私のように、まず動作するコードが欲しいという方へ。以下のコードがそれです。ただし、すべてが正しく機能するためには、Google Cloud Consoleでいくつかの設定が必要です。それは次のセクションで説明します。[Flaskテンプレート](https://replit.com/@replit/Flask?v=1)を使って新しいReplit Appを作成し、以下を`main.py`に入力してください。コード内のコメントが各部分の説明をしています:
```python theme={null}
from flask import Flask, redirect, session, url_for, request
import google_auth_oauthlib.flow
import json
import os
import requests
app = Flask('app')
# `FLASK_SECRET_KEY` is used by sessions. You should create a random string
# and store it as secret.
app.secret_key = os.environ.get('FLASK_SECRET_KEY') or os.urandom(24)
# `GOOGLE_APIS_OAUTH_SECRET` contains the contents of a JSON file to be downloaded
# from the Google Cloud Credentials panel. See next section.
oauth_config = json.loads(os.environ['GOOGLE_OAUTH_SECRETS'])
# This sets up a configuration for the OAuth flow
oauth_flow = google_auth_oauthlib.flow.Flow.from_client_config(
oauth_config,
# scopes define what APIs you want to access on behave of the user once authenticated
scopes=[
"https://www.googleapis.com/auth/userinfo.email",
"openid",
"https://www.googleapis.com/auth/userinfo.profile",
]
)
# This is entrypoint of the login page. It will redirect to the Google login service located at the
# `authorization_url`. The `redirect_uri` is actually the URI which the Google login service will use to
# redirect back to this app.
@app.route('/signin')
def signin():
# We rewrite the URL from http to https because inside the Replit App http is used,
# but externally it's accessed via https, and the redirect_uri has to match that
oauth_flow.redirect_uri = url_for('oauth2callback', _external=True).replace('http://', 'https://')
authorization_url, state = oauth_flow.authorization_url()
session['state'] = state
return redirect(authorization_url)
# This is the endpoint that Google login service redirects back to. It must be added to the "Authorized redirect URIs"
# in the API credentials panel within Google Cloud. It will call a Google endpoint to request
# an access token and store it in the user session. After this, the access token can be used to access
# APIs on behalf of the user.
@app.route('/oauth2callback')
def oauth2callback():
if not session['state'] == request.args['state']:
return 'Invalid state parameter', 400
oauth_flow.fetch_token(authorization_response=request.url.replace('http:', 'https:'))
session['access_token'] = oauth_flow.credentials.token
return redirect("/")
# This is the home page of the app. It directs the user to log in if they are not already.
# It shows the user info's information if they already are.
@app.route('/')
def welcome():
if "access_token" in session:
user_info = get_user_info(session["access_token"])
if user_info:
return f"""
Hello {user_info["given_name"]}!
Your email address is {user_info["email"]}
Log out
"""
return """
Hello!
Sign In via Google
"""
# Call the userinfo API to get the user's information with a valid access token.
# This is the first example of using the access token to access an API on the user's behalf.
def get_user_info(access_token):
response = requests.get("https://www.googleapis.com/oauth2/v3/userinfo", headers={
"Authorization": f"Bearer {access_token}"
})
if response.status_code == 200:
user_info = response.json()
return user_info
else:
print(f"Failed to fetch user info: {response.status_code} {response.text}")
return None
@app.route('/logout')
def logout():
session.clear()
return redirect('/')
if __name__ == '__main__':
app.run(host='0.0.0.0', port=5000)
```
## OAuthアプリ/クライアントのセットアップ
上記のコードを動作させるには、Google Cloudで以下の設定が必要です。
1. Google Cloudプロジェクトを作成する(まだない場合)。
2. OAuth同意画面を設定する。
3. アプリのOAuthクライアントIDを作成する。
### Google Cloudプロジェクトの作成
この演習に使いたいGoogle Cloudプロジェクトが既にある場合は、このステップをスキップできます。
1. [Google Cloud Console](https://console.cloud.google.com/)に移動します。
2. Google Cloudロゴのそばにあるプロジェクトセレクターのドロップボックスをクリックします:
 3. 既存のプロジェクトを選択するか、「新しいプロジェクト」をクリックして新しいプロジェクトを作成します。
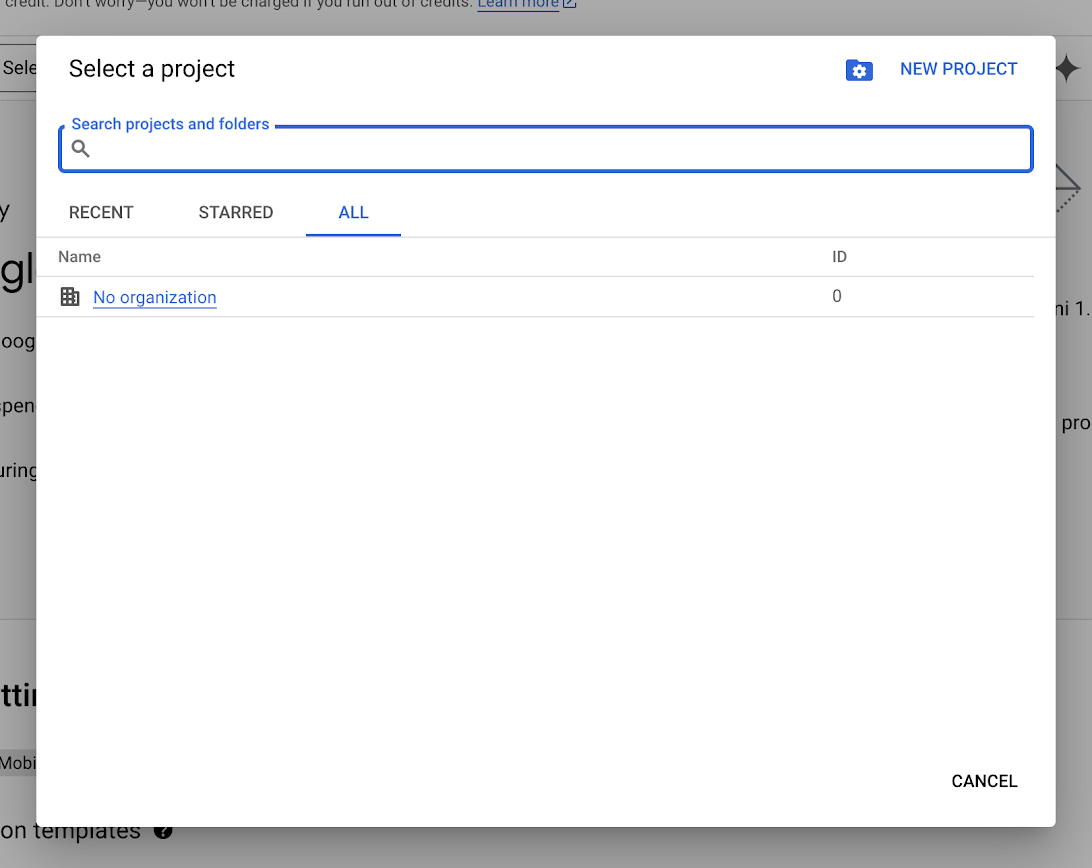 4. 新しいプロジェクトを作成する場合は、プロジェクト名を入力して「作成」をクリックします。
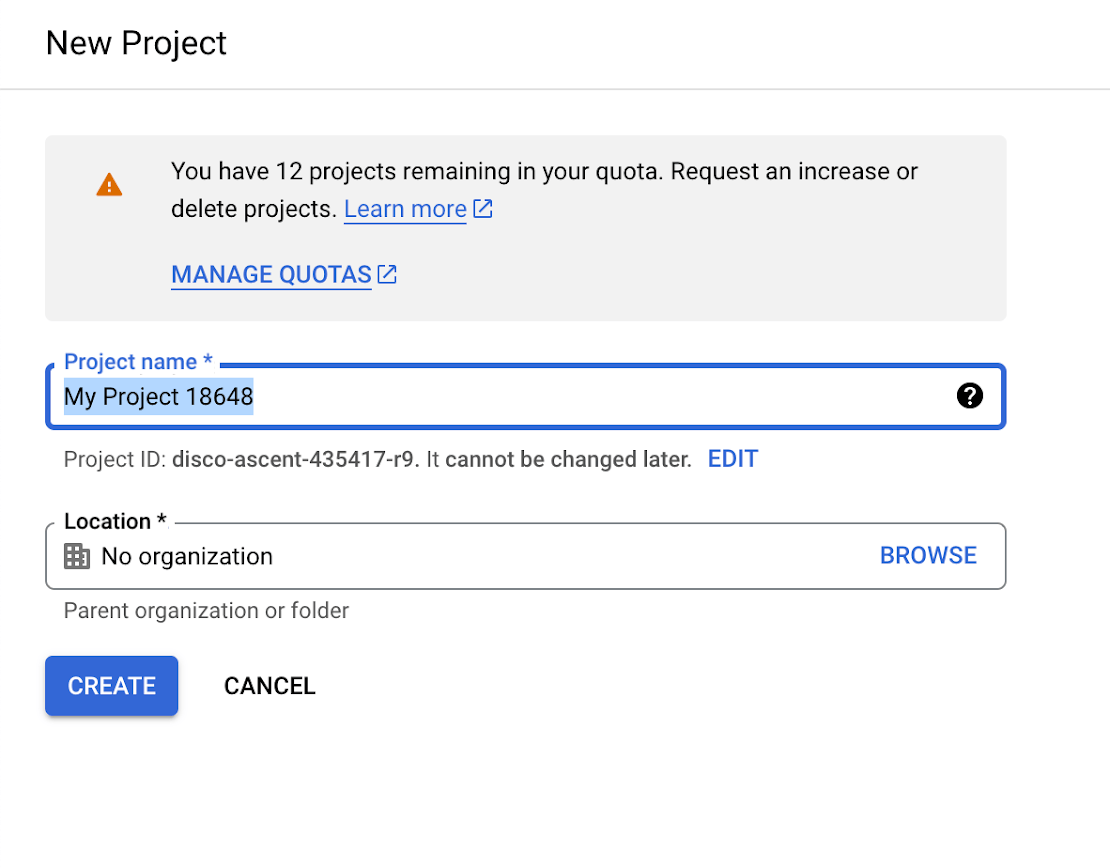 ポップアップに新しいプロジェクトが表示されたら、「プロジェクトを選択」をクリックして*アクティブプロジェクト*に設定します。
### OAuth同意画面の設定
プロジェクトができたら、OAuth同意画面を設定します:
1. [OAuth同意画面](https://console.cloud.google.com/apis/credentials/consent)に移動します。
ポップアップに新しいプロジェクトが表示されたら、「プロジェクトを選択」をクリックして*アクティブプロジェクト*に設定します。
### OAuth同意画面の設定
プロジェクトができたら、OAuth同意画面を設定します:
1. [OAuth同意画面](https://console.cloud.google.com/apis/credentials/consent)に移動します。
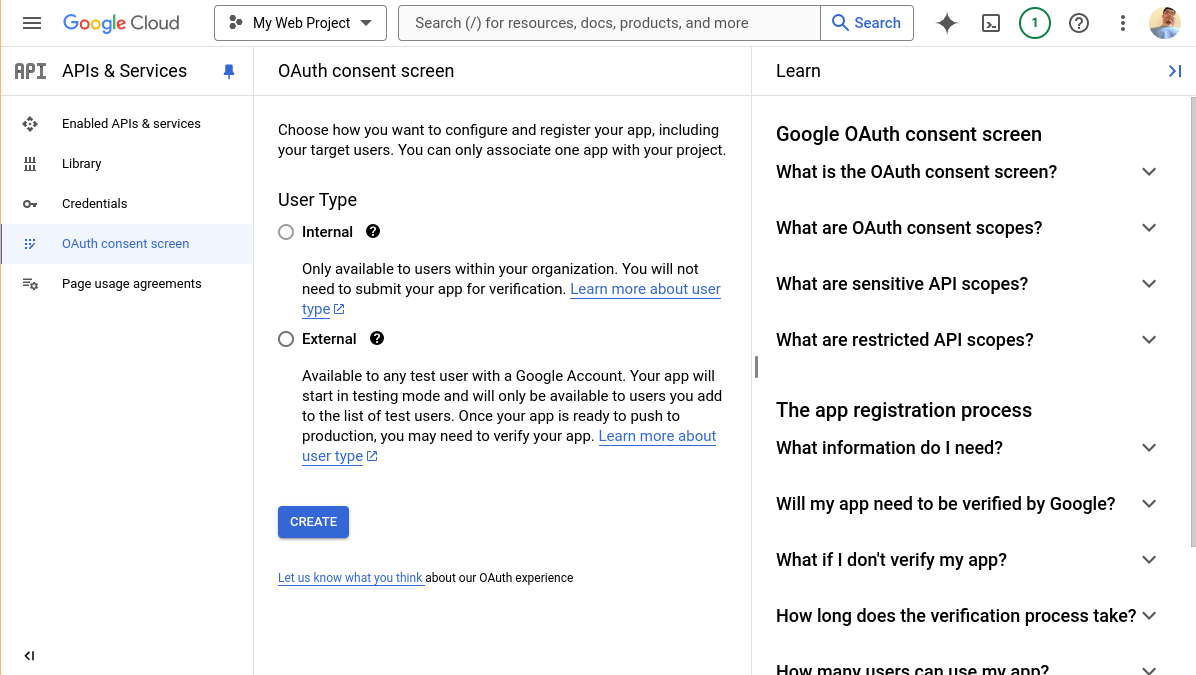 2. プロジェクトのドロップダウンで、使用したいプロジェクトが選択されていることを確認します。
3. 任意のGoogleアカウントを持つユーザーがアプリにログインできるよう「外部」を選択します。「内部」は組織内のユーザーのみに制限されます。
4. 「作成」をクリックします。
5. アプリ名とこのアプリをサポートする担当者のメールアドレスを入力します(あなた自身?)
2. プロジェクトのドロップダウンで、使用したいプロジェクトが選択されていることを確認します。
3. 任意のGoogleアカウントを持つユーザーがアプリにログインできるよう「外部」を選択します。「内部」は組織内のユーザーのみに制限されます。
4. 「作成」をクリックします。
5. アプリ名とこのアプリをサポートする担当者のメールアドレスを入力します(あなた自身?)
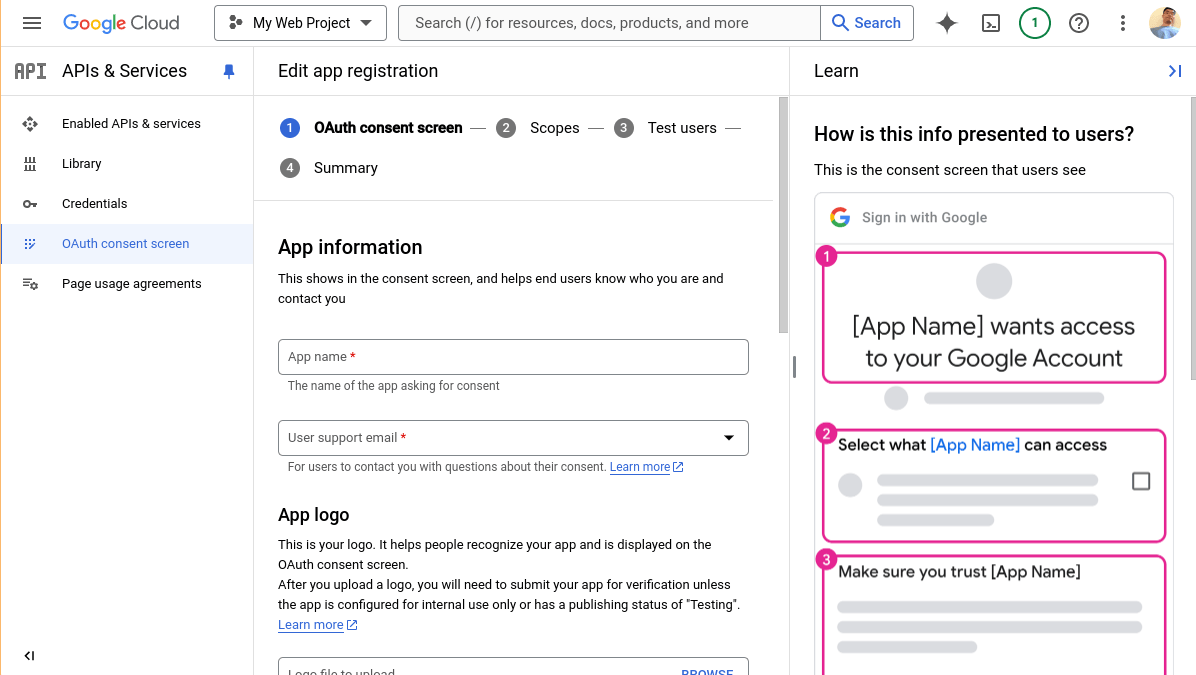 6. 「デベロッパーの連絡先情報」にメールアドレスを入力します。
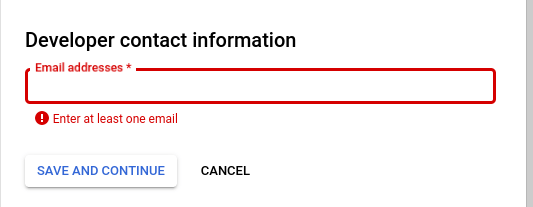 7. 「保存して続行」をクリックします。
8. スコープ画面では、アプリがアクセスしたいAPIを追加できます。基本的なユーザー情報取得のAPIには既にアクセスできます。
7. 「保存して続行」をクリックします。
8. スコープ画面では、アプリがアクセスしたいAPIを追加できます。基本的なユーザー情報取得のAPIには既にアクセスできます。
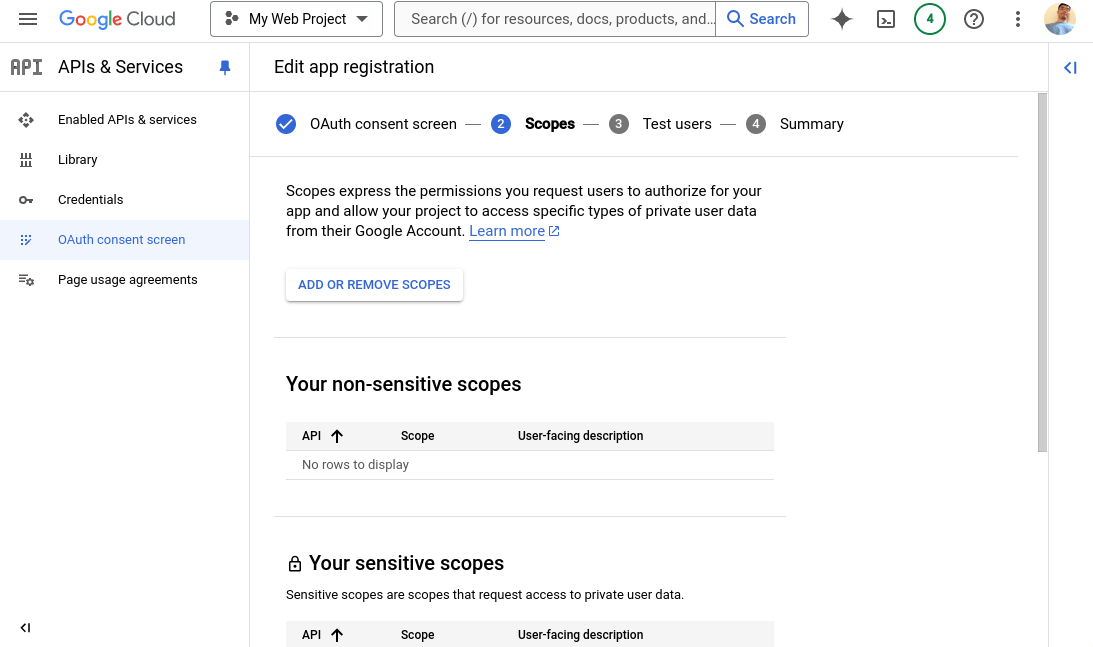 今はこのままにして「保存して続行」をクリックします。
9\. テストユーザーでは、テスト段階でアプリをテストするユーザーのメールアドレスを追加する必要があります。
今はこのままにして「保存して続行」をクリックします。
9\. テストユーザーでは、テスト段階でアプリをテストするユーザーのメールアドレスを追加する必要があります。
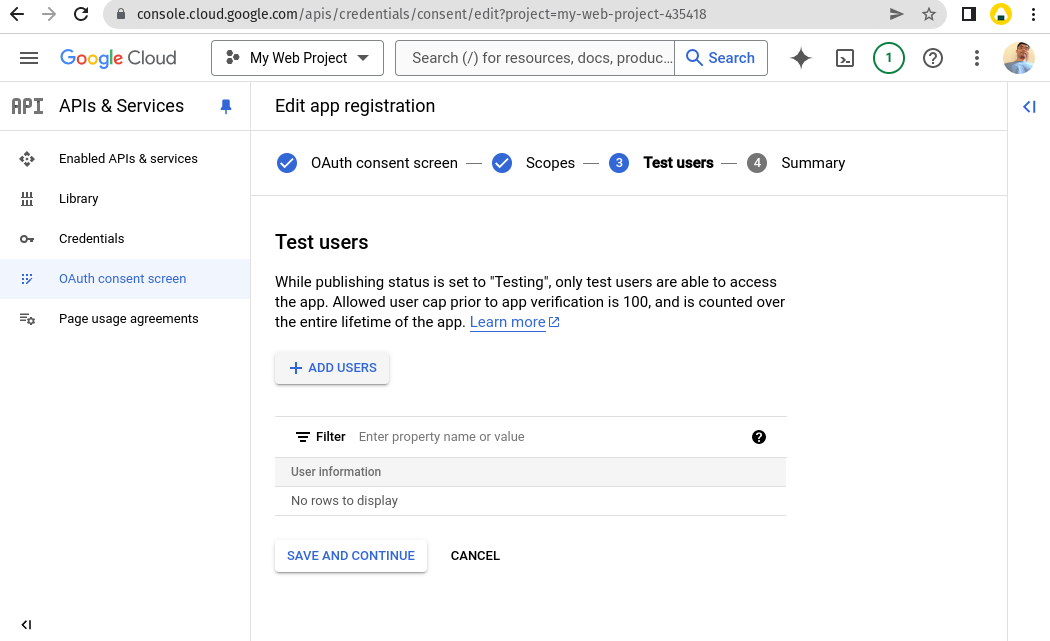 「ユーザーを追加」をクリックします。
10\. 1つ以上のGoogleメールアドレスを追加して「追加」をクリックします。
「ユーザーを追加」をクリックします。
10\. 1つ以上のGoogleメールアドレスを追加して「追加」をクリックします。
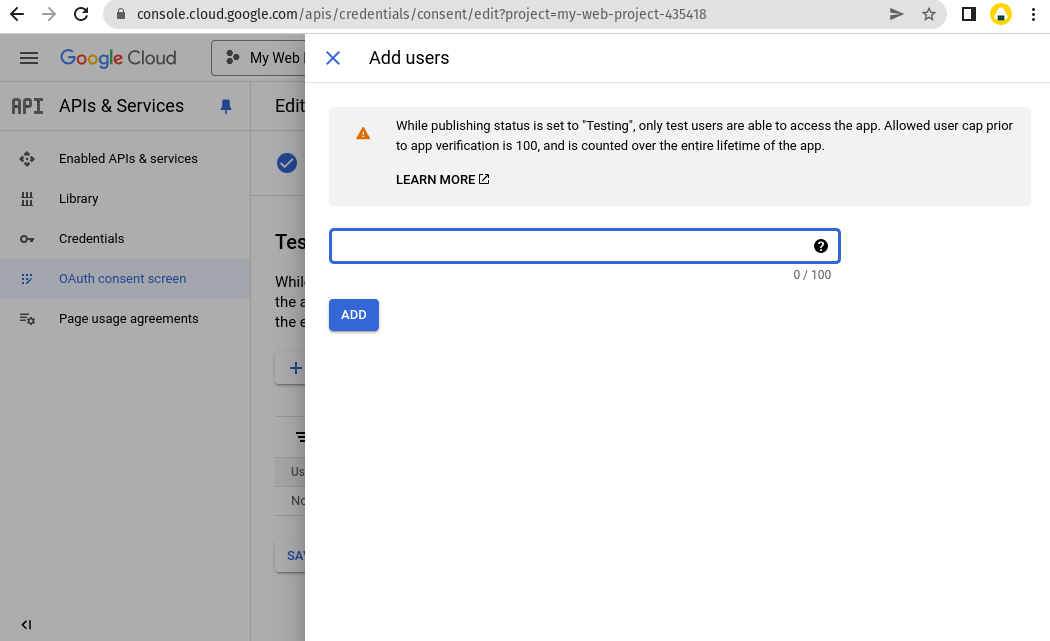 次に「保存して続行」をクリックします。
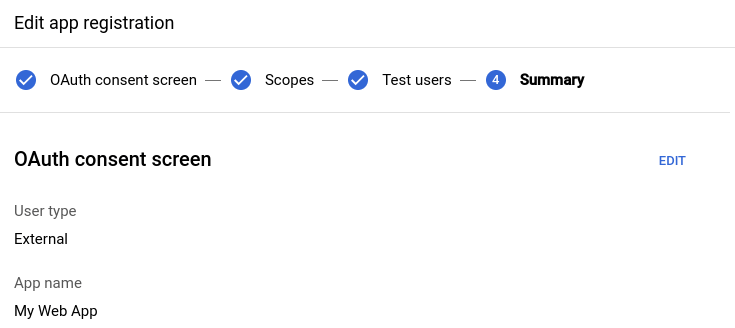
11\. サマリー画面を確認します。いつでも戻って各ステップを編集できます。
次に「保存して続行」をクリックします。
11\. サマリー画面を確認します。いつでも戻って各ステップを編集できます。
 ### アプリのOAuthクライアントIDの作成
これが最後の部分です。OAuthを機能させるには、アプリのOAuthクライアントIDを作成する必要があります。
1. [認証情報](https://console.cloud.google.com/apis/credentials)に移動します。
### アプリのOAuthクライアントIDの作成
これが最後の部分です。OAuthを機能させるには、アプリのOAuthクライアントIDを作成する必要があります。
1. [認証情報](https://console.cloud.google.com/apis/credentials)に移動します。
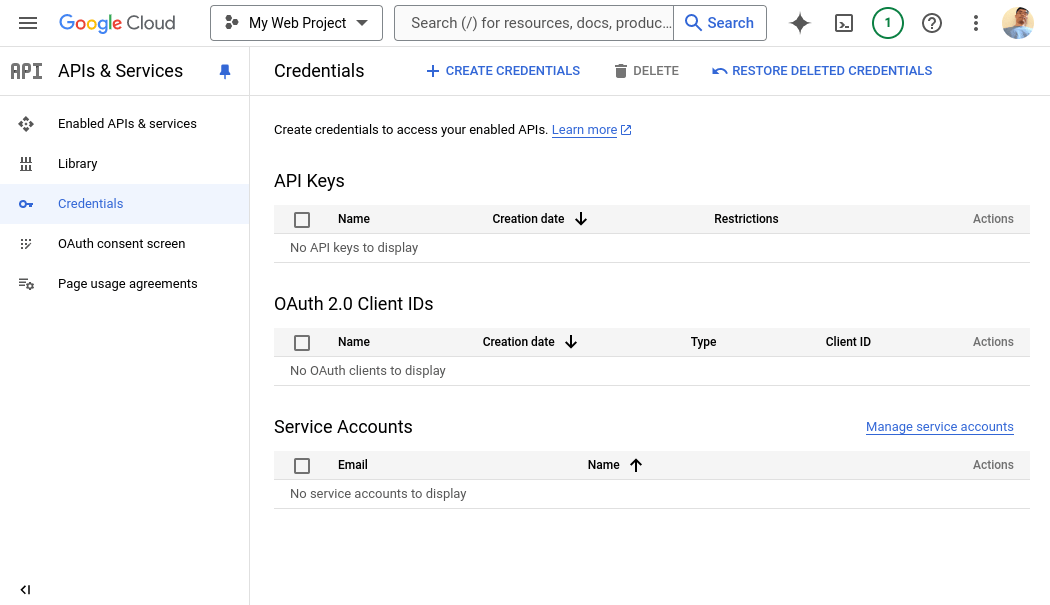 2. 「認証情報を作成」をクリックします。
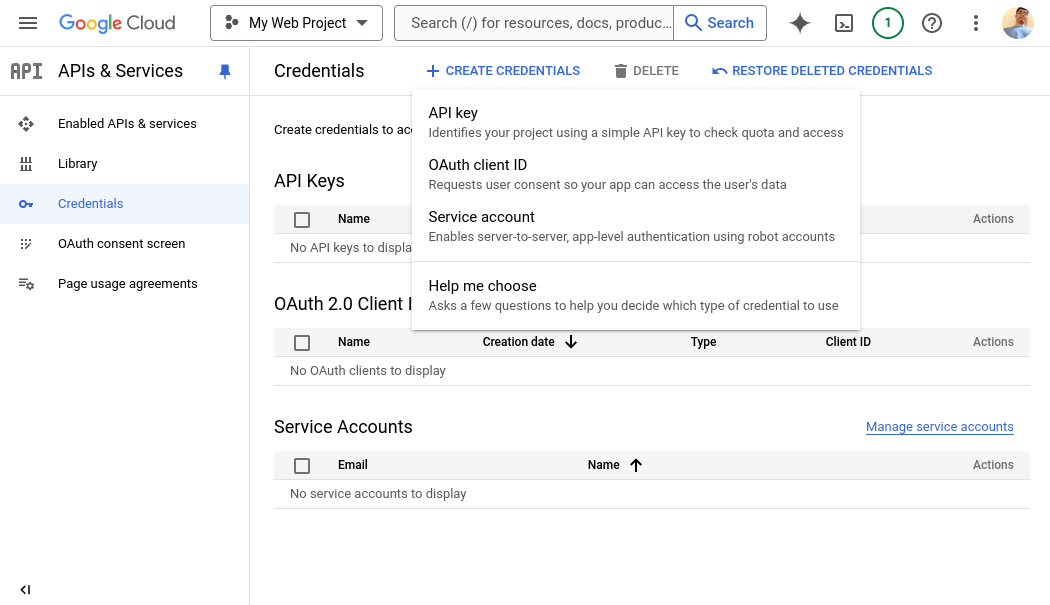 「OAuthクライアントID」を選択します。
3\. アプリケーションの種類として「ウェブアプリケーション」を選択します。このクライアントIDの名前を入力します。
「OAuthクライアントID」を選択します。
3\. アプリケーションの種類として「ウェブアプリケーション」を選択します。このクライアントIDの名前を入力します。
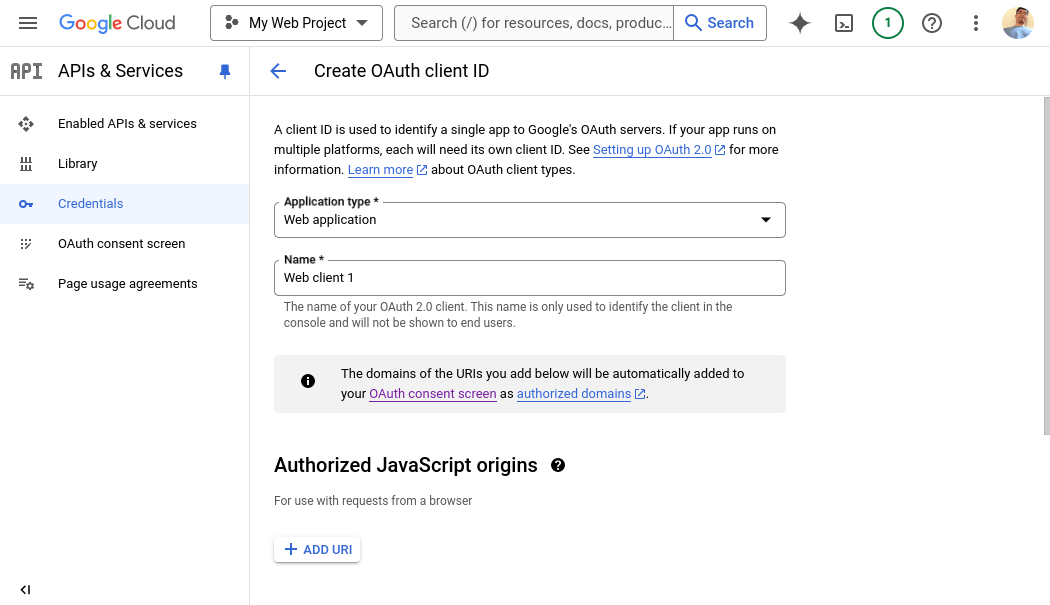 4. Flask Replit Appに移動します。シェルを開いて次のコマンドを入力します:`echo https://$REPLIT_DEV_DOMAIN/oauth2callback`。結果は `https://81309e9b-c4df-48e0-a2c2-0a8d3c0e3162-00-35ppsa0tcuv6v.infra-staging.replit.dev/oauth2callback` のようになります。このテキストをコピーして、フォーム下部の「承認済みのリダイレクトURI」の1つとして入力します。
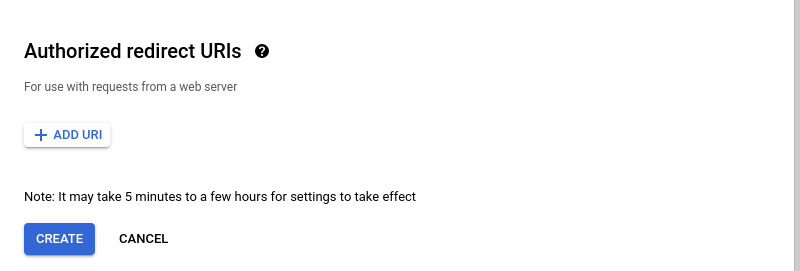 後でアプリを公開する際は、ここに戻って別のエントリ `https://YOUR_APP_DOMAIN/oauth2callback` を追加してください。
5. 「作成」をクリックします。
6. 「JSONをダウンロード」をクリックします:
後でアプリを公開する際は、ここに戻って別のエントリ `https://YOUR_APP_DOMAIN/oauth2callback` を追加してください。
5. 「作成」をクリックします。
6. 「JSONをダウンロード」をクリックします:
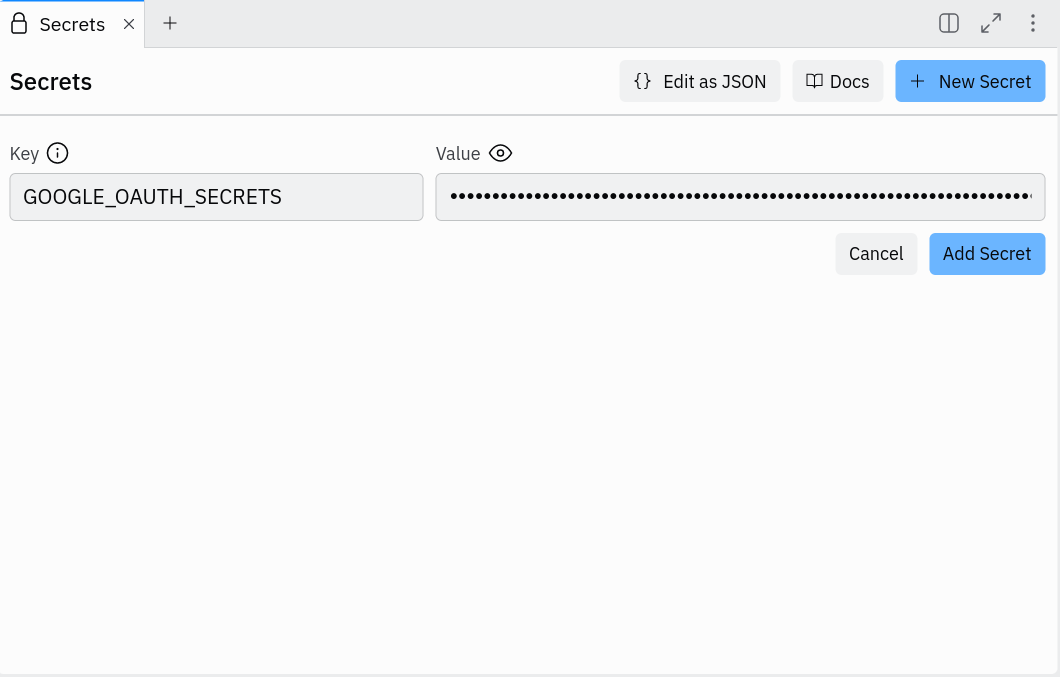
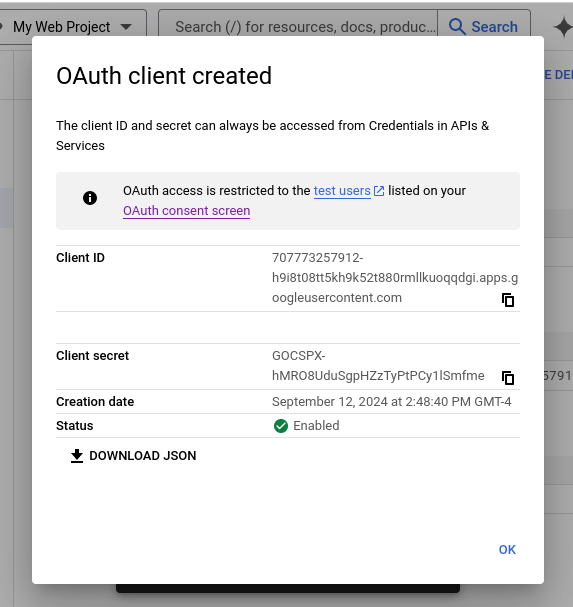 7. Replit Appに戻り、Secretsペインを開きます。`GOOGLE_OAUTH_SECRETS` という名前のシークレットを作成し、ダウンロードしたファイルの内容をシークレットの値として貼り付けます。
 お疲れ様でした!ここまで辿り着いた方はおめでとうございます!これでFlaskアプリを実行し、テストユーザーのGoogleアカウントを使ってログインできるようになりました。アプリを任意のGoogleユーザーが利用できるようにするには、[同意ページ](https://console.cloud.google.com/apis/credentials/consent)に戻って「アプリを公開」をクリックする必要があります。SheetsやDriveなどの追加のGoogle APIが必要な場合は、確認プロセスが必要になることがあります。
次は、Sheetsなどのような Google APIとの統合方法を説明します。さらに進めたい方は引き続きご覧ください。
## Google Sheets APIのセットアップ
Google SheetsのようなGoogle API統合を追加するには、まずアプリのAPIを有効にする必要があります。[利用可能なAPIを参照](https://console.cloud.google.com/apis/library)できます。例としてGoogle Sheetsを使用します。
1. [Google Sheets APIのリストページ](https://console.cloud.google.com/apis/library/sheets.googleapis.com)に移動します。
2. 「有効にする」をクリックします。
以上です!この部分のGoogle Cloudセットアップはこれだけです。
## Google Sheets統合:コードを見せてください
まず、元のコードのOAuthフローセクションで、`"https://www.googleapis.com/auth/spreadsheets.readonly"` をスコープのリストに追加する以外はすべて同じままにします:
```python theme={null}
# This sets up a configuration for the OAuth flow
oauth_flow = google_auth_oauthlib.flow.Flow.from_client_config(
oauth_config,
# scopes define what APIs you want to access on behave of the user once authenticated
scopes=[
"https://www.googleapis.com/auth/userinfo.email",
"openid",
"https://www.googleapis.com/auth/userinfo.profile",
"https://www.googleapis.com/auth/spreadsheets.readonly"
]
)
```
`googleapiclient.discovery` ライブラリでGoogle APIにアクセスする方法は、まずアクセストークンを使用して `Credentials` オブジェクトを作成し、次に `build` 関数を使用して呼び出し可能なAPIオブジェクトを作成します。Sheets APIの場合は以下のようになります:
```python theme={null}
credentials = google.oauth2.credentials.Credentials(token=session['access_token'])
service = build("sheets", "v4", credentials=credentials)
sheets_api = service.spreadsheets()
```
Sheets APIの実際の使用方法について、いくつかのヘルパー関数を作成しました:
```python theme={null}
# fetch all sheets within a Google spreadsheet
def get_sheets(sheets_api, spreadsheet_id) -> list[str]:
result = sheets_api.get(spreadsheetId=spreadsheet_id).execute()
return [sheet["properties"]["title"] for sheet in result["sheets"]]
# fetch the data for a given sheet within a Google spreadsheet
def get_sheet_data(sheets_api, spreadsheet_id, sheet_title) -> list[list[str]]:
result = (
sheets_api.values()
.get(spreadsheetId=spreadsheet_id, range=sheet_title)
.execute()
)
return result["values"]
```
上記のヘルパーを使って、Googleスプレッドシートをインポートするためのハンドラーエンドポイントを以下のように作成できます:
```python theme={null}
@app.route("/import_spreadsheet", methods = ['POST'])
def import_spreadsheet():
if 'access_token' not in session:
return redirect('/signin')
spreadsheet_id = request.form["spreadsheet_id"]
credentials = google.oauth2.credentials.Credentials(token=session['access_token'])
service = build("sheets", "v4", credentials=credentials)
sheets_api = service.spreadsheets()
try:
sheets = get_sheets(sheets_api, spreadsheet_id)
data_by_sheets = {}
for sheet in sheets:
data = get_sheet_data(sheets_api, spreadsheet_id, sheet)
data_by_sheets[sheet] = data
except googleapiclient.errors.HttpError as e:
return f"upload failure"
dirpath = os.path.join("static", "uploads", spreadsheet_id)
filepath = os.path.join(dirpath, "data.json")
os.makedirs(dirpath, exist_ok=True)
with open(filepath, "w") as file:
json.dump(data_by_sheets, file)
return "upload success!"
```
完全な動作コードはこちらです:
```python theme={null}
from flask import Flask, redirect, session, url_for, request
import google_auth_oauthlib.flow
import json
import os
import requests
from googleapiclient.discovery import build
import googleapiclient.errors
import google.oauth2.credentials
app = Flask('app')
# `FLASK_SECRET_KEY` is used by sessions. You should create a random string
# and store it as secret.
app.secret_key = os.environ.get('FLASK_SECRET_KEY') or os.urandom(24)
# `GOOGLE_APIS_OAUTH_SECRET` contains the contents of a JSON file to be downloaded
# from the Google Cloud Credentials panel. See next section.
oauth_config = json.loads(os.environ['GOOGLE_OAUTH_SECRETS'])
# This sets up a configuration for the OAuth flow
oauth_flow = google_auth_oauthlib.flow.Flow.from_client_config(
oauth_config,
# scopes define what APIs you want to access on behave of the user once authenticated
scopes=[
"https://www.googleapis.com/auth/userinfo.email",
"openid",
"https://www.googleapis.com/auth/userinfo.profile",
"https://www.googleapis.com/auth/spreadsheets.readonly"
]
)
# This is entrypoint of the login page. It will redirect to the Google login service located at the
# `authorization_url`. The `redirect_uri` is actually the URI which the Google login service will use to
# redirect back to this app.
@app.route('/signin')
def signin():
# We rewrite the URL from http to https because inside the Replit App http is used,
# but externally it's accessed via https, and the redirect_uri has to match that
oauth_flow.redirect_uri = url_for('oauth2callback', _external=True).replace('http://', 'https://')
authorization_url, state = oauth_flow.authorization_url()
session['state'] = state
return redirect(authorization_url)
# This is the endpoint that Google login service redirects back to. It must be added to the "Authorized redirect URIs"
# in the API credentials panel within Google Cloud. It will call a Google endpoint to request
# an access token and store it in the user session. After this, the access token can be used to access
# APIs on behalf of the user.
@app.route('/oauth2callback')
def oauth2callback():
if not session['state'] == request.args['state']:
return 'Invalid state parameter', 400
oauth_flow.fetch_token(authorization_response=request.url.replace('http:', 'https:'))
session['access_token'] = oauth_flow.credentials.token
return redirect("/")
# Call the userinfo API to get the user's information with a valid access token.
# This is the first example of using the access token to access an API on the user's behalf.
def get_user_info(access_token):
response = requests.get("https://www.googleapis.com/oauth2/v3/userinfo", headers={
"Authorization": f"Bearer {access_token}"
})
if response.status_code == 200:
user_info = response.json()
return user_info
else:
print(f"Failed to fetch user info: {response.status_code} {response.text}")
return None
@app.route('/logout')
def logout():
session.clear()
return redirect('/')
# fetch all sheets within a Google spreadsheet
def get_sheets(sheets_api, spreadsheet_id) -> list[str]:
result = sheets_api.get(spreadsheetId=spreadsheet_id).execute()
return [sheet["properties"]["title"] for sheet in result["sheets"]]
# fetch the data for a given sheet within a Google spreadsheet
def get_sheet_data(sheets_api, spreadsheet_id, sheet_title) -> list[list[str]]:
result = (
sheets_api.values()
.get(spreadsheetId=spreadsheet_id, range=sheet_title)
.execute()
)
return result["values"]
# Render a form to allow importing a spreadsheet
@app.route("/import_spreadsheet_form")
def import_spreadsheet_form():
return """
お疲れ様でした!ここまで辿り着いた方はおめでとうございます!これでFlaskアプリを実行し、テストユーザーのGoogleアカウントを使ってログインできるようになりました。アプリを任意のGoogleユーザーが利用できるようにするには、[同意ページ](https://console.cloud.google.com/apis/credentials/consent)に戻って「アプリを公開」をクリックする必要があります。SheetsやDriveなどの追加のGoogle APIが必要な場合は、確認プロセスが必要になることがあります。
次は、Sheetsなどのような Google APIとの統合方法を説明します。さらに進めたい方は引き続きご覧ください。
## Google Sheets APIのセットアップ
Google SheetsのようなGoogle API統合を追加するには、まずアプリのAPIを有効にする必要があります。[利用可能なAPIを参照](https://console.cloud.google.com/apis/library)できます。例としてGoogle Sheetsを使用します。
1. [Google Sheets APIのリストページ](https://console.cloud.google.com/apis/library/sheets.googleapis.com)に移動します。
2. 「有効にする」をクリックします。
以上です!この部分のGoogle Cloudセットアップはこれだけです。
## Google Sheets統合:コードを見せてください
まず、元のコードのOAuthフローセクションで、`"https://www.googleapis.com/auth/spreadsheets.readonly"` をスコープのリストに追加する以外はすべて同じままにします:
```python theme={null}
# This sets up a configuration for the OAuth flow
oauth_flow = google_auth_oauthlib.flow.Flow.from_client_config(
oauth_config,
# scopes define what APIs you want to access on behave of the user once authenticated
scopes=[
"https://www.googleapis.com/auth/userinfo.email",
"openid",
"https://www.googleapis.com/auth/userinfo.profile",
"https://www.googleapis.com/auth/spreadsheets.readonly"
]
)
```
`googleapiclient.discovery` ライブラリでGoogle APIにアクセスする方法は、まずアクセストークンを使用して `Credentials` オブジェクトを作成し、次に `build` 関数を使用して呼び出し可能なAPIオブジェクトを作成します。Sheets APIの場合は以下のようになります:
```python theme={null}
credentials = google.oauth2.credentials.Credentials(token=session['access_token'])
service = build("sheets", "v4", credentials=credentials)
sheets_api = service.spreadsheets()
```
Sheets APIの実際の使用方法について、いくつかのヘルパー関数を作成しました:
```python theme={null}
# fetch all sheets within a Google spreadsheet
def get_sheets(sheets_api, spreadsheet_id) -> list[str]:
result = sheets_api.get(spreadsheetId=spreadsheet_id).execute()
return [sheet["properties"]["title"] for sheet in result["sheets"]]
# fetch the data for a given sheet within a Google spreadsheet
def get_sheet_data(sheets_api, spreadsheet_id, sheet_title) -> list[list[str]]:
result = (
sheets_api.values()
.get(spreadsheetId=spreadsheet_id, range=sheet_title)
.execute()
)
return result["values"]
```
上記のヘルパーを使って、Googleスプレッドシートをインポートするためのハンドラーエンドポイントを以下のように作成できます:
```python theme={null}
@app.route("/import_spreadsheet", methods = ['POST'])
def import_spreadsheet():
if 'access_token' not in session:
return redirect('/signin')
spreadsheet_id = request.form["spreadsheet_id"]
credentials = google.oauth2.credentials.Credentials(token=session['access_token'])
service = build("sheets", "v4", credentials=credentials)
sheets_api = service.spreadsheets()
try:
sheets = get_sheets(sheets_api, spreadsheet_id)
data_by_sheets = {}
for sheet in sheets:
data = get_sheet_data(sheets_api, spreadsheet_id, sheet)
data_by_sheets[sheet] = data
except googleapiclient.errors.HttpError as e:
return f"upload failure"
dirpath = os.path.join("static", "uploads", spreadsheet_id)
filepath = os.path.join(dirpath, "data.json")
os.makedirs(dirpath, exist_ok=True)
with open(filepath, "w") as file:
json.dump(data_by_sheets, file)
return "upload success!"
```
完全な動作コードはこちらです:
```python theme={null}
from flask import Flask, redirect, session, url_for, request
import google_auth_oauthlib.flow
import json
import os
import requests
from googleapiclient.discovery import build
import googleapiclient.errors
import google.oauth2.credentials
app = Flask('app')
# `FLASK_SECRET_KEY` is used by sessions. You should create a random string
# and store it as secret.
app.secret_key = os.environ.get('FLASK_SECRET_KEY') or os.urandom(24)
# `GOOGLE_APIS_OAUTH_SECRET` contains the contents of a JSON file to be downloaded
# from the Google Cloud Credentials panel. See next section.
oauth_config = json.loads(os.environ['GOOGLE_OAUTH_SECRETS'])
# This sets up a configuration for the OAuth flow
oauth_flow = google_auth_oauthlib.flow.Flow.from_client_config(
oauth_config,
# scopes define what APIs you want to access on behave of the user once authenticated
scopes=[
"https://www.googleapis.com/auth/userinfo.email",
"openid",
"https://www.googleapis.com/auth/userinfo.profile",
"https://www.googleapis.com/auth/spreadsheets.readonly"
]
)
# This is entrypoint of the login page. It will redirect to the Google login service located at the
# `authorization_url`. The `redirect_uri` is actually the URI which the Google login service will use to
# redirect back to this app.
@app.route('/signin')
def signin():
# We rewrite the URL from http to https because inside the Replit App http is used,
# but externally it's accessed via https, and the redirect_uri has to match that
oauth_flow.redirect_uri = url_for('oauth2callback', _external=True).replace('http://', 'https://')
authorization_url, state = oauth_flow.authorization_url()
session['state'] = state
return redirect(authorization_url)
# This is the endpoint that Google login service redirects back to. It must be added to the "Authorized redirect URIs"
# in the API credentials panel within Google Cloud. It will call a Google endpoint to request
# an access token and store it in the user session. After this, the access token can be used to access
# APIs on behalf of the user.
@app.route('/oauth2callback')
def oauth2callback():
if not session['state'] == request.args['state']:
return 'Invalid state parameter', 400
oauth_flow.fetch_token(authorization_response=request.url.replace('http:', 'https:'))
session['access_token'] = oauth_flow.credentials.token
return redirect("/")
# Call the userinfo API to get the user's information with a valid access token.
# This is the first example of using the access token to access an API on the user's behalf.
def get_user_info(access_token):
response = requests.get("https://www.googleapis.com/oauth2/v3/userinfo", headers={
"Authorization": f"Bearer {access_token}"
})
if response.status_code == 200:
user_info = response.json()
return user_info
else:
print(f"Failed to fetch user info: {response.status_code} {response.text}")
return None
@app.route('/logout')
def logout():
session.clear()
return redirect('/')
# fetch all sheets within a Google spreadsheet
def get_sheets(sheets_api, spreadsheet_id) -> list[str]:
result = sheets_api.get(spreadsheetId=spreadsheet_id).execute()
return [sheet["properties"]["title"] for sheet in result["sheets"]]
# fetch the data for a given sheet within a Google spreadsheet
def get_sheet_data(sheets_api, spreadsheet_id, sheet_title) -> list[list[str]]:
result = (
sheets_api.values()
.get(spreadsheetId=spreadsheet_id, range=sheet_title)
.execute()
)
return result["values"]
# Render a form to allow importing a spreadsheet
@app.route("/import_spreadsheet_form")
def import_spreadsheet_form():
return """
Import Spreadsheet
"""
@app.route("/import_spreadsheet", methods = ['POST'])
def import_spreadsheet():
if 'access_token' not in session:
return redirect('/signin')
spreadsheet_id = request.form["spreadsheet_id"]
credentials = google.oauth2.credentials.Credentials(token=session['access_token'])
service = build("sheets", "v4", credentials=credentials)
sheets_api = service.spreadsheets()
try:
sheets = get_sheets(sheets_api, spreadsheet_id)
data_by_sheets = {}
for sheet in sheets:
data = get_sheet_data(sheets_api, spreadsheet_id, sheet)
data_by_sheets[sheet] = data
except googleapiclient.errors.HttpError as e:
return f"upload failure"
dirpath = os.path.join("static", "uploads", spreadsheet_id)
filepath = os.path.join(dirpath, "data.json")
os.makedirs(dirpath, exist_ok=True)
with open(filepath, "w") as file:
json.dump(data_by_sheets, file)
return "upload success! Really!"
@app.route('/')
def welcome():
if "access_token" in session:
user_info = get_user_info(session["access_token"])
if user_info:
return f"""
Hello {user_info["given_name"]}!
Your email address is {user_info["email"]}
Sign In to Google
Import a Sheet
"""
return """
Welcome to Google Sheet Importer
Sign In to Google
Import a Sheet
"""
if __name__ == '__main__':
app.run(host='0.0.0.0', port=5000)
```
アプリを公開する際は、必ず以下を確認してください:
1. 本番環境の `/oauth2callback` URIを「承認済みのリダイレクトURI」に追加する。
2. [同意ページ](https://console.cloud.google.com/apis/credentials/consent)に移動して「アプリを公開」をクリックする。
良い体験ができたことを願っています。さらなる冒険をお楽しみください。