> ## Documentation Index
> Fetch the complete documentation index at: https://docs.replit.com/llms.txt
> Use this file to discover all available pages before exploring further.

# Add payments with RevenueCat

> Charge players for content in your app using RevenueCat.

export const PromptActions = ({prompt = "", campaign = "docs-prompt-actions"}) => {
  const LZ_SRC = "https://cdnjs.cloudflare.com/ajax/libs/lz-string/1.5.0/lz-string.min.js";
  const ensureLZString = () => {
    if (typeof document === "undefined") return;
    if (window.LZString) return;
    if (document.querySelector(`script[src="${LZ_SRC}"]`)) return;
    const s = document.createElement("script");
    s.src = LZ_SRC;
    s.async = true;
    document.head.appendChild(s);
  };
  const handleCopy = async e => {
    const btn = e.currentTarget;
    if (!prompt) return;
    try {
      await navigator.clipboard.writeText(prompt);
    } catch {
      const ta = document.createElement("textarea");
      ta.value = prompt;
      document.body.appendChild(ta);
      ta.select();
      try {
        document.execCommand("copy");
      } catch {}
      document.body.removeChild(ta);
    }
    const original = btn.dataset.label || btn.innerText;
    btn.dataset.label = original;
    btn.innerText = "Copied!";
    setTimeout(() => {
      if (btn.isConnected) btn.innerText = original;
    }, 1500);
  };
  const handleBuild = () => {
    if (!prompt || typeof window === "undefined") return;
    const utm = `utm_source=replit-docs&utm_medium=docs&utm_campaign=${encodeURIComponent(campaign)}&utm_content=prompt-actions`;
    let url;
    if (window.LZString) {
      const encoded = window.LZString.compressToEncodedURIComponent(prompt);
      url = `https://replit.com/?prompt=${encoded}&referrer=replit-docs&${utm}`;
    } else {
      url = `https://replit.com/?prompt=${encodeURIComponent(prompt)}&referrer=replit-docs&${utm}`;
    }
    window.open(url, "_blank", "noopener,noreferrer");
  };
  ensureLZString();
  const baseButtonStyle = {
    display: "inline-flex",
    alignItems: "center",
    gap: "6px",
    padding: "8px 16px",
    borderRadius: "8px",
    fontSize: "14px",
    fontWeight: 500,
    cursor: "pointer",
    lineHeight: 1.2,
    fontFamily: "inherit",
    textDecoration: "none"
  };
  return <div style={{
    display: "flex",
    gap: "12px",
    margin: "16px 0",
    flexWrap: "wrap",
    alignItems: "center"
  }}>
      <button type="button" onClick={handleCopy} style={{
    ...baseButtonStyle,
    background: "transparent",
    color: "inherit",
    border: "1px solid rgba(127,127,127,0.4)"
  }}>
        Copy the prompt
      </button>
      <button type="button" onClick={handleBuild} style={{
    ...baseButtonStyle,
    background: "#F26207",
    color: "#FFFFFF",
    border: "1px solid #F26207"
  }}>
        Build on Replit ↗
      </button>
    </div>;
};

export const AiPrompt = ({children}) => {
  return <CodeBlock className="relative block font-sans whitespace-pre-wrap break-words">
      <div className="pr-7">
        {children}
      </div>
    </CodeBlock>;
};

export const subscriptionPrompt = "Add a monthly subscription to PixelGames that unlocks Snake, Racer, and Pinball.";
export const paywallPrompt = "Show the four unlockable games as cover art on the PixelGames paywall.";

## What is RevenueCat

In PixelGames, Snake, Racer, and Pinball are marked coming soon. RevenueCat lets your app sell
a subscription that unlocks them, without wiring up Apple and Google's purchase systems
directly, ask Agent to add a subscription, connect RevenueCat, and it handles the rest.

<Warning>
  Apple and Google both require using their own in-app purchase system for digital content
  like this, and both take a cut of the sale. You can't route around it with an external
  payment link.
</Warning>

## Before you start

* A Replit project with your project set up as a mobile app.
* A RevenueCat account, just an email and password, no bank account needed yet.

## Get started

<Steps>
  <Step title="Ask Agent to add a subscription">
    <AiPrompt>
      {subscriptionPrompt}
    </AiPrompt>

    <PromptActions prompt={subscriptionPrompt} campaign="docs-mobile-payments" />
  </Step>

  <Step title="Connect your RevenueCat account">
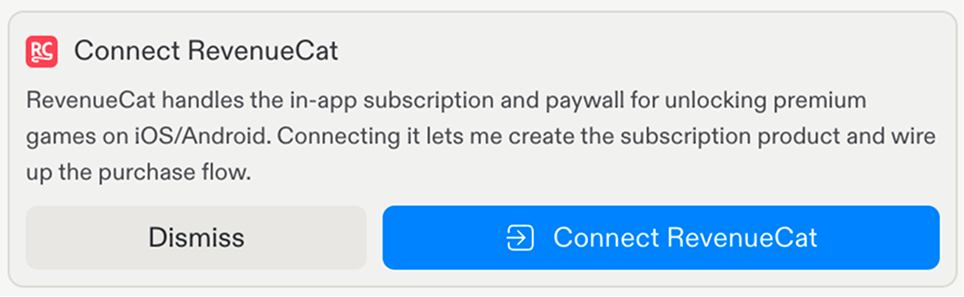
    Agent prompts you to connect RevenueCat, select **Connect RevenueCat** to begin.

    <Frame caption="Replit asking to connect RevenueCat after detecting the feature.">
      <img src="https://mintcdn.com/replit/wpDFPJulnZRpqmW6/images/pixelgames/mobile/revenuecat.png?fit=max&auto=format&n=wpDFPJulnZRpqmW6&q=85&s=880a63197ea3bcc5b1c7ec064674e44f" alt="Replit's Connect RevenueCat setup modal" data-path="images/pixelgames/mobile/revenuecat.png" width="964" height="297" data-path="images/pixelgames/mobile/revenuecat.png" />
    </Frame>
  </Step>

  <Step title="Authorize Replit">
    On RevenueCat's authorization page, grant **Read & Write** access.
  </Step>

  <Step title="Agent builds the subscription">
    Agent creates the RevenueCat project, configures the product and entitlement, and wires
    up the purchase flow in your app.
  </Step>
</Steps>

## Test subscriptions

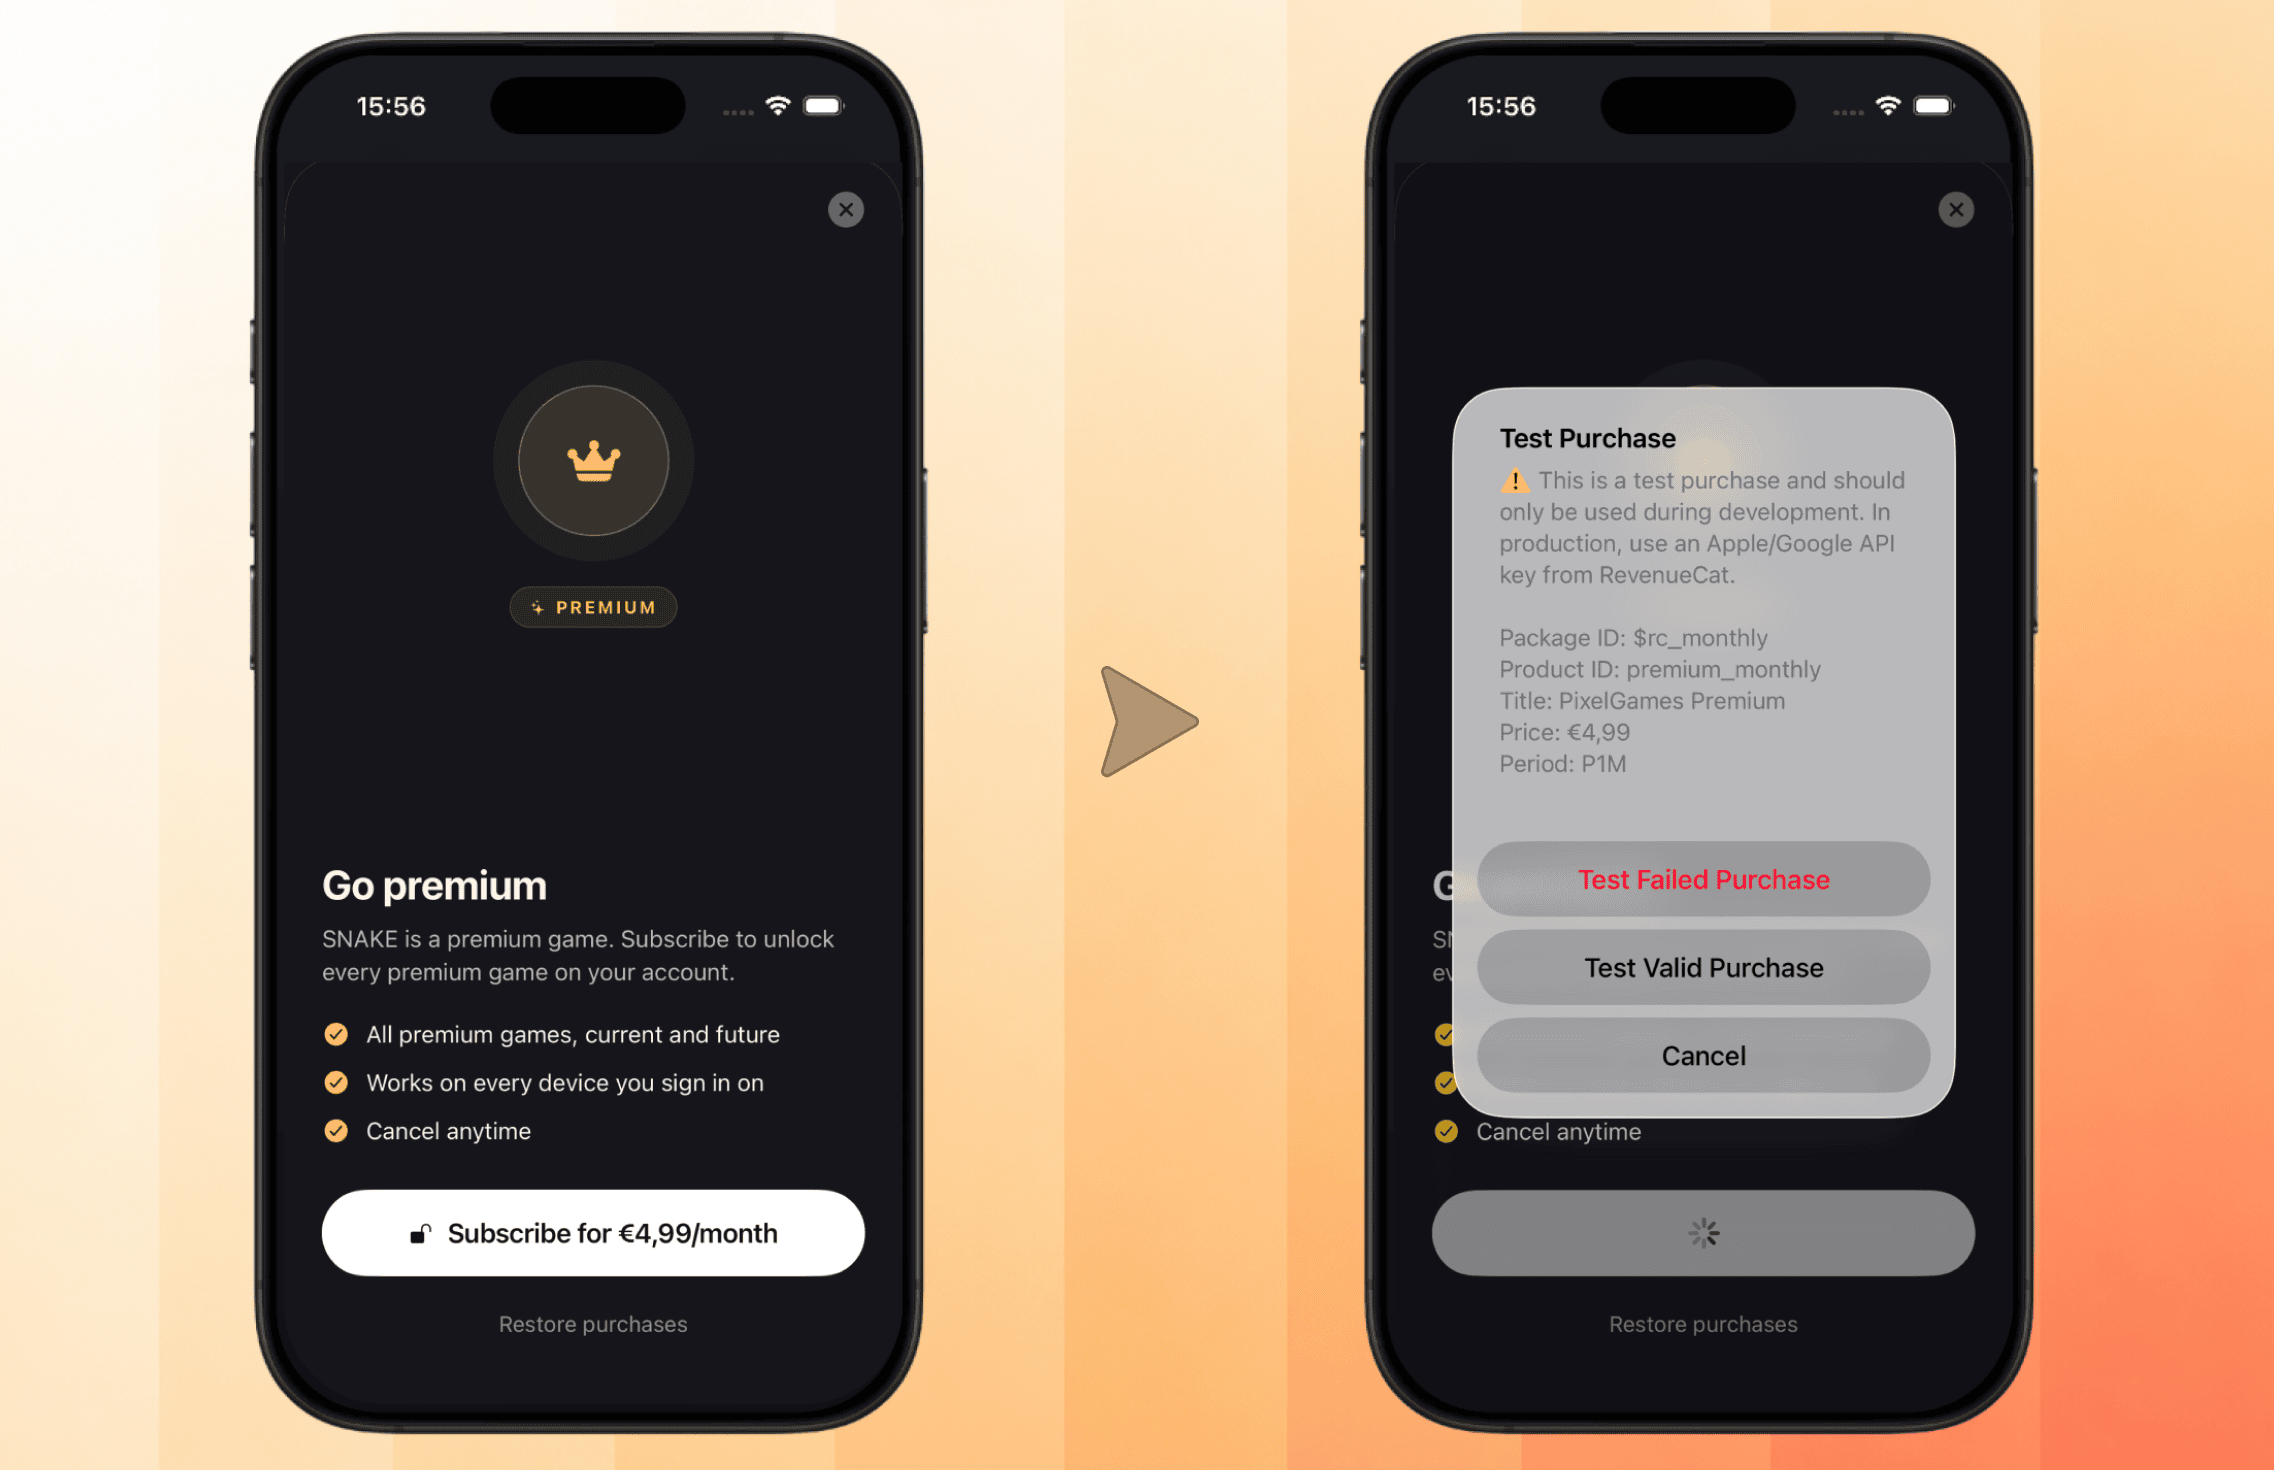
Replit previews use RevenueCat's test mode. Testing a purchase in Expo Go shows a test
purchase dialog, no real charges. Once Apple approves your app for the App Store,
purchases use real money, so double check the price before submitting.

<Frame caption="The paywall in PixelGames, and the test purchase dialog shown in Expo Go.">
  <img src="https://mintcdn.com/replit/WuaQIOfW5oxRlxex/images/pixelgames/mobile/paywall.png?fit=max&auto=format&n=WuaQIOfW5oxRlxex&q=85&s=6575d5687f78a783861b52044eb21c14" alt="PixelGames paywall screen next to RevenueCat's test purchase dialog" data-path="images/pixelgames/mobile/paywall.png" width="2274" height="1470" data-path="images/pixelgames/mobile/paywall.png" />
</Frame>

The test purchase dialog above isn't what players actually see. Expo Go is a shared app
previewing every Expo project, so it can't resolve your app's real RevenueCat identity, it
shows a generic test flow instead. Once you have a real build or your app is published, the
paywall itself is RevenueCat's own screen, served remotely rather than hardcoded in your app.

## Customize the paywall

Because the paywall is served remotely, you can change its design without a new build, two
ways:

**Ask Agent**

<AiPrompt>
  {paywallPrompt}
</AiPrompt>

<PromptActions prompt={paywallPrompt} campaign="docs-mobile-payments" />

**Or edit it manually**

<Steps>
  <Step title="Open the paywall editor">
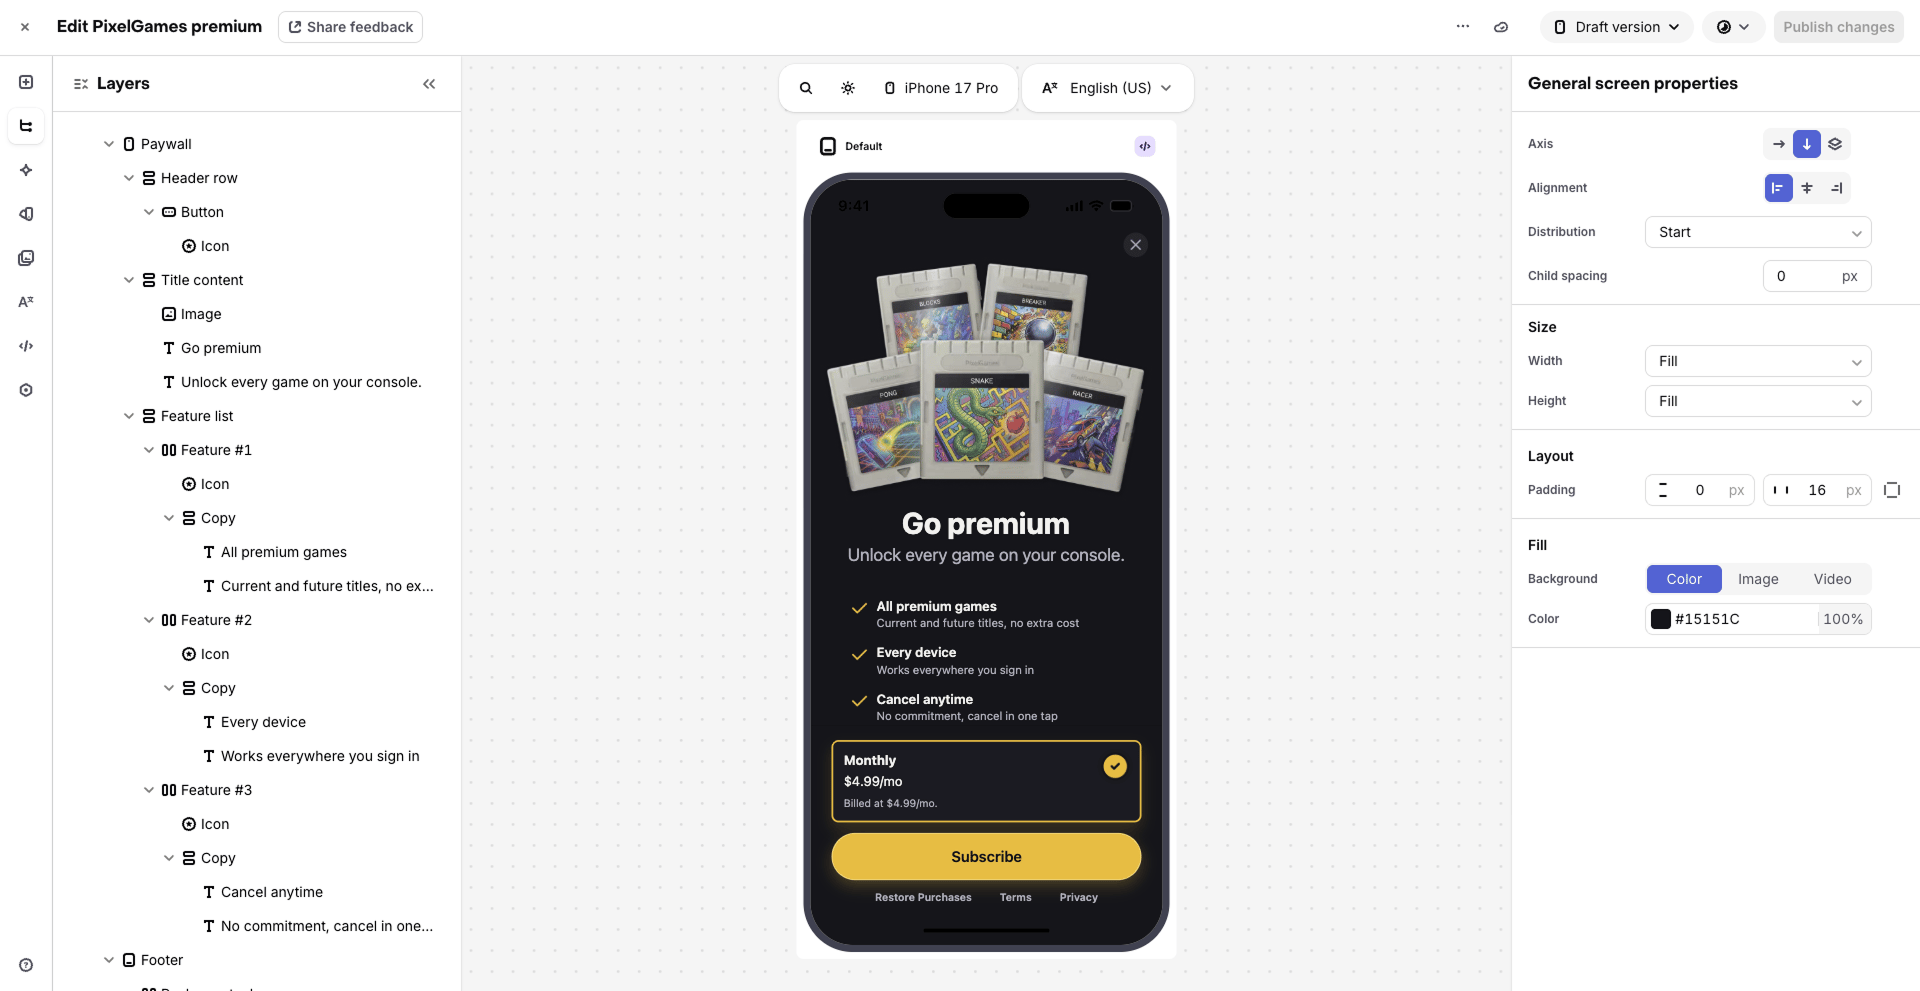
    In your RevenueCat dashboard, go to **Paywalls** and create or edit one with their visual
    editor: colors, background image, title text, button style, whatever fits your app's look.

    <Frame caption="RevenueCat's visual paywall editor.">
      <img src="https://mintcdn.com/replit/WuaQIOfW5oxRlxex/images/pixelgames/mobile/customize-paywall.png?fit=max&auto=format&n=WuaQIOfW5oxRlxex&q=85&s=fca147e23db57f4408ad00bec8eab2d1" alt="RevenueCat's paywall editor showing the PixelGames premium paywall layout and properties" data-path="images/pixelgames/mobile/customize-paywall.png" width="1920" height="991" data-path="images/pixelgames/mobile/customize-paywall.png" />
    </Frame>
  </Step>

  <Step title="Attach it to your offering">
    Connect the paywall to your current offering.
  </Step>

  <Step title="Changes go out remotely">
    The new design appears next time the paywall opens, on TestFlight or after publishing, no
    App Store update required.
  </Step>
</Steps>

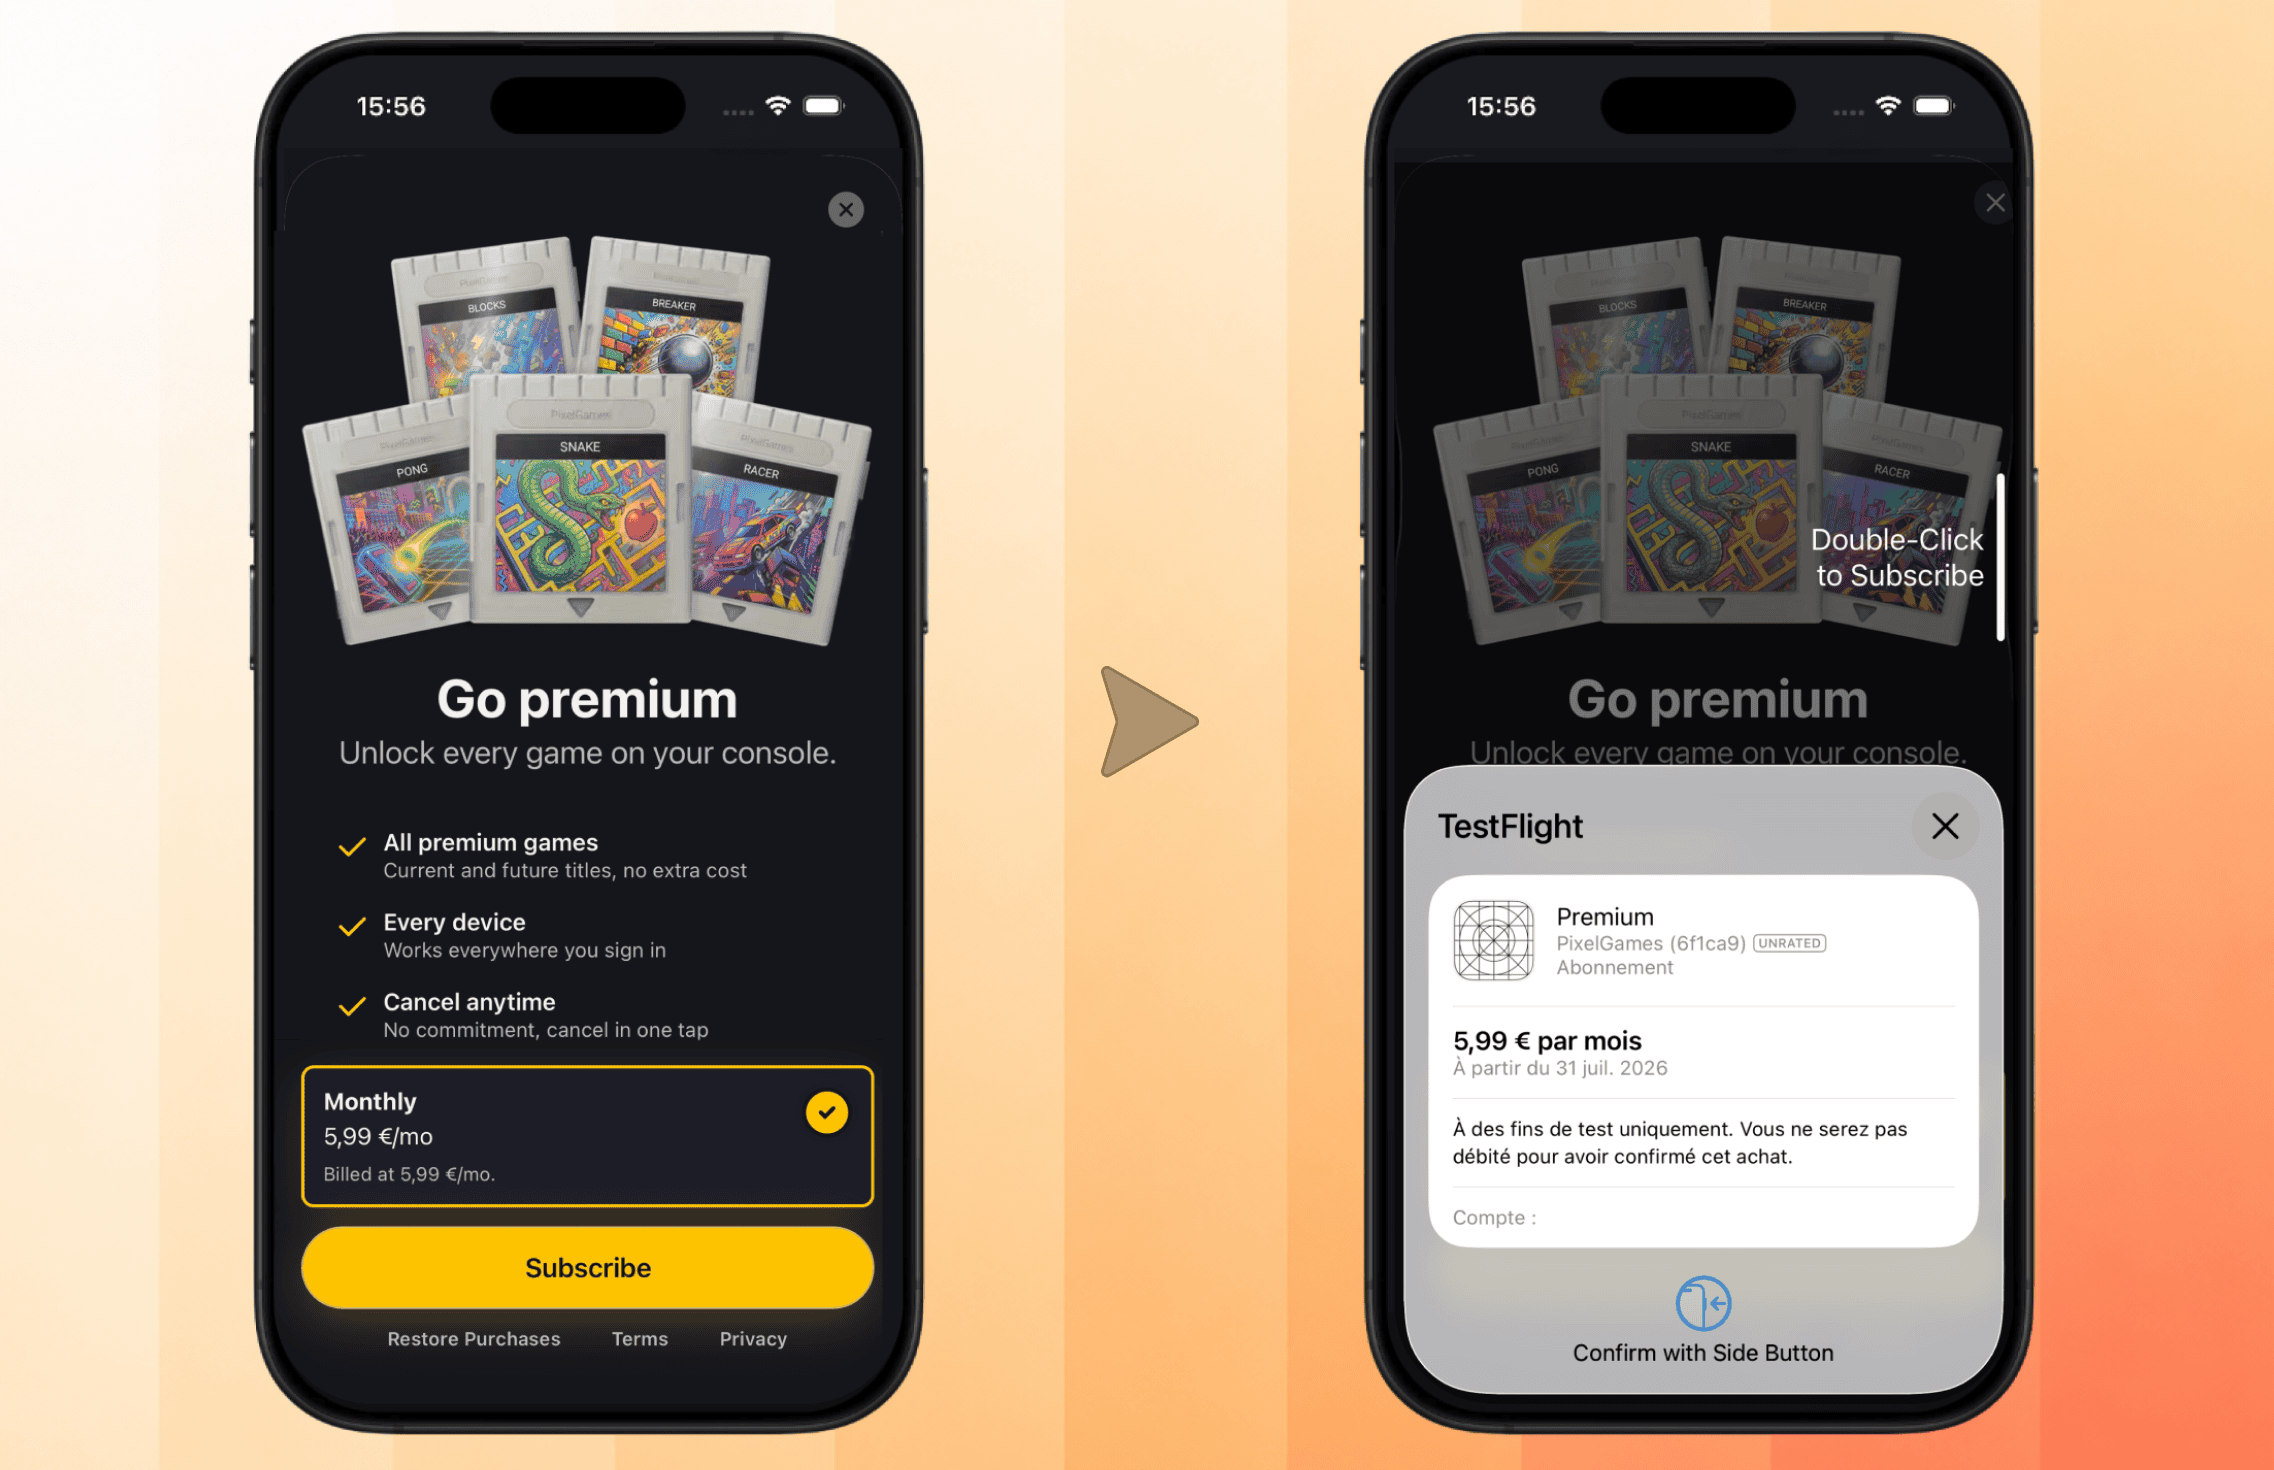
<Frame caption="The customized paywall live on TestFlight, with the real system purchase confirmation.">
  <img src="https://mintcdn.com/replit/WuaQIOfW5oxRlxex/images/pixelgames/mobile/paywall-testflight.png?fit=max&auto=format&n=WuaQIOfW5oxRlxex&q=85&s=fc8a548efa85548a37065c4ff41f54a6" alt="PixelGames paywall on TestFlight next to the real TestFlight purchase confirmation sheet" data-path="images/pixelgames/mobile/paywall-testflight.png" width="2274" height="1470" data-path="images/pixelgames/mobile/paywall-testflight.png" />
</Frame>

This is what players actually see, a real purchase confirmation instead of Expo Go's test
dialog, and your customized design instead of the default layout.

## Sync to App Store Connect

Syncing allows you to create or modify an in-app subscription or product directly from
RevenueCat or Replit Agent.

Before you can connect App Store Connect, three things need to be in place:

* **Enroll** in the Apple Developer Program, if you haven't already. It has an annual membership
  fee.
* **Submit** your app to the App Store, see [upload your app](/build/mobile-upload-ios)
  if you haven't yet, RevenueCat needs an app record to sync products against.
* **Connect** a bank account and **sign** Apple's Paid Apps Agreement, both done inside App
  Store Connect, Apple won't process any payout without them.

<Steps>
  <Step title="Start the sync from Replit">
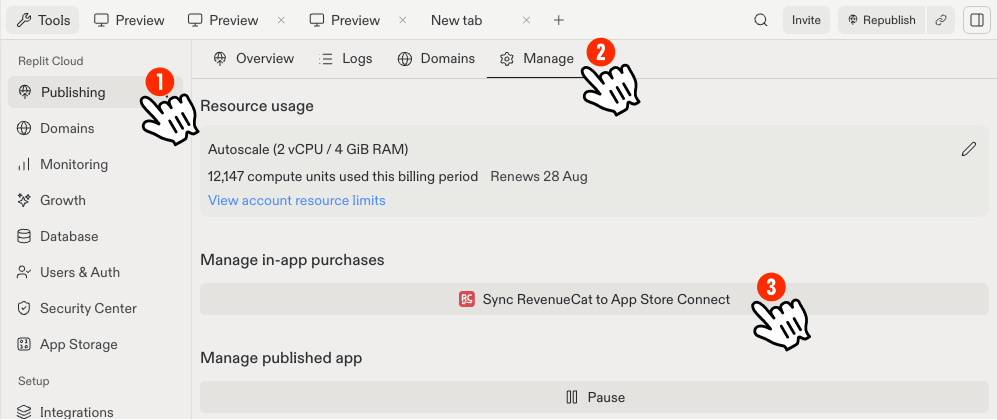
    In Replit, open **Publishing → Manage**, and select **Sync RevenueCat to App Store
    Connect**. This button appears once your app is submitted to TestFlight.

    <Frame caption="Starting the sync from Replit's Publishing pane.">
      <img src="https://mintcdn.com/replit/wpDFPJulnZRpqmW6/images/pixelgames/mobile/rev-co-step1.png?fit=max&auto=format&n=wpDFPJulnZRpqmW6&q=85&s=db78d8d81b07f88f65b5e0d689ed1427" alt="Replit Publishing pane with Manage tab open and Sync RevenueCat to App Store Connect button" data-path="images/pixelgames/mobile/rev-co-step1.png" width="997" height="420" data-path="images/pixelgames/mobile/rev-co-step1.png" />
    </Frame>
  </Step>

  <Step title="Open the App Store Connect API page">
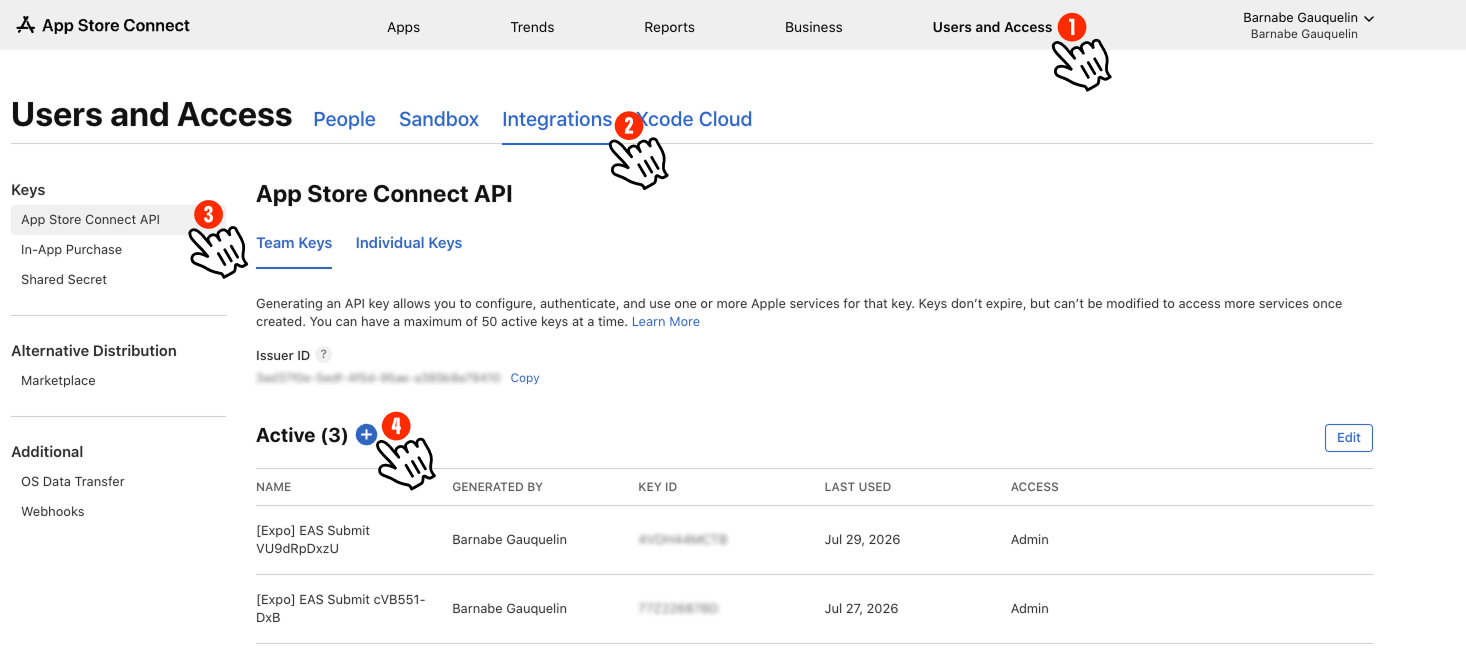
    In App Store Connect, go to **Users and Access → Integrations → App Store Connect API**
    ([open it directly](https://appstoreconnect.apple.com/access/integrations/api)) and
    select the **+** to add a new key.

    <Frame caption="Navigating to App Store Connect API keys.">
      <img src="https://mintcdn.com/replit/wpDFPJulnZRpqmW6/images/pixelgames/mobile/rev-co-step2.png?fit=max&auto=format&n=wpDFPJulnZRpqmW6&q=85&s=3ee0f35c3bf64afebaeb6c4f64a172ba" alt="App Store Connect Users and Access page, Integrations tab, App Store Connect API section" data-path="images/pixelgames/mobile/rev-co-step2.png" width="1466" height="657" data-path="images/pixelgames/mobile/rev-co-step2.png" />
    </Frame>
  </Step>

  <Step title="Generate the key">
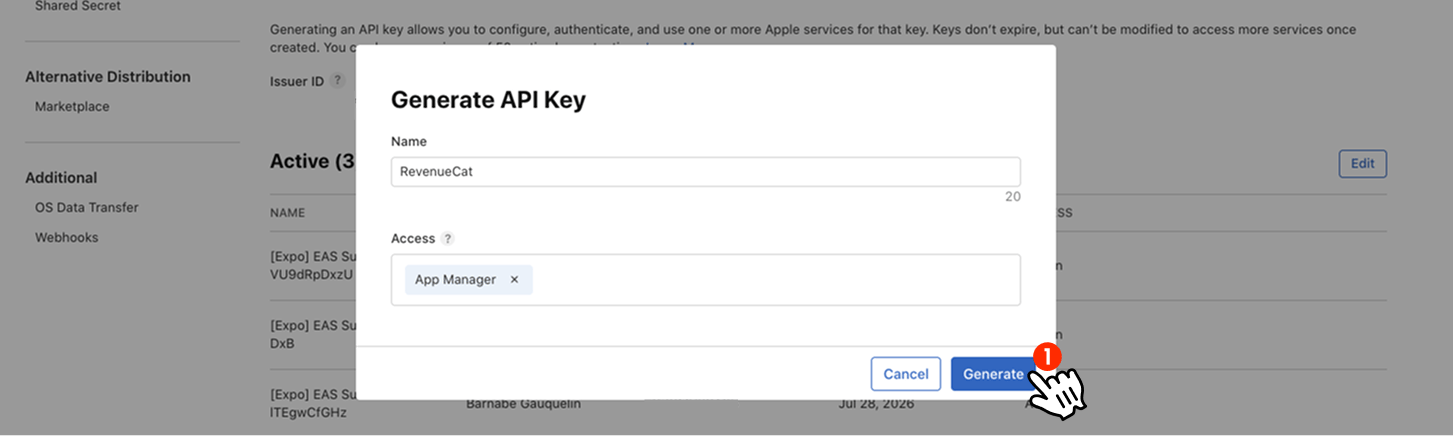
    Name it (for example "RevenueCat"), set **Access** to **App Manager**, and select
    **Generate**.

    <Frame caption="Generating an App Store Connect API key for RevenueCat.">
      <img src="https://mintcdn.com/replit/wpDFPJulnZRpqmW6/images/pixelgames/mobile/rev-co-step3.png?fit=max&auto=format&n=wpDFPJulnZRpqmW6&q=85&s=5711ebfa2d1bab0e108e944598bc5da9" alt="Generate API Key modal with name field and App Manager access selected" data-path="images/pixelgames/mobile/rev-co-step3.png" width="1453" height="436" data-path="images/pixelgames/mobile/rev-co-step3.png" />
    </Frame>
  </Step>

  <Step title="Copy the key details">
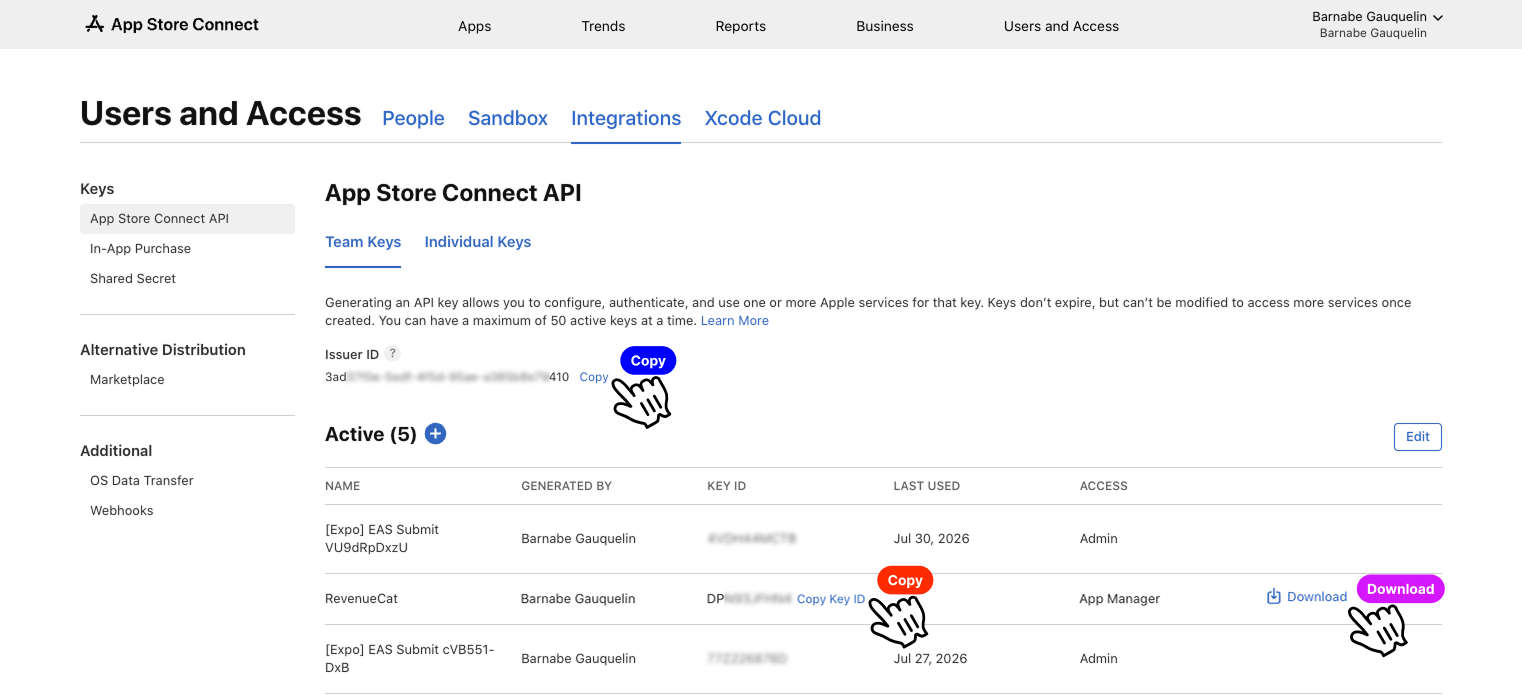
    Copy the **Key ID** and download the key file.

    <Frame caption="Copying the Key ID and downloading the App Store Connect API key.">
      <img src="https://mintcdn.com/replit/wpDFPJulnZRpqmW6/images/pixelgames/mobile/rev-co-step4.png?fit=max&auto=format&n=wpDFPJulnZRpqmW6&q=85&s=2d1f05ed614a71e51d1425ee4d7b6c43" alt="App Store Connect API keys list with the new RevenueCat key, Copy and Download actions" data-path="images/pixelgames/mobile/rev-co-step4.png" width="1522" height="695" data-path="images/pixelgames/mobile/rev-co-step4.png" />
    </Frame>
  </Step>

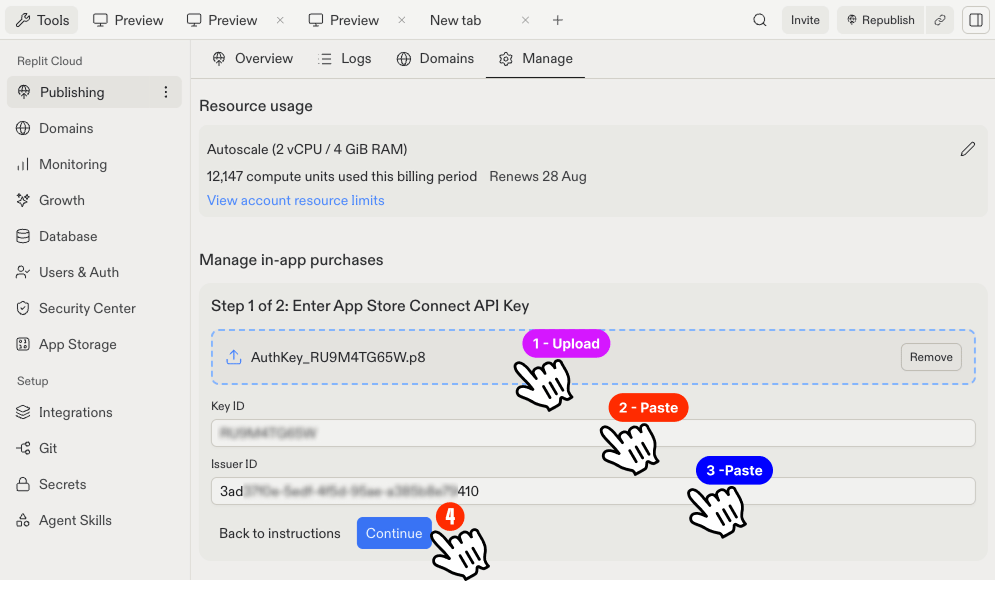
  <Step title="Add it to Replit">
    Back in Replit's sync modal (Step 1 of 2), upload the key file, paste the **Key ID** and
    **Issuer ID**, then select **Continue**.

    <Frame caption="Entering the App Store Connect API key in Replit.">
      <img src="https://mintcdn.com/replit/wpDFPJulnZRpqmW6/images/pixelgames/mobile/rev-co-step5.png?fit=max&auto=format&n=wpDFPJulnZRpqmW6&q=85&s=5a0cdf7dbf416d708b5e8c3a6b691f21" alt="Replit modal Step 1 of 2, uploading the App Store Connect API key and pasting its details" data-path="images/pixelgames/mobile/rev-co-step5.png" width="995" height="591" data-path="images/pixelgames/mobile/rev-co-step5.png" />
    </Frame>
  </Step>

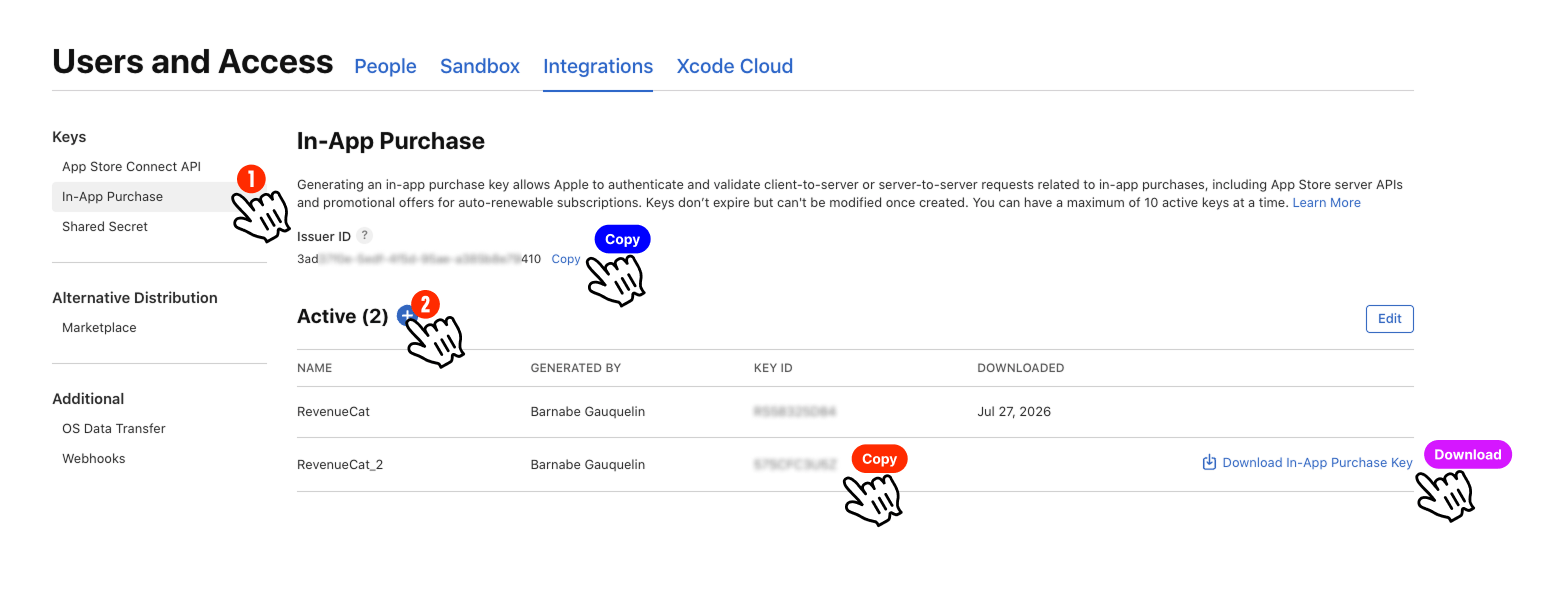
  <Step title="Repeat for the In-App Purchase key">
    Same place in App Store Connect, the **In-App Purchase** tab this time
    ([open it directly](https://appstoreconnect.apple.com/access/integrations/api/subs)),
    generate another key and copy its details.

    <Frame caption="Generating and copying an In-App Purchase API key.">
      <img src="https://mintcdn.com/replit/wpDFPJulnZRpqmW6/images/pixelgames/mobile/rev-co-step6.png?fit=max&auto=format&n=wpDFPJulnZRpqmW6&q=85&s=9ca61ec4c150cb443dc4b0b02531bd6d" alt="App Store Connect In-App Purchase key list with Download and Copy actions" data-path="images/pixelgames/mobile/rev-co-step6.png" width="1547" height="593" data-path="images/pixelgames/mobile/rev-co-step6.png" />
    </Frame>
  </Step>

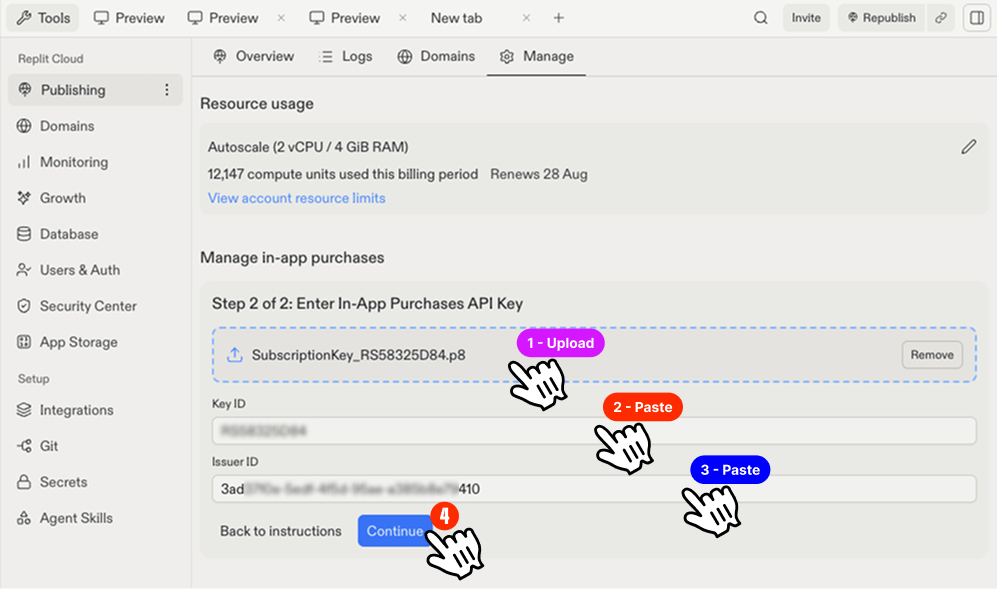
  <Step title="Add it to Replit">
    Back in Replit's sync modal (Step 2 of 2), upload this key file too, paste its **Key ID**
    and **Issuer ID**, then select **Continue**.

    <Frame caption="Entering the In-App Purchase API key in Replit.">
      <img src="https://mintcdn.com/replit/wpDFPJulnZRpqmW6/images/pixelgames/mobile/rev-co-step7.png?fit=max&auto=format&n=wpDFPJulnZRpqmW6&q=85&s=d6006070e16940bc3c0db0d09557dd0c" alt="Replit modal Step 2 of 2, uploading the In-App Purchase API key and pasting its details" data-path="images/pixelgames/mobile/rev-co-step7.png" width="997" height="591" data-path="images/pixelgames/mobile/rev-co-step7.png" />
    </Frame>
  </Step>

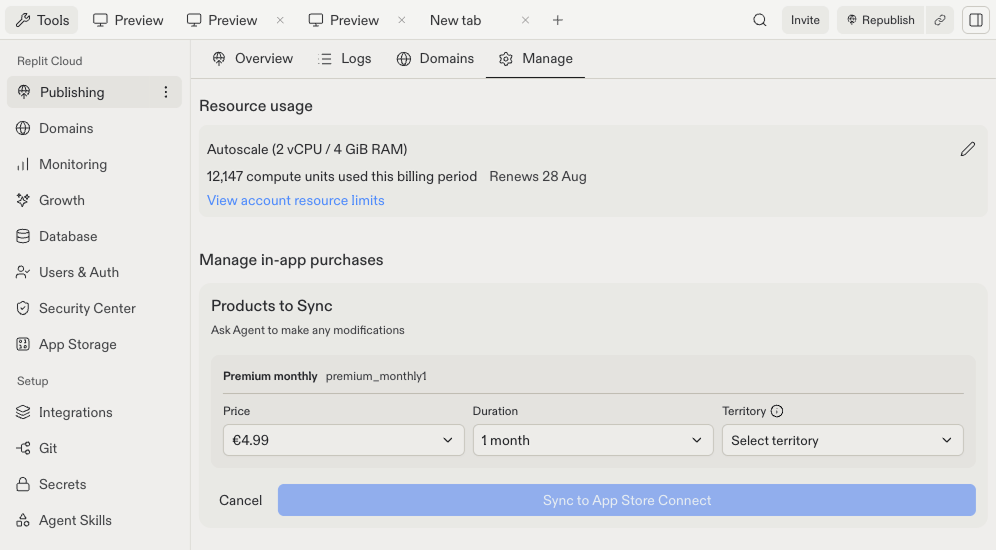
  <Step title="Confirm and sync">
    Once synced, you can manually change your product's price anytime from the same
    **Publishing → Manage** pane in Replit.

    <Frame caption="Confirming the products before syncing to App Store Connect.">
      <img src="https://mintcdn.com/replit/wpDFPJulnZRpqmW6/images/pixelgames/mobile/rev-co-step8.png?fit=max&auto=format&n=wpDFPJulnZRpqmW6&q=85&s=0748e90c6246378f73f129cbc1f8d0e5" alt="Replit Products to Sync screen with the premium monthly subscription ready to sync" data-path="images/pixelgames/mobile/rev-co-step8.png" width="996" height="550" data-path="images/pixelgames/mobile/rev-co-step8.png" />
    </Frame>
  </Step>
</Steps>

## Troubleshooting

* **Purchase succeeds but nothing unlocks:** check the entitlement in RevenueCat is mapped
  to the right product ID.
* **Works in test, not after publishing:** confirm the products are synced to App Store
  Connect and Apple's Paid Apps Agreement is signed.

## Frequently asked questions

<AccordionGroup>
  <Accordion title="Do I need a bank account to use RevenueCat?">
    No. Only an email and password to create the account. A bank account is connected
    separately, through Apple or Google, once you're ready to receive payouts.
  </Accordion>

  <Accordion title="Are test purchases charged?">
    No. Replit previews use RevenueCat's test mode, purchases are simulated. Real charges
    only start once Apple approves your app for the App Store.
  </Accordion>

  <Accordion title="What can I configure with RevenueCat?">
    Pricing, entitlements, and the paywall itself. Ask Agent to make any change, it updates
    both the RevenueCat configuration and your app's code.
  </Accordion>
</AccordionGroup>

## What's next

<CardGroup cols={2}>
  <Card title="Collect reviews and ratings" icon="star" href="/build/mobile-collect-reviews">
    Ask happy players to rate PixelGames.
  </Card>
</CardGroup>

## Related

* [Store images in your mobile app](/build/mobile-store-images)
* [Submit to the App Store](/build/mobile-publish-ios)
* [Submit to Google Play](/build/mobile-publish-android)